> ## Documentation Index
> Fetch the complete documentation index at: https://docs.blinkops.com/llms.txt
> Use this file to discover all available pages before exploring further.

# Microsoft Teams Interactivity

> Build interactive Microsoft Teams messages with buttons and menus to control workflow execution in Blink.

The *"Microsoft Teams Interactivity*" action integrates the Blink Teams Bot (part of the Blink app) into your Microsoft Teams account, allowing you to perform common Microsoft Teams actions within your workflows. Messages from Blink to Microsoft Teams are sent through this bot.

<Tip>The 'Blink Bot' is named **Blink** by default and displays the Blink logo.</Tip>

This action allows you to send a personalized message to a user or channel. The message can include a variety of interactive components, such as date pickers, checkboxes, text inputs, multiple choice selections, and more. Use this action to gather all the necessary information in a single interaction, formatted to best suit the type of data you're collecting.

<Warning>To use the **Microsoft Teams Interactivity** -action, it is essential to use the [Microsoft Teams Adaptive Cards](https://adaptivecards.io/designer/) for building and previewing your messages before executing the step.</Warning>

<Note>
  Please note that when designing a [Microsoft Teams Adaptive Cards](https://adaptivecards.io/designer/), it must incorporate at least one **input** and one **action**.

  **The input options include:**

  * Input.Text
  * Input.Date
  * Input.Time
  * Input.Number
  * Input.ChoiceSet
  * Input.Toggle
</Note>

***

## Creating a Workflow using the *Microsoft Teams Interactivity* Action

### Add Blink Teams Bot to your Microsoft Teams Account

<Steps>
  <Step title="Search for Blink in Microsoft Teams">
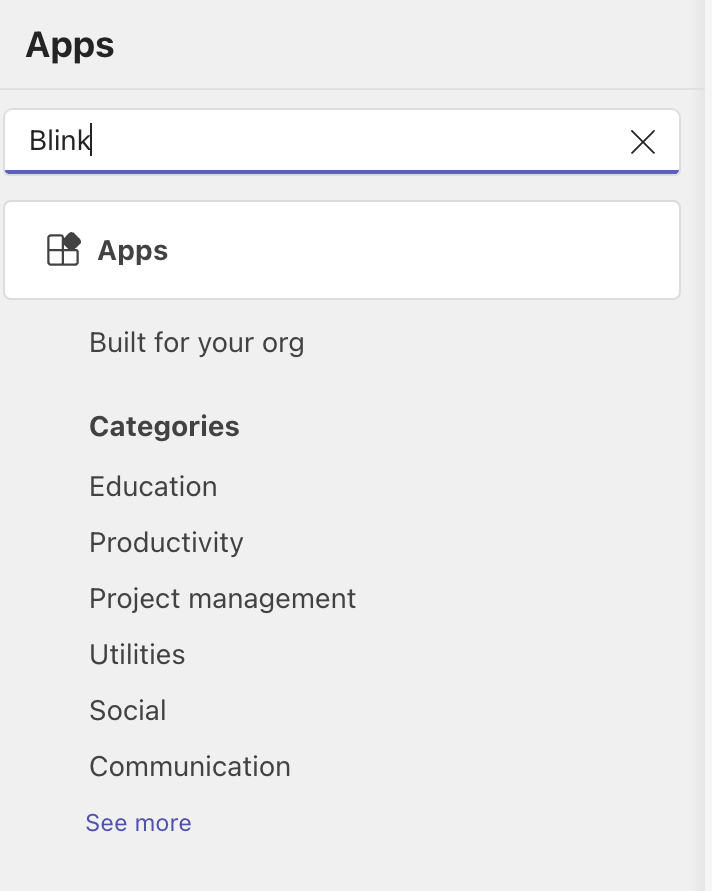
    Navigate to your Microsoft Teams application and click on the **App** icon in the left-hand sidebar. Then, type **Blink** into the search bar. Select the Blink option.

    <Frame>
      <img src="https://mintcdn.com/blinkops-2/deay2AiePWJDKGEh/img/Actions/TeamsSearchBlink.png?fit=max&auto=format&n=deay2AiePWJDKGEh&q=85&s=eb26926c42eaea1924194fd4b168a64a" width="712" height="891" data-path="img/Actions/TeamsSearchBlink.png" />
    </Frame>
  </Step>

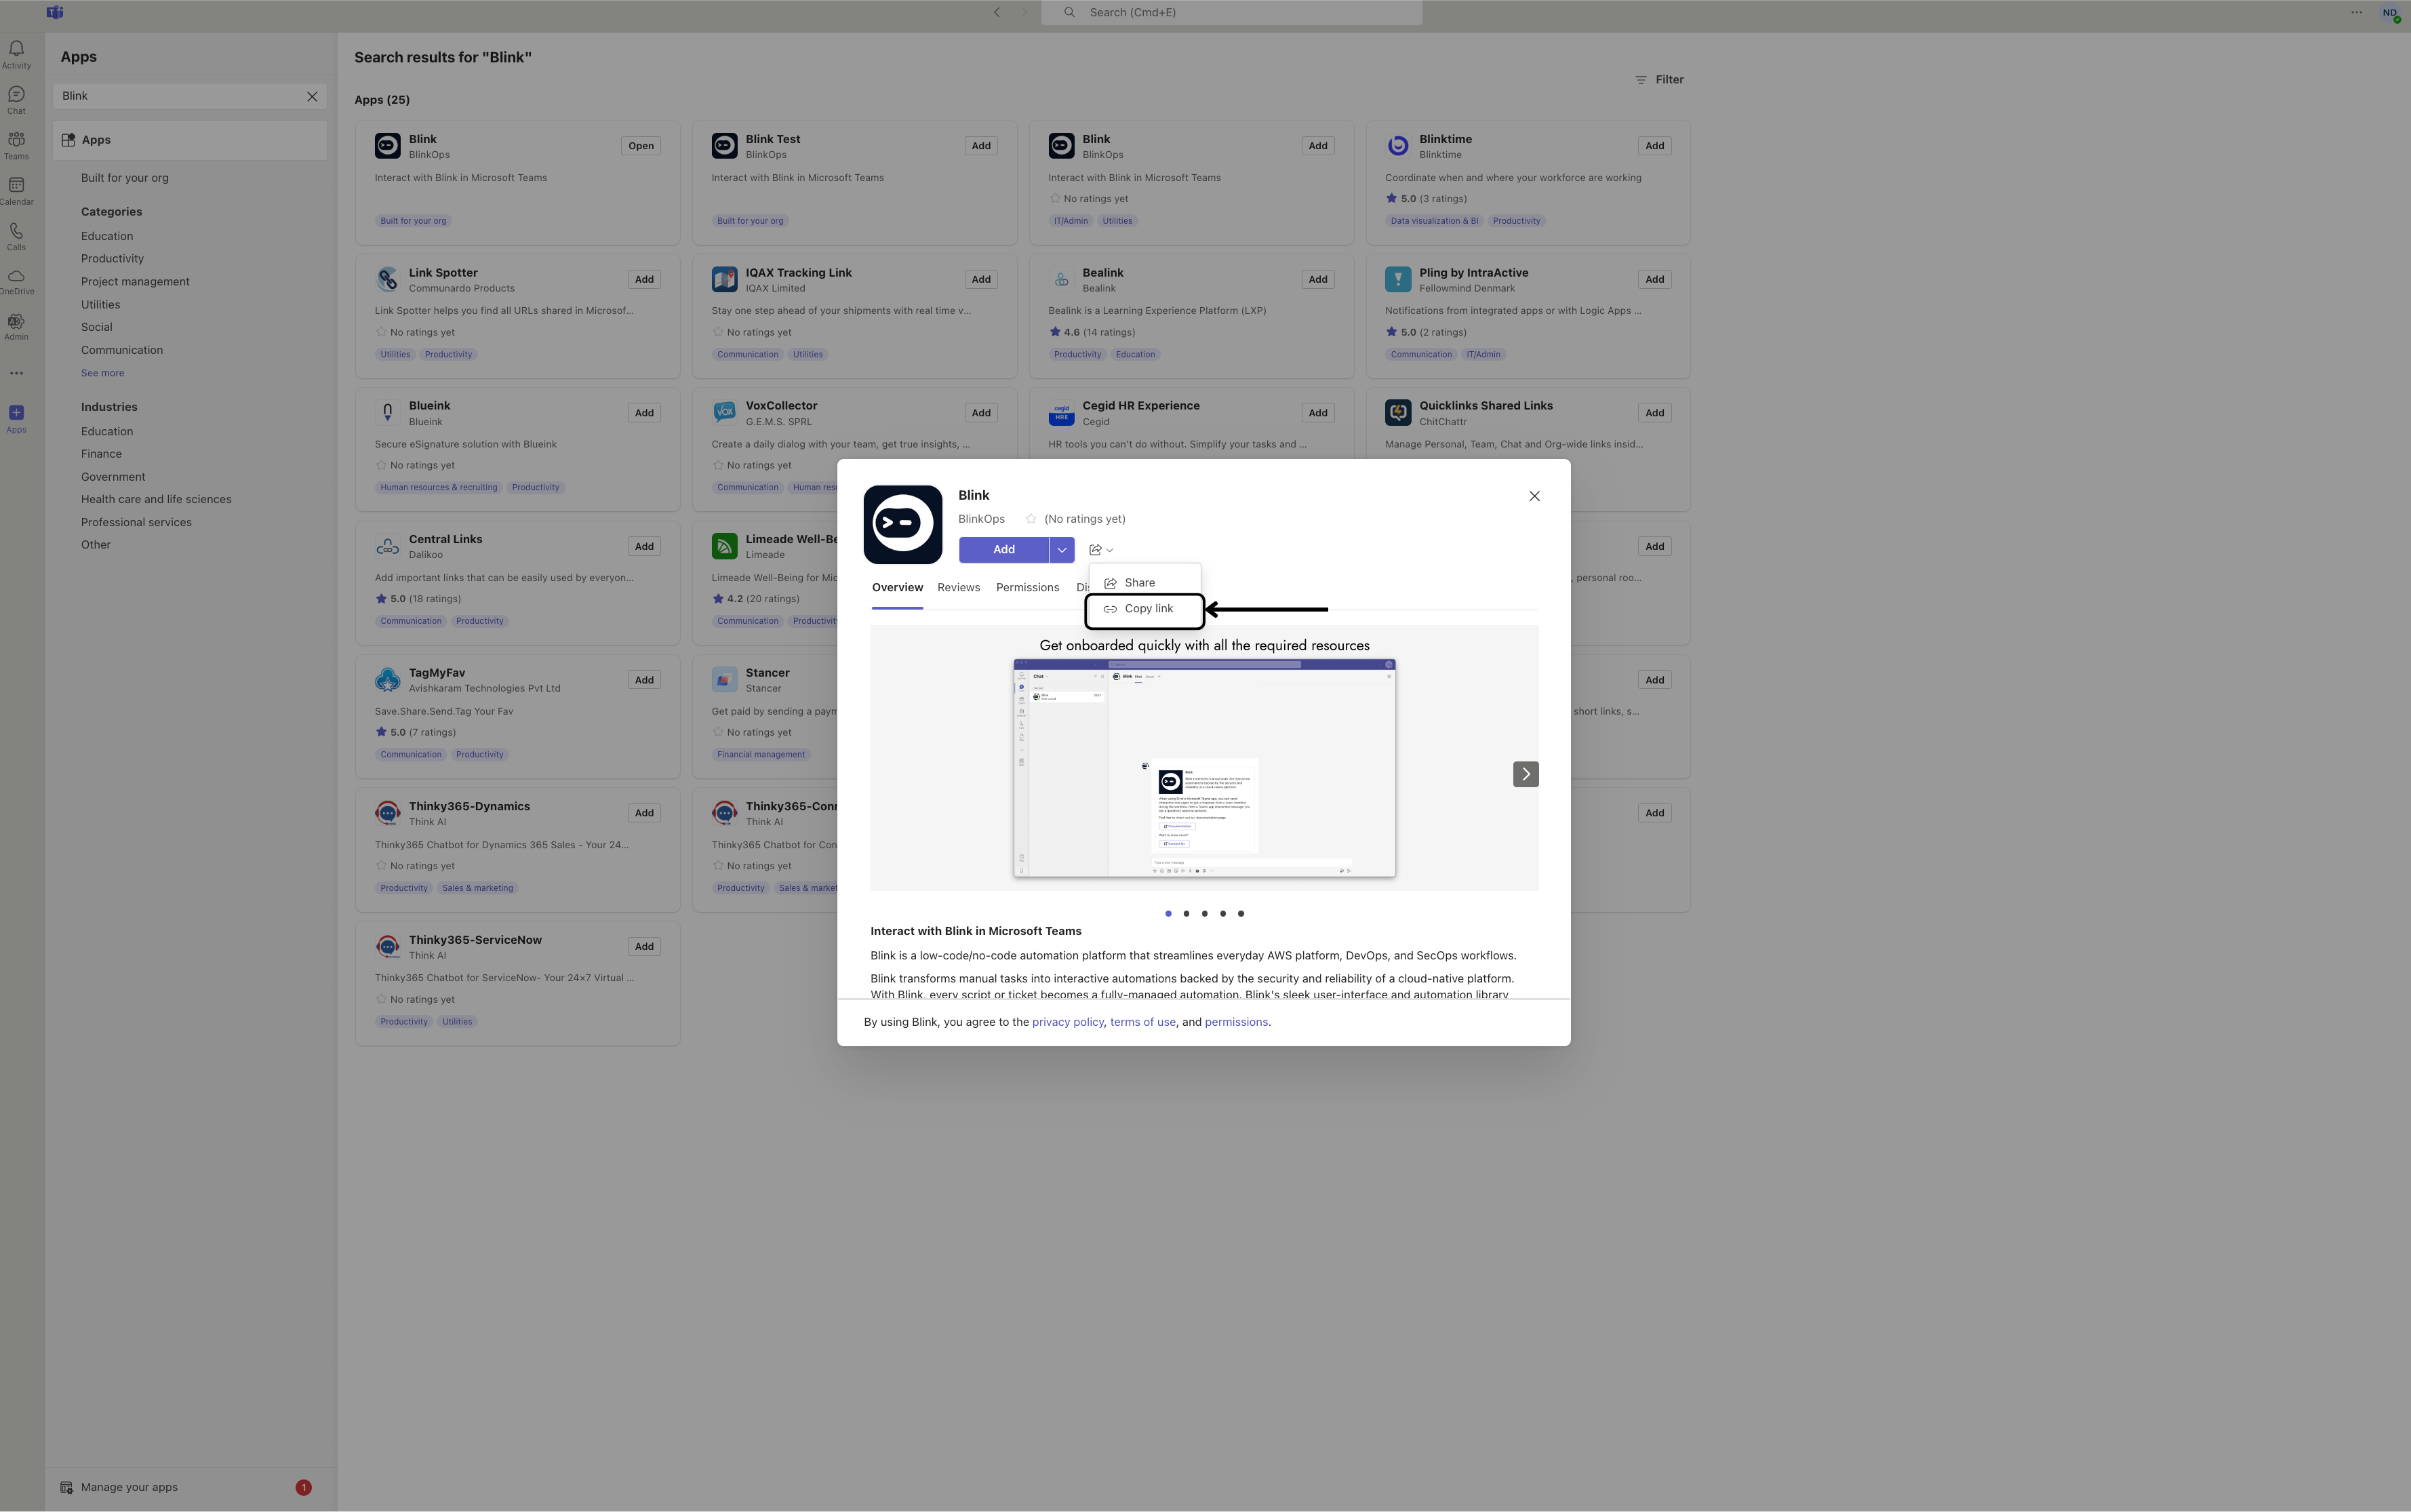
  <Step title="Copy the App Installation Link">
    Select and copy the link as illustrated in the image below:

    <Frame>
      <img src="https://mintcdn.com/blinkops-2/ZUtie3exEe7_7B_M/img/Actions/CopyTeamsLink.png?fit=max&auto=format&n=ZUtie3exEe7_7B_M&q=85&s=286204219fbf4a261c6fcda6c935e0b1" width="3556" height="2230" data-path="img/Actions/CopyTeamsLink.png" />
    </Frame>
  </Step>

  <Step title="Open the Installation Link in Your Browser">
    Paste the link into your web browser's search bar and follow the provided instructions, making sure to complete all required information.
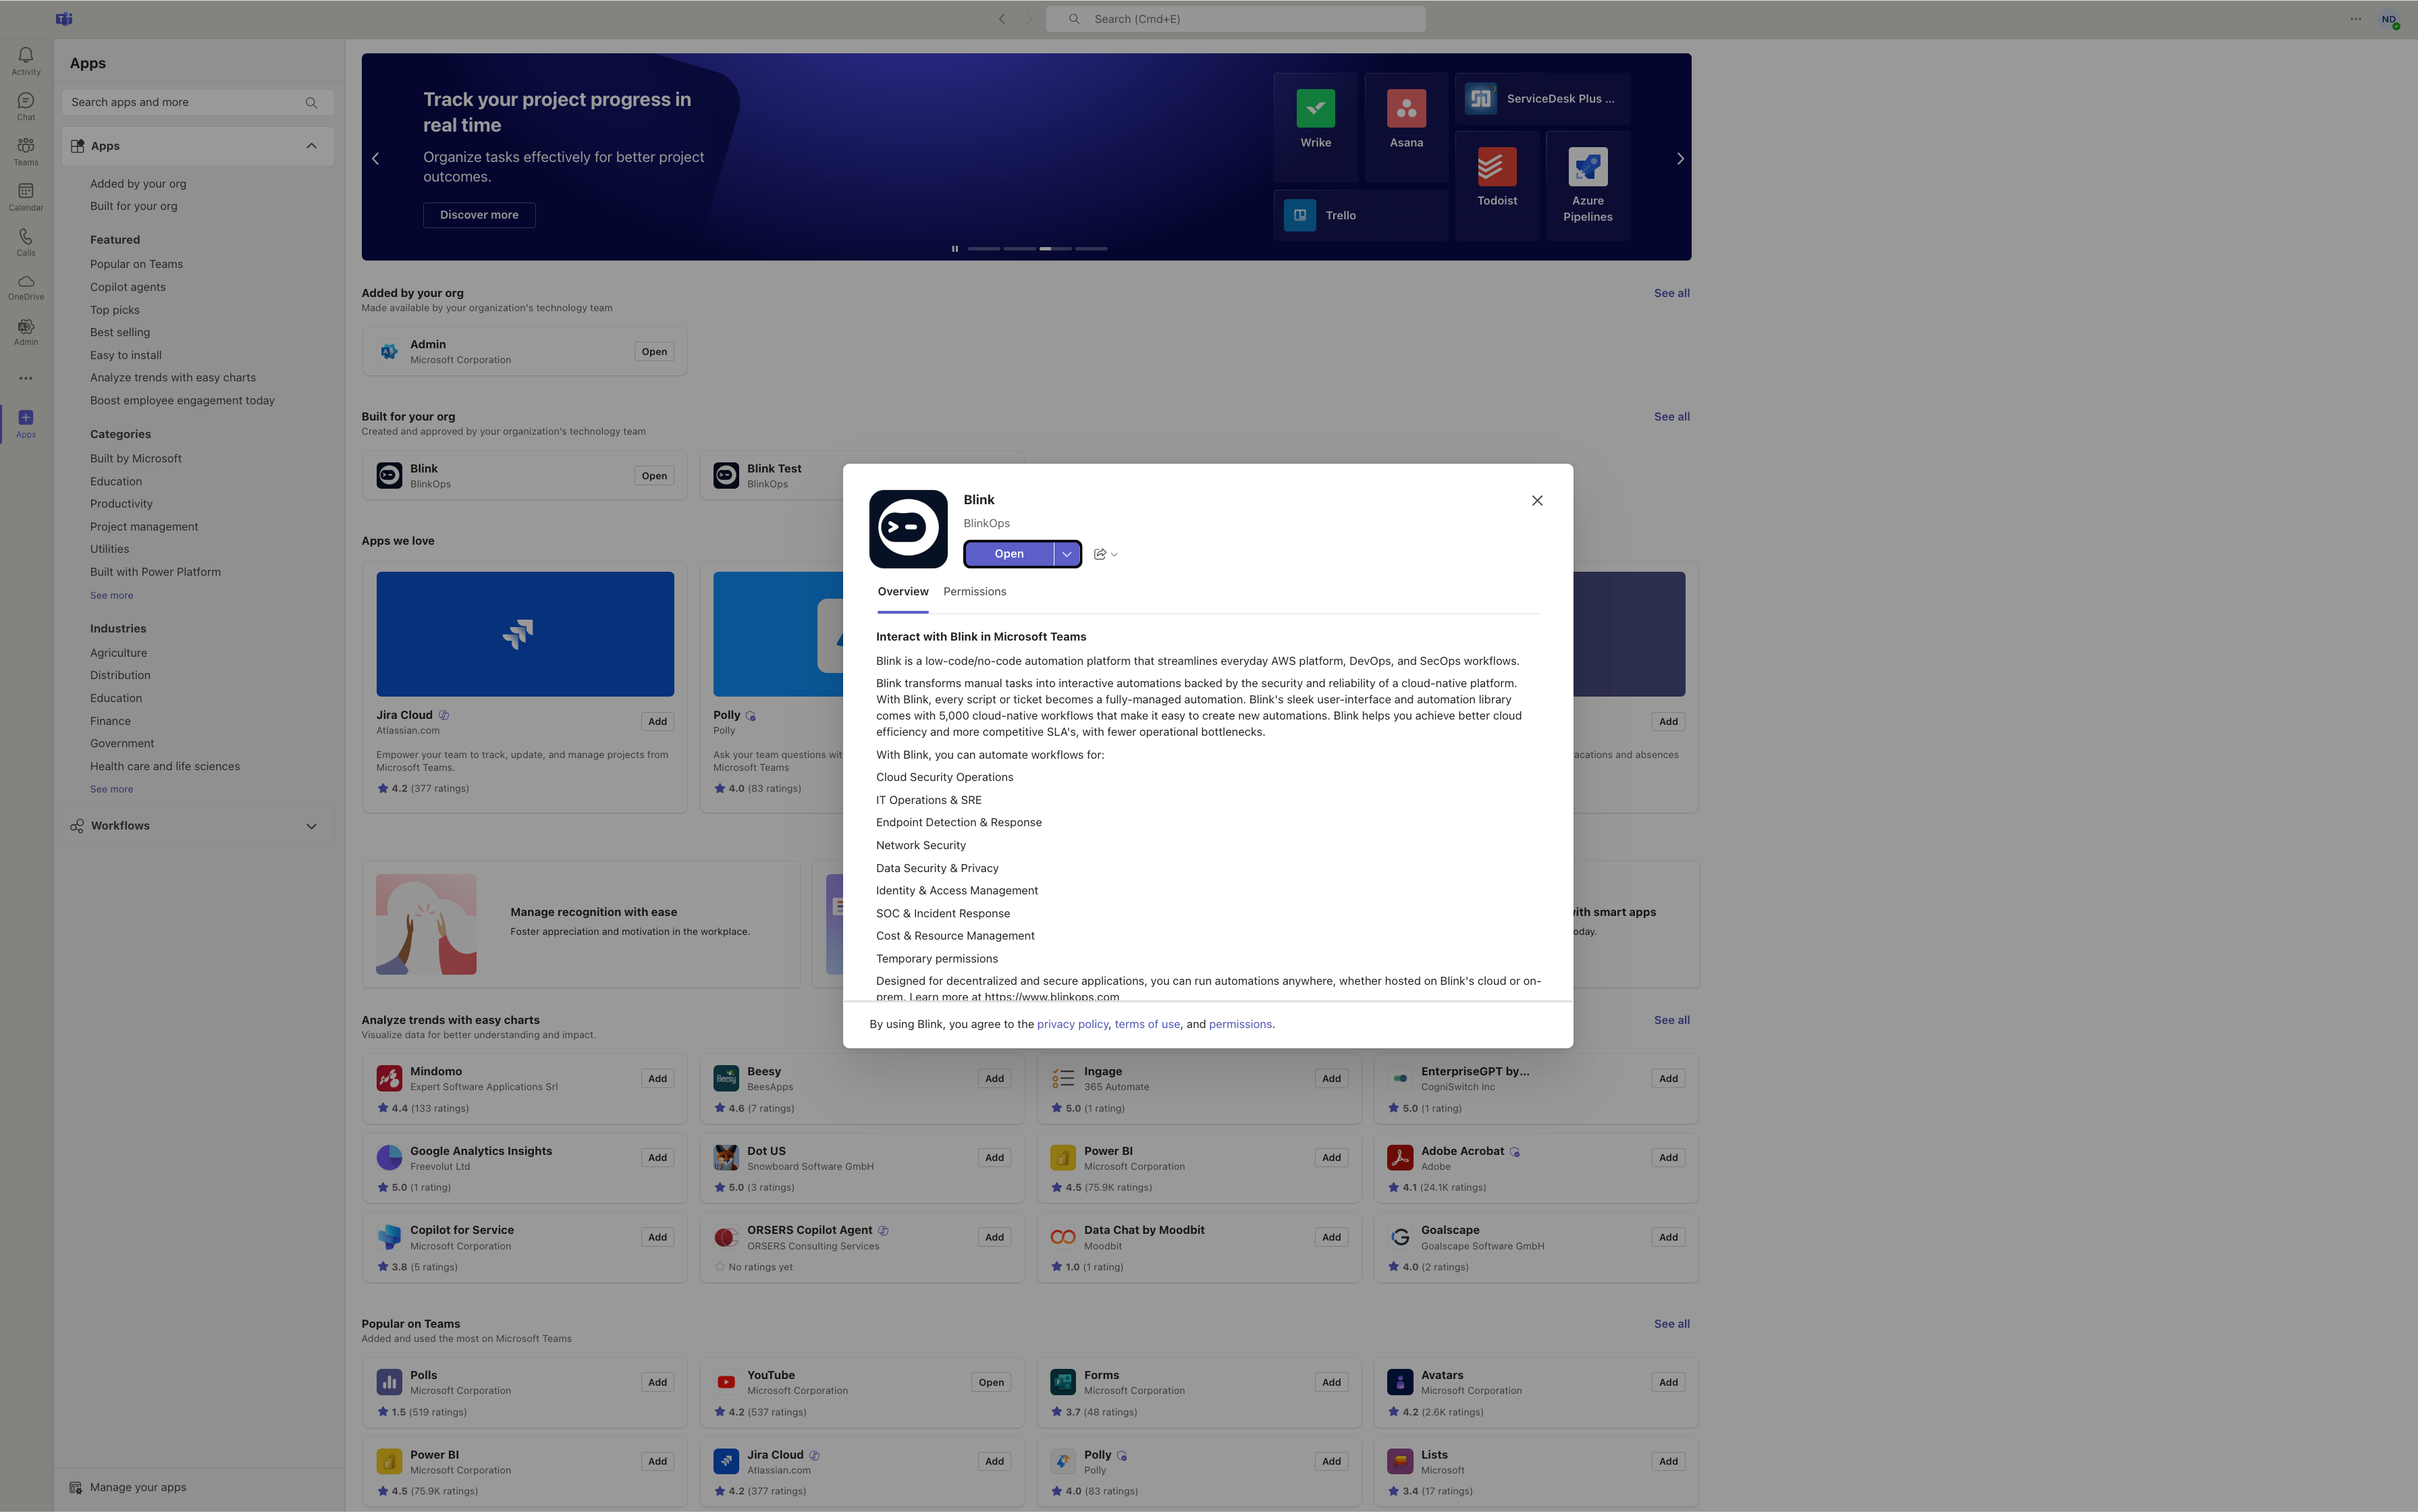
    Then return to the **Blink App** option you previously selected within the Microsoft Teams application, and click the **Open** button.

    <Frame>
      <img src="https://mintcdn.com/blinkops-2/3_6WnkGGmnkZFzEe/img/Actions/OpenTeamsBot.png?fit=max&auto=format&n=3_6WnkGGmnkZFzEe&q=85&s=b173906de9855ce47090f2934276cbab" width="3582" height="2240" data-path="img/Actions/OpenTeamsBot.png" />
    </Frame>
  </Step>

  <Step title="Receive Confirmation from Blink App">
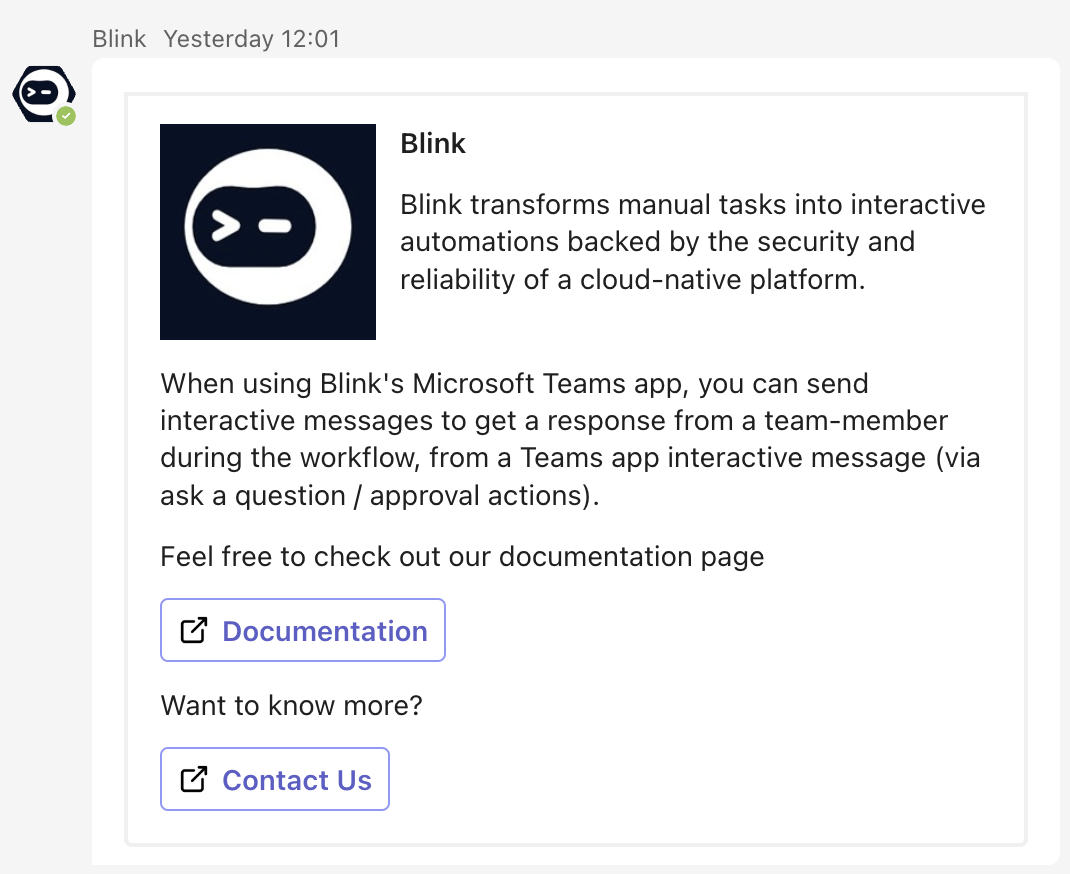
    You will receive the following message from the Blink App, confirming that you have successfully integrated the Blink App with your Microsoft Teams:

    <Frame>
      <img src="https://mintcdn.com/blinkops-2/deay2AiePWJDKGEh/img/Actions/TeamsMessageBlink.png?fit=max&auto=format&n=deay2AiePWJDKGEh&q=85&s=e301fa7e2d657701a952ab7a74b8cd73" width="1070" height="874" data-path="img/Actions/TeamsMessageBlink.png" />
    </Frame>
  </Step>
</Steps>

***

### Navigate to the Blink Platform

<Steps>
  <Step title="Add Microsoft Interactivity Action to Workflow">
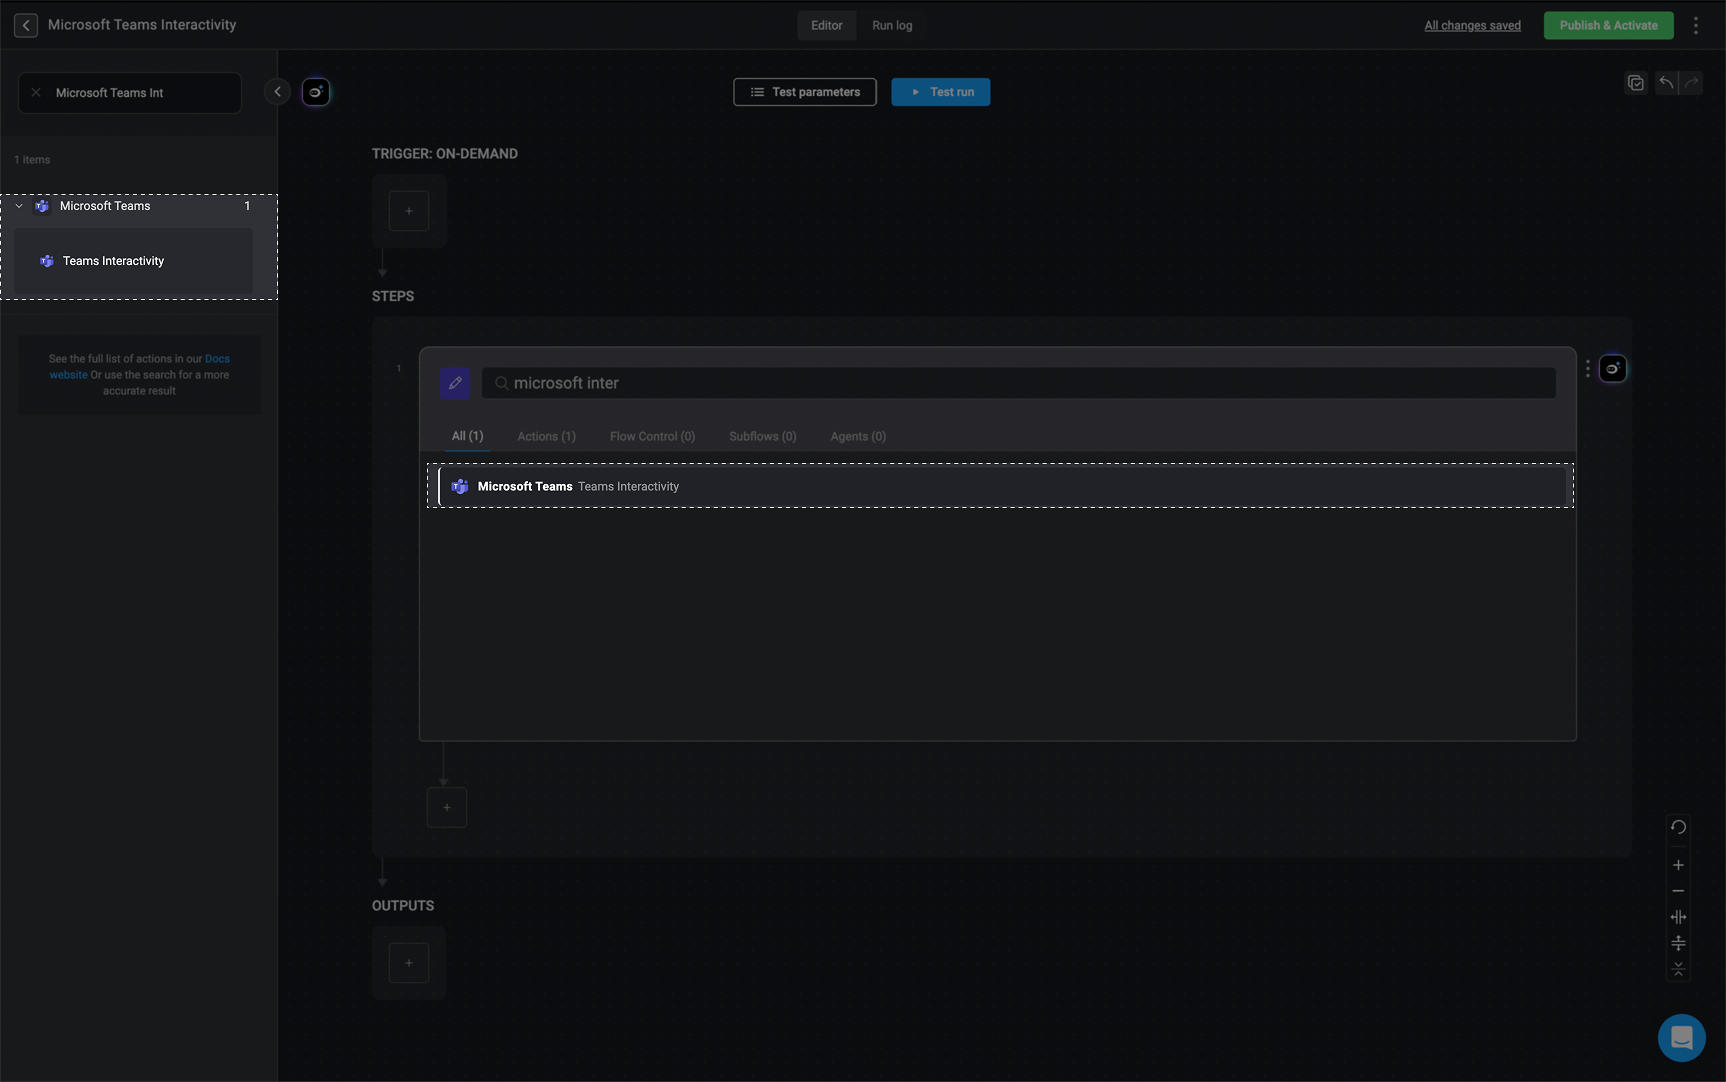
    In the Workflow Editor, click to open the inline action panel and search for "Microsoft Interactivity" action. Alternatively, you can drag the action to the step.

    <Frame>
      <img src="https://mintcdn.com/blinkops-2/yRkQ-wRlnQIXwr-A/img/Actions/AddMTInteractivity.png?fit=max&auto=format&n=yRkQ-wRlnQIXwr-A&q=85&s=7f87e59547829b10d0c540fc16a2c140" width="1726" height="1082" data-path="img/Actions/AddMTInteractivity.png" />
    </Frame>
  </Step>

  <Step title="Enter Microsoft Interactivity Parameters">
    Within this step, enter the following parameters:

    <div className="integrations-table">
      | Parameter                     | Description                                                                                                                                                                                                                                 |
      | ----------------------------- | ------------------------------------------------------------------------------------------------------------------------------------------------------------------------------------------------------------------------------------------- |
      | Send To                       | The message's destination: User Email, Chat or Channel                                                                                                                                                                                      |
      | Thread Message ID (optional)  | The ID of the root message in the channel thread to reply to. Only available when **Send To** is set to **Channel**.                                                                                                                        |
      | Cards                         | Array of Cards composing the message. **Must include one action and one input**                                                                                                                                                             |
      | Timeout in minutes (optional) | Timeout in minutes for the recipient to respond.                                                                                                                                                                                            |
      | Include user Info             | Check the box to include the responding user's information.                                                                                                                                                                                 |
      | Return Answers As Object      | Select to return the answers as a JSON object, where each input card ID is a key and its corresponding answer is the value. By default, answers are returned as an array or a single value, depending on how many inputs the card contains. |
      | Response Message              | The message to display to the user in MS Teams after they submit their response.                                                                                                                                                            |
    </div>
  </Step>

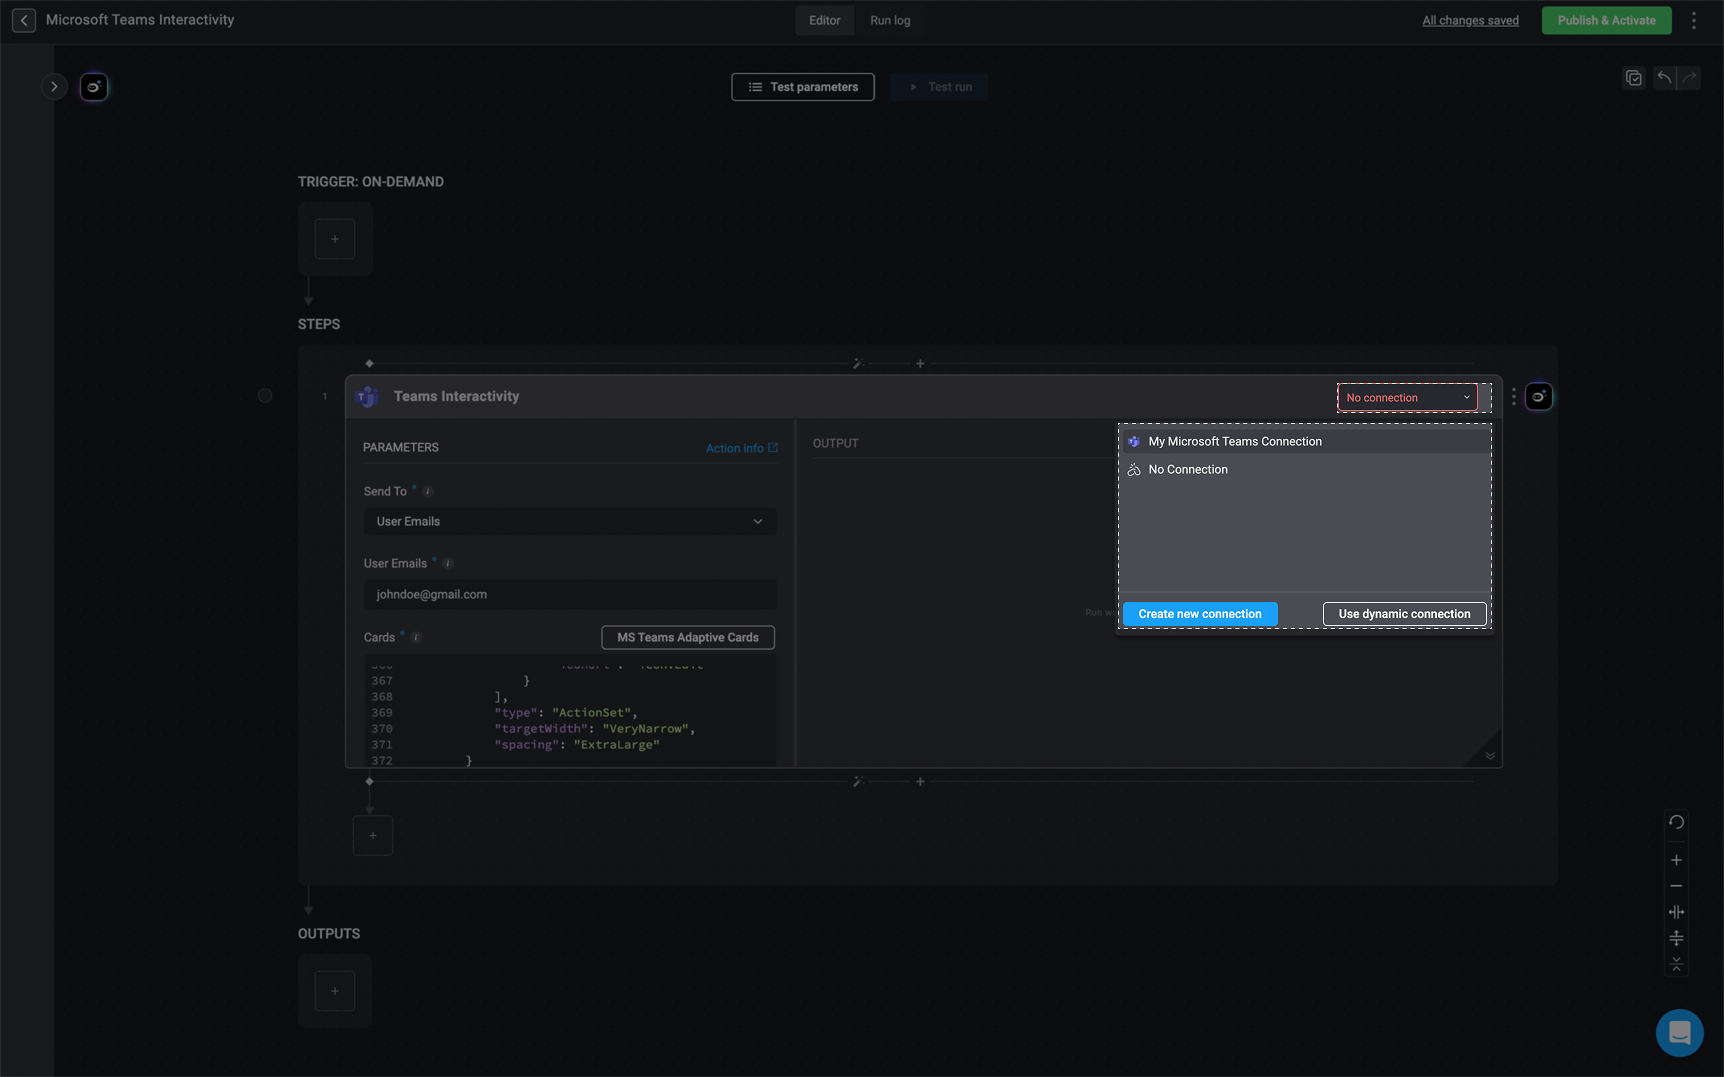
  <Step title="Create or Select Microsoft Teams Connection">
    Create a connection with Microsoft Teams by clicking ***Connection required*** in the top-right corner of your Step.

    <Tip>If you have already set up a Microsoft Teams connection, select one from the available options. Otherwise, create a new connection by selecting **Microsoft Teams connection** and following the steps outlined in the [Microsoft Teams connection guideline](/docs/integrations/microsoft-teams/microsoft-teams#creating-a-microsoft-teams-connection).</Tip>

    Once done, click **Create connection** to proceed.

    <Frame>
      <img src="https://mintcdn.com/blinkops-2/-eoT09amno25RB5l/img/Actions/MTConnection.png?fit=max&auto=format&n=-eoT09amno25RB5l&q=85&s=96a6d0eda9f0cc1bcd39d1c229214642" width="1724" height="1077" data-path="img/Actions/MTConnection.png" />
    </Frame>
  </Step>

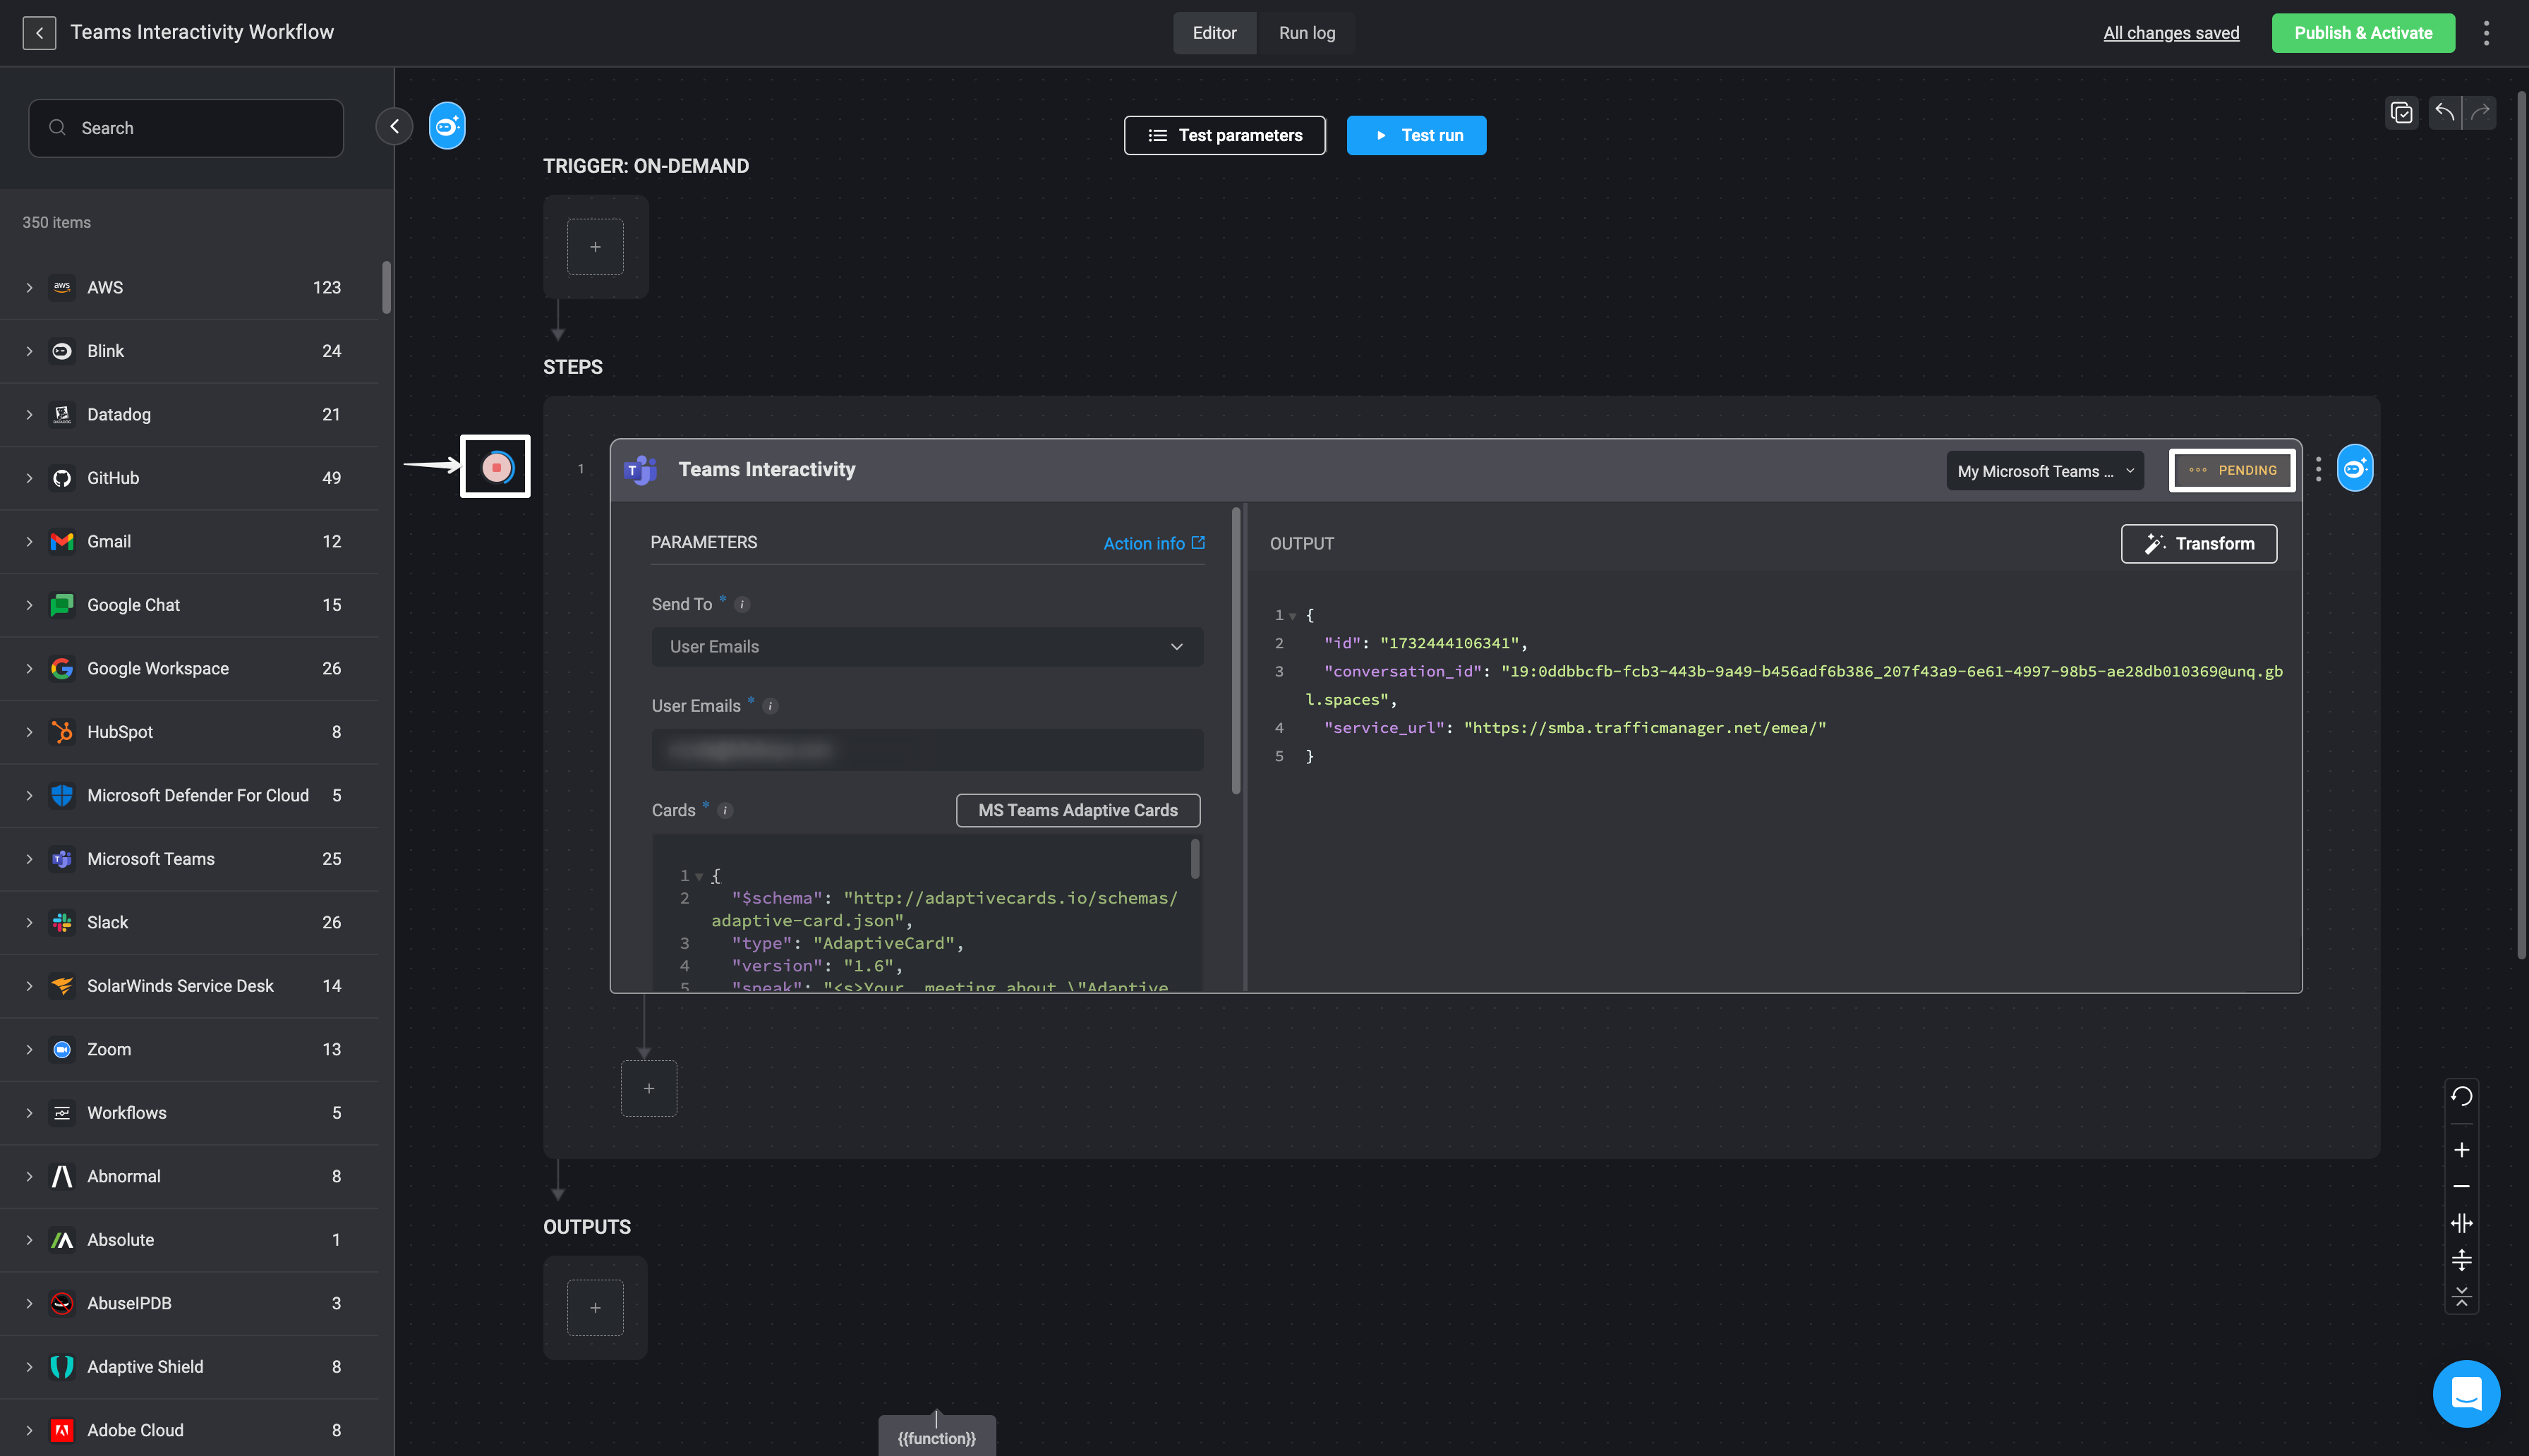
  <Step title="Run a Test Execution of the Step">
    <p>Once these steps are completed, you can select the <Icon icon="play" /> button to execute a trial run of the step or the 'test run' button to execute a test run of your Workflow.</p>

    <Frame>
      <img src="https://mintcdn.com/blinkops-2/deay2AiePWJDKGEh/img/Actions/TeamsPending.png?fit=max&auto=format&n=deay2AiePWJDKGEh&q=85&s=0c0977a0b9002406c0d172d830a7b13e" width="3584" height="2064" data-path="img/Actions/TeamsPending.png" />
    </Frame>
  </Step>

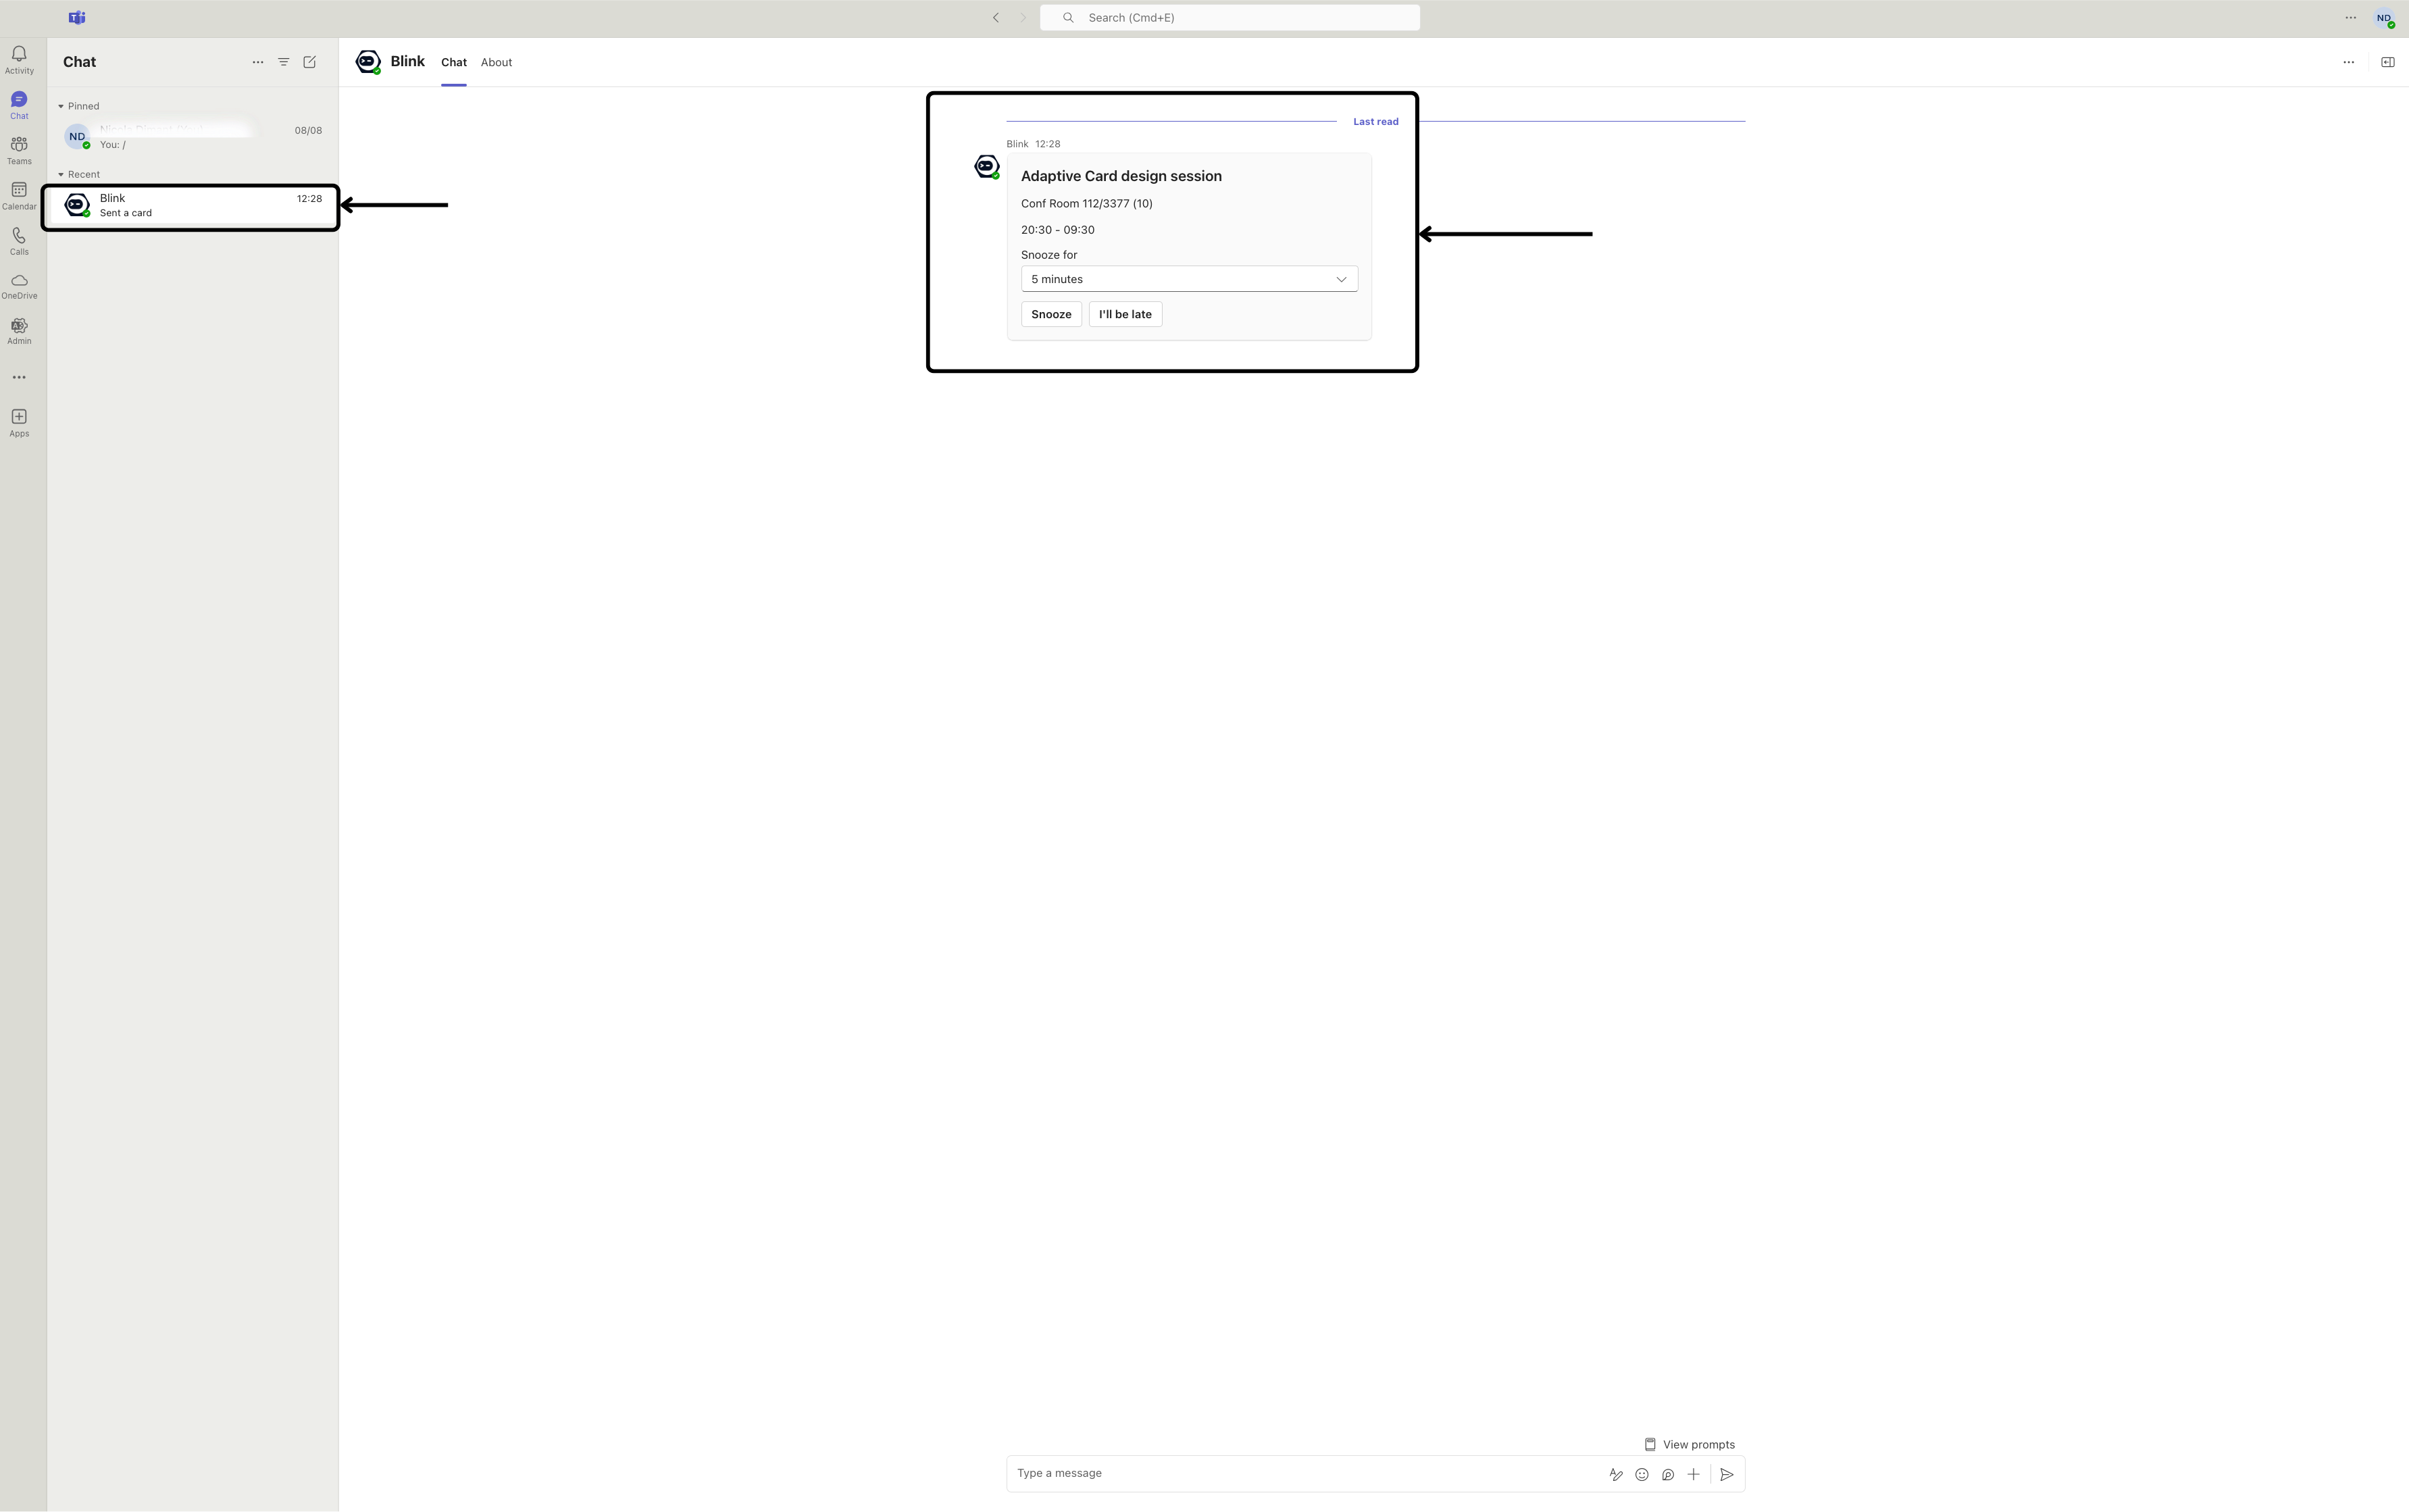
  <Step title="Respond to Microsoft Teams Card">
    When this Workflow runs, the message will be sent to the selected destination in your Microsoft account.
    Users at the destination can engage with the card and submit their responses.

    <Frame>
      <img src="https://mintcdn.com/blinkops-2/deay2AiePWJDKGEh/img/Actions/TeamsRecieveMessage.png?fit=max&auto=format&n=deay2AiePWJDKGEh&q=85&s=b5a099a56c74b59cb22ecc0b06af3237" width="3566" height="2238" data-path="img/Actions/TeamsRecieveMessage.png" />
    </Frame>
  </Step>

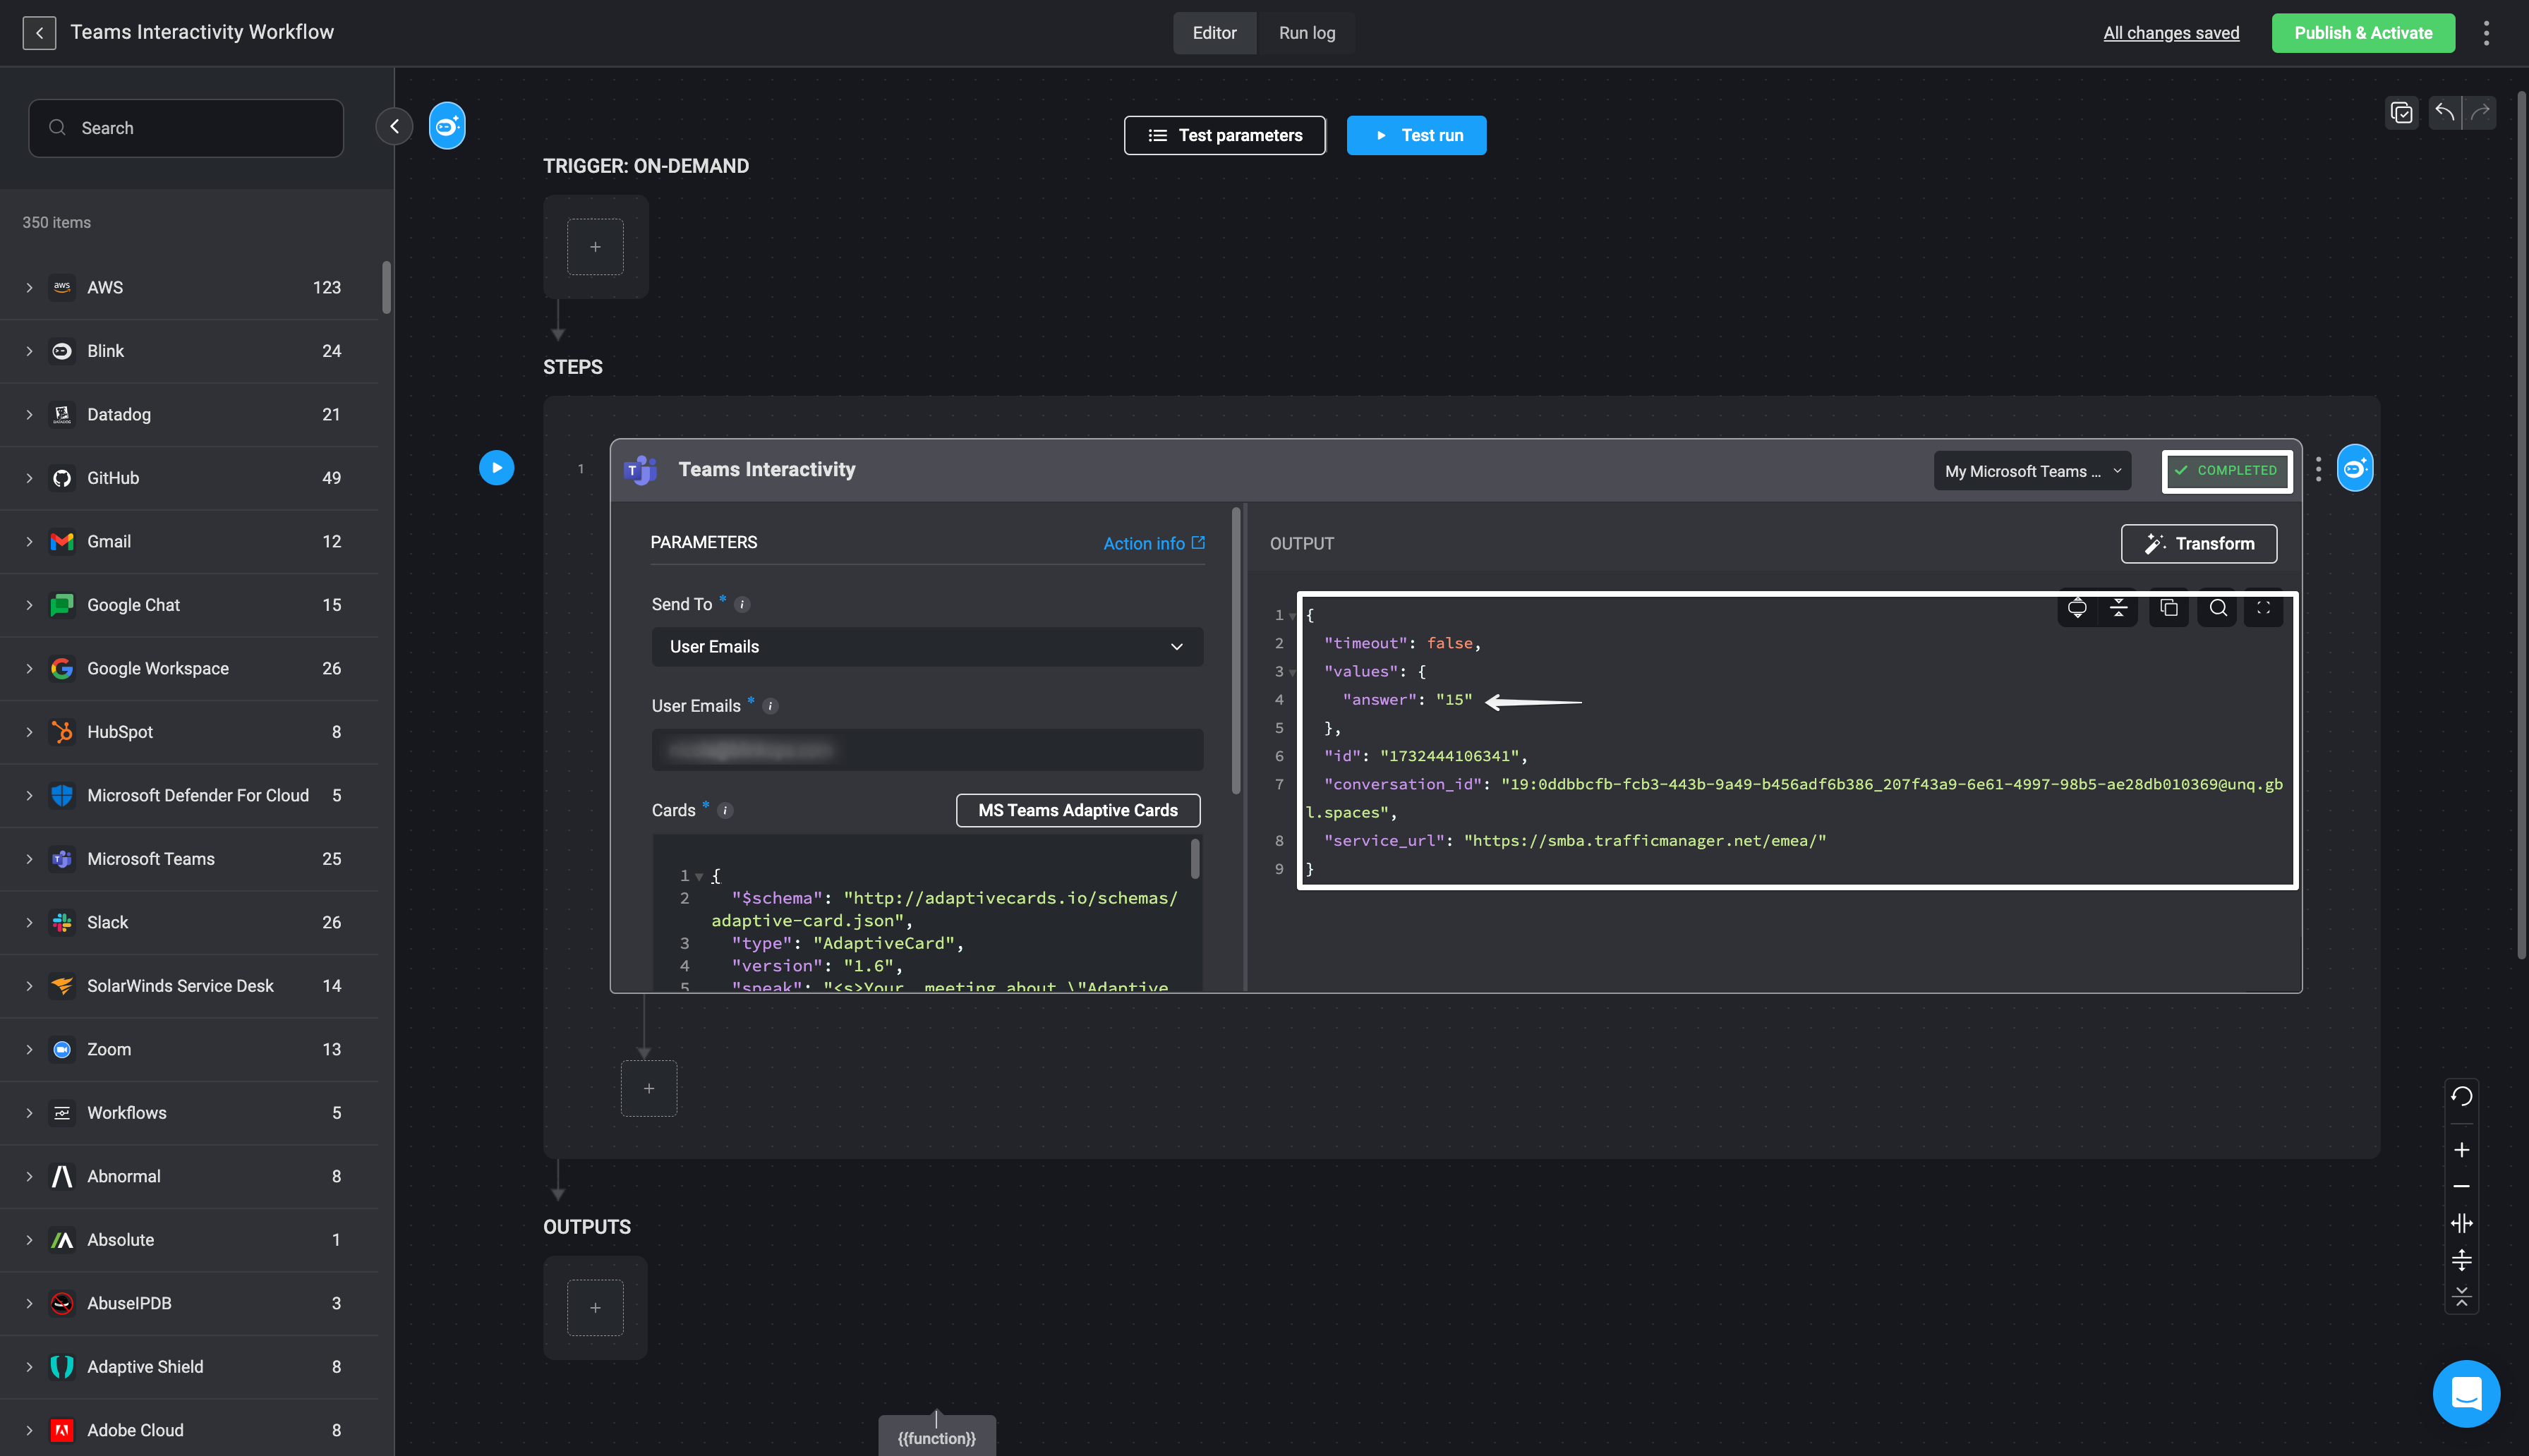
  <Step title="View Microsoft Teams Response in Workflow Output">
    You can then navigate back to your Workflow, where you will find the Microsoft Teams response in the output of your Workflow.

    <Frame>
      <img src="https://mintcdn.com/blinkops-2/deay2AiePWJDKGEh/img/Actions/TeamsOutput.png?fit=max&auto=format&n=deay2AiePWJDKGEh&q=85&s=be7cda73957a4e70cd5e6b0eb5253794" width="3584" height="2064" data-path="img/Actions/TeamsOutput.png" />
    </Frame>
  </Step>
</Steps>