> ## Documentation Index
> Fetch the complete documentation index at: https://docs.blinkops.com/llms.txt
> Use this file to discover all available pages before exploring further.
# Flow Control Actions
> Flow Control Actions allow users to control the flow of their Workflows
| Flow Control Action Name | Icon |
| ------------------------------- | -------------------------------------------------------------------------------------------------------------------------------------------------------------------------------------------------------------------------------------------------------------------------------------------------------------------------------------------------------------------------------------------------------------------------------------------------------------------------------------------------------------------------------------------------------------------------------------------------------------------------------------------------------------------------------------------------------------------------------------------------------------------------------------------------------------------------------------------------------------------------------------------------------------------------------------------------------------------------------------------------------------------------------------------------------------------------------------------------------------------------------------------------------------------------------------------------------------------------------------------------------------------------------------------------------------------------------- |
| [If](#if) |

|
| [Switch Case](#switch-case) |

|
| [Loop Through](#loop-through) |

|
| [While](#while) |

|
| [Wait](#wait) |

|
| [Set variables](#set-variables) |

|
| [Note](#note) |

|
| [Run On Error](#run-on-error) |

|
| [End Run](#end-run) |

|

- The 'Check If' Icon
Determines the workflow's direction based on whether a condition is `true` or `false`. If `true`, the workflow follows one course of action; if `false`, it follows an alternative course
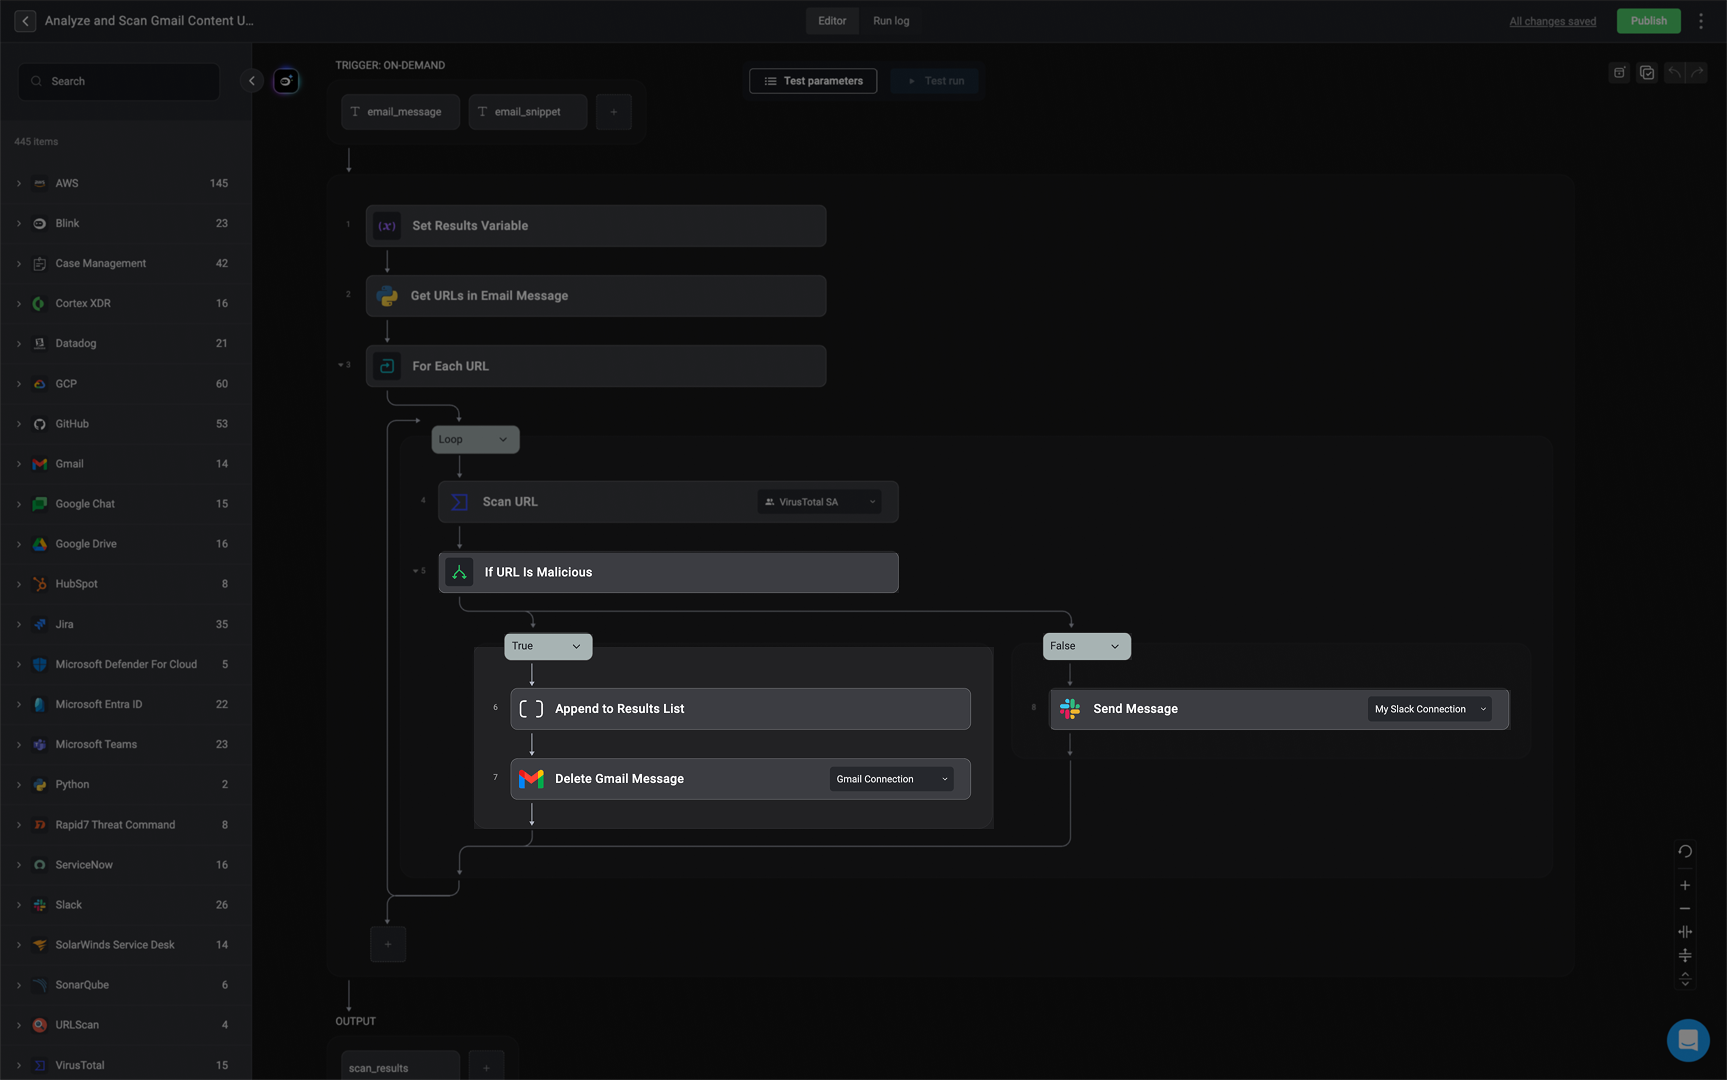 The "If" statement in the use case example is being used to check whether a scanned URL is classified as "Malicious."
* The workflow is triggered when a **new Gmail message** is received.
* The system **extracts URLs** from the email.
* Each URL is **scanned** using VirusTotal (or another scanning tool).
* The **If statement** checks if the scanned URL is flagged as **"Malicious."**
* If **true**, the workflow notifies a Slack channel and deletes the email to prevent potential threats.
* If **false**, the workflow continues without taking these actions.
***
## Switch Case
The "If" statement in the use case example is being used to check whether a scanned URL is classified as "Malicious."
* The workflow is triggered when a **new Gmail message** is received.
* The system **extracts URLs** from the email.
* Each URL is **scanned** using VirusTotal (or another scanning tool).
* The **If statement** checks if the scanned URL is flagged as **"Malicious."**
* If **true**, the workflow notifies a Slack channel and deletes the email to prevent potential threats.
* If **false**, the workflow continues without taking these actions.
***
## Switch Case
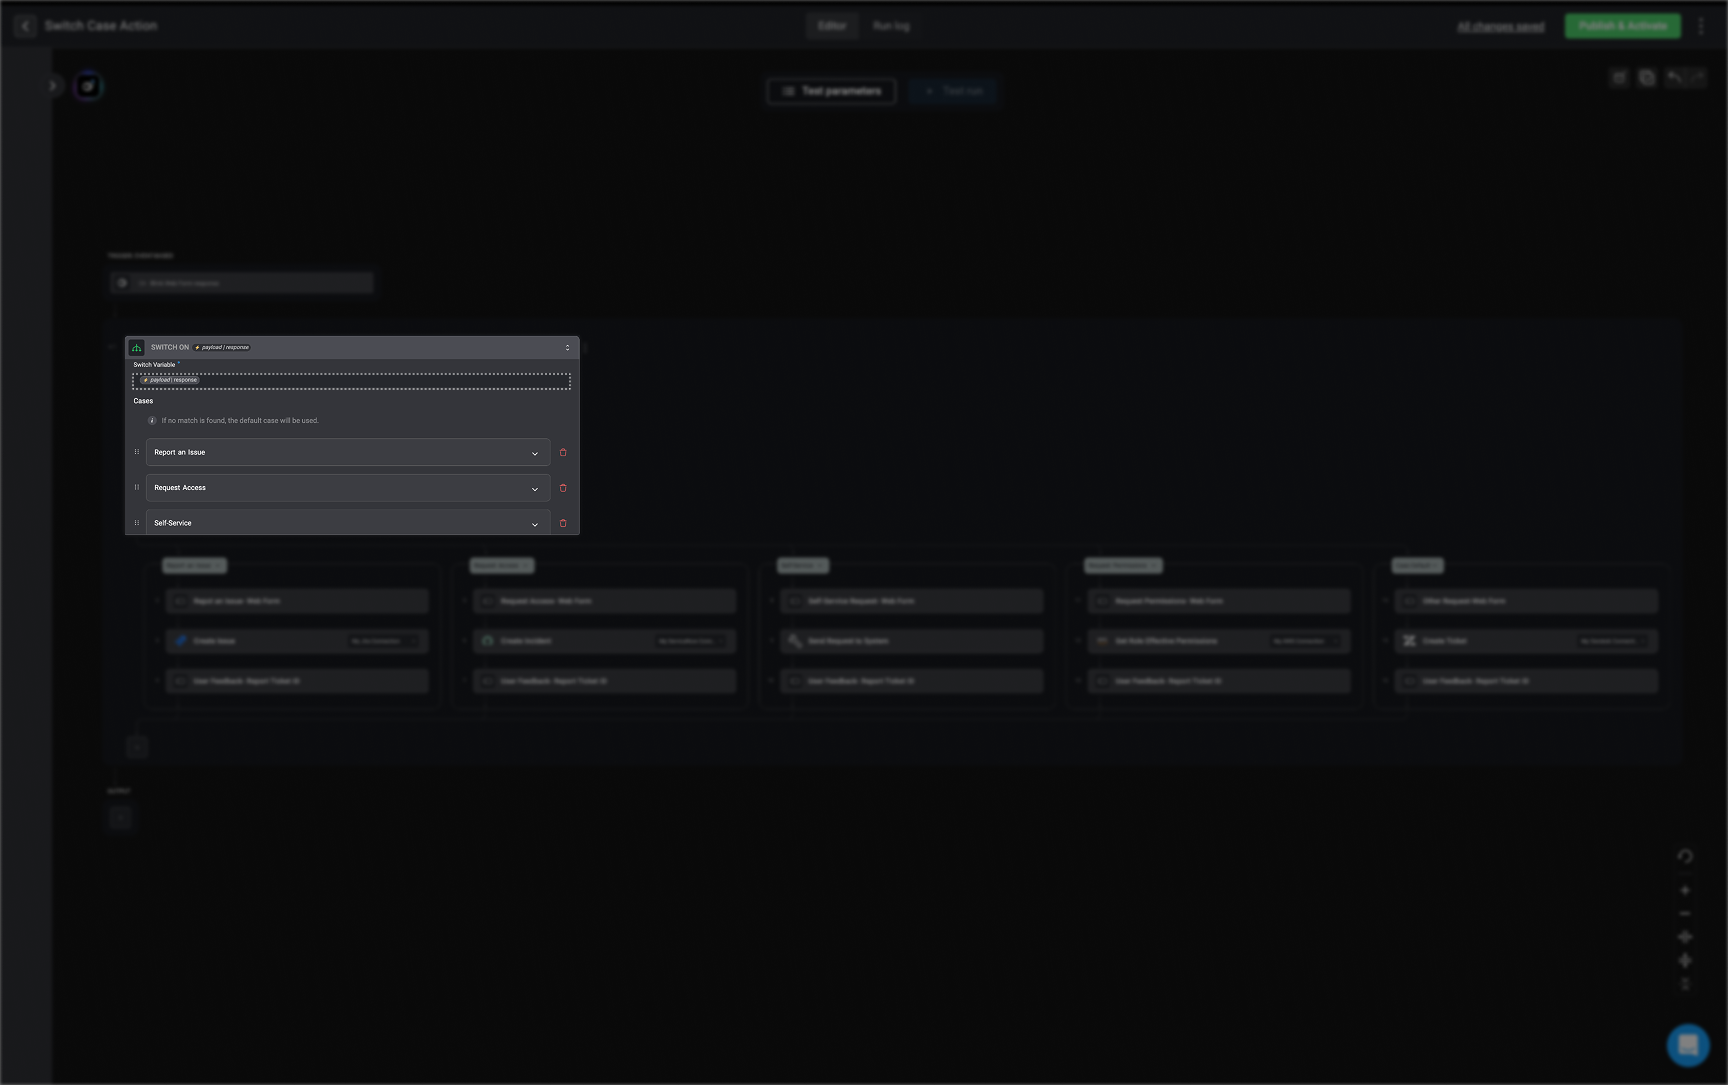
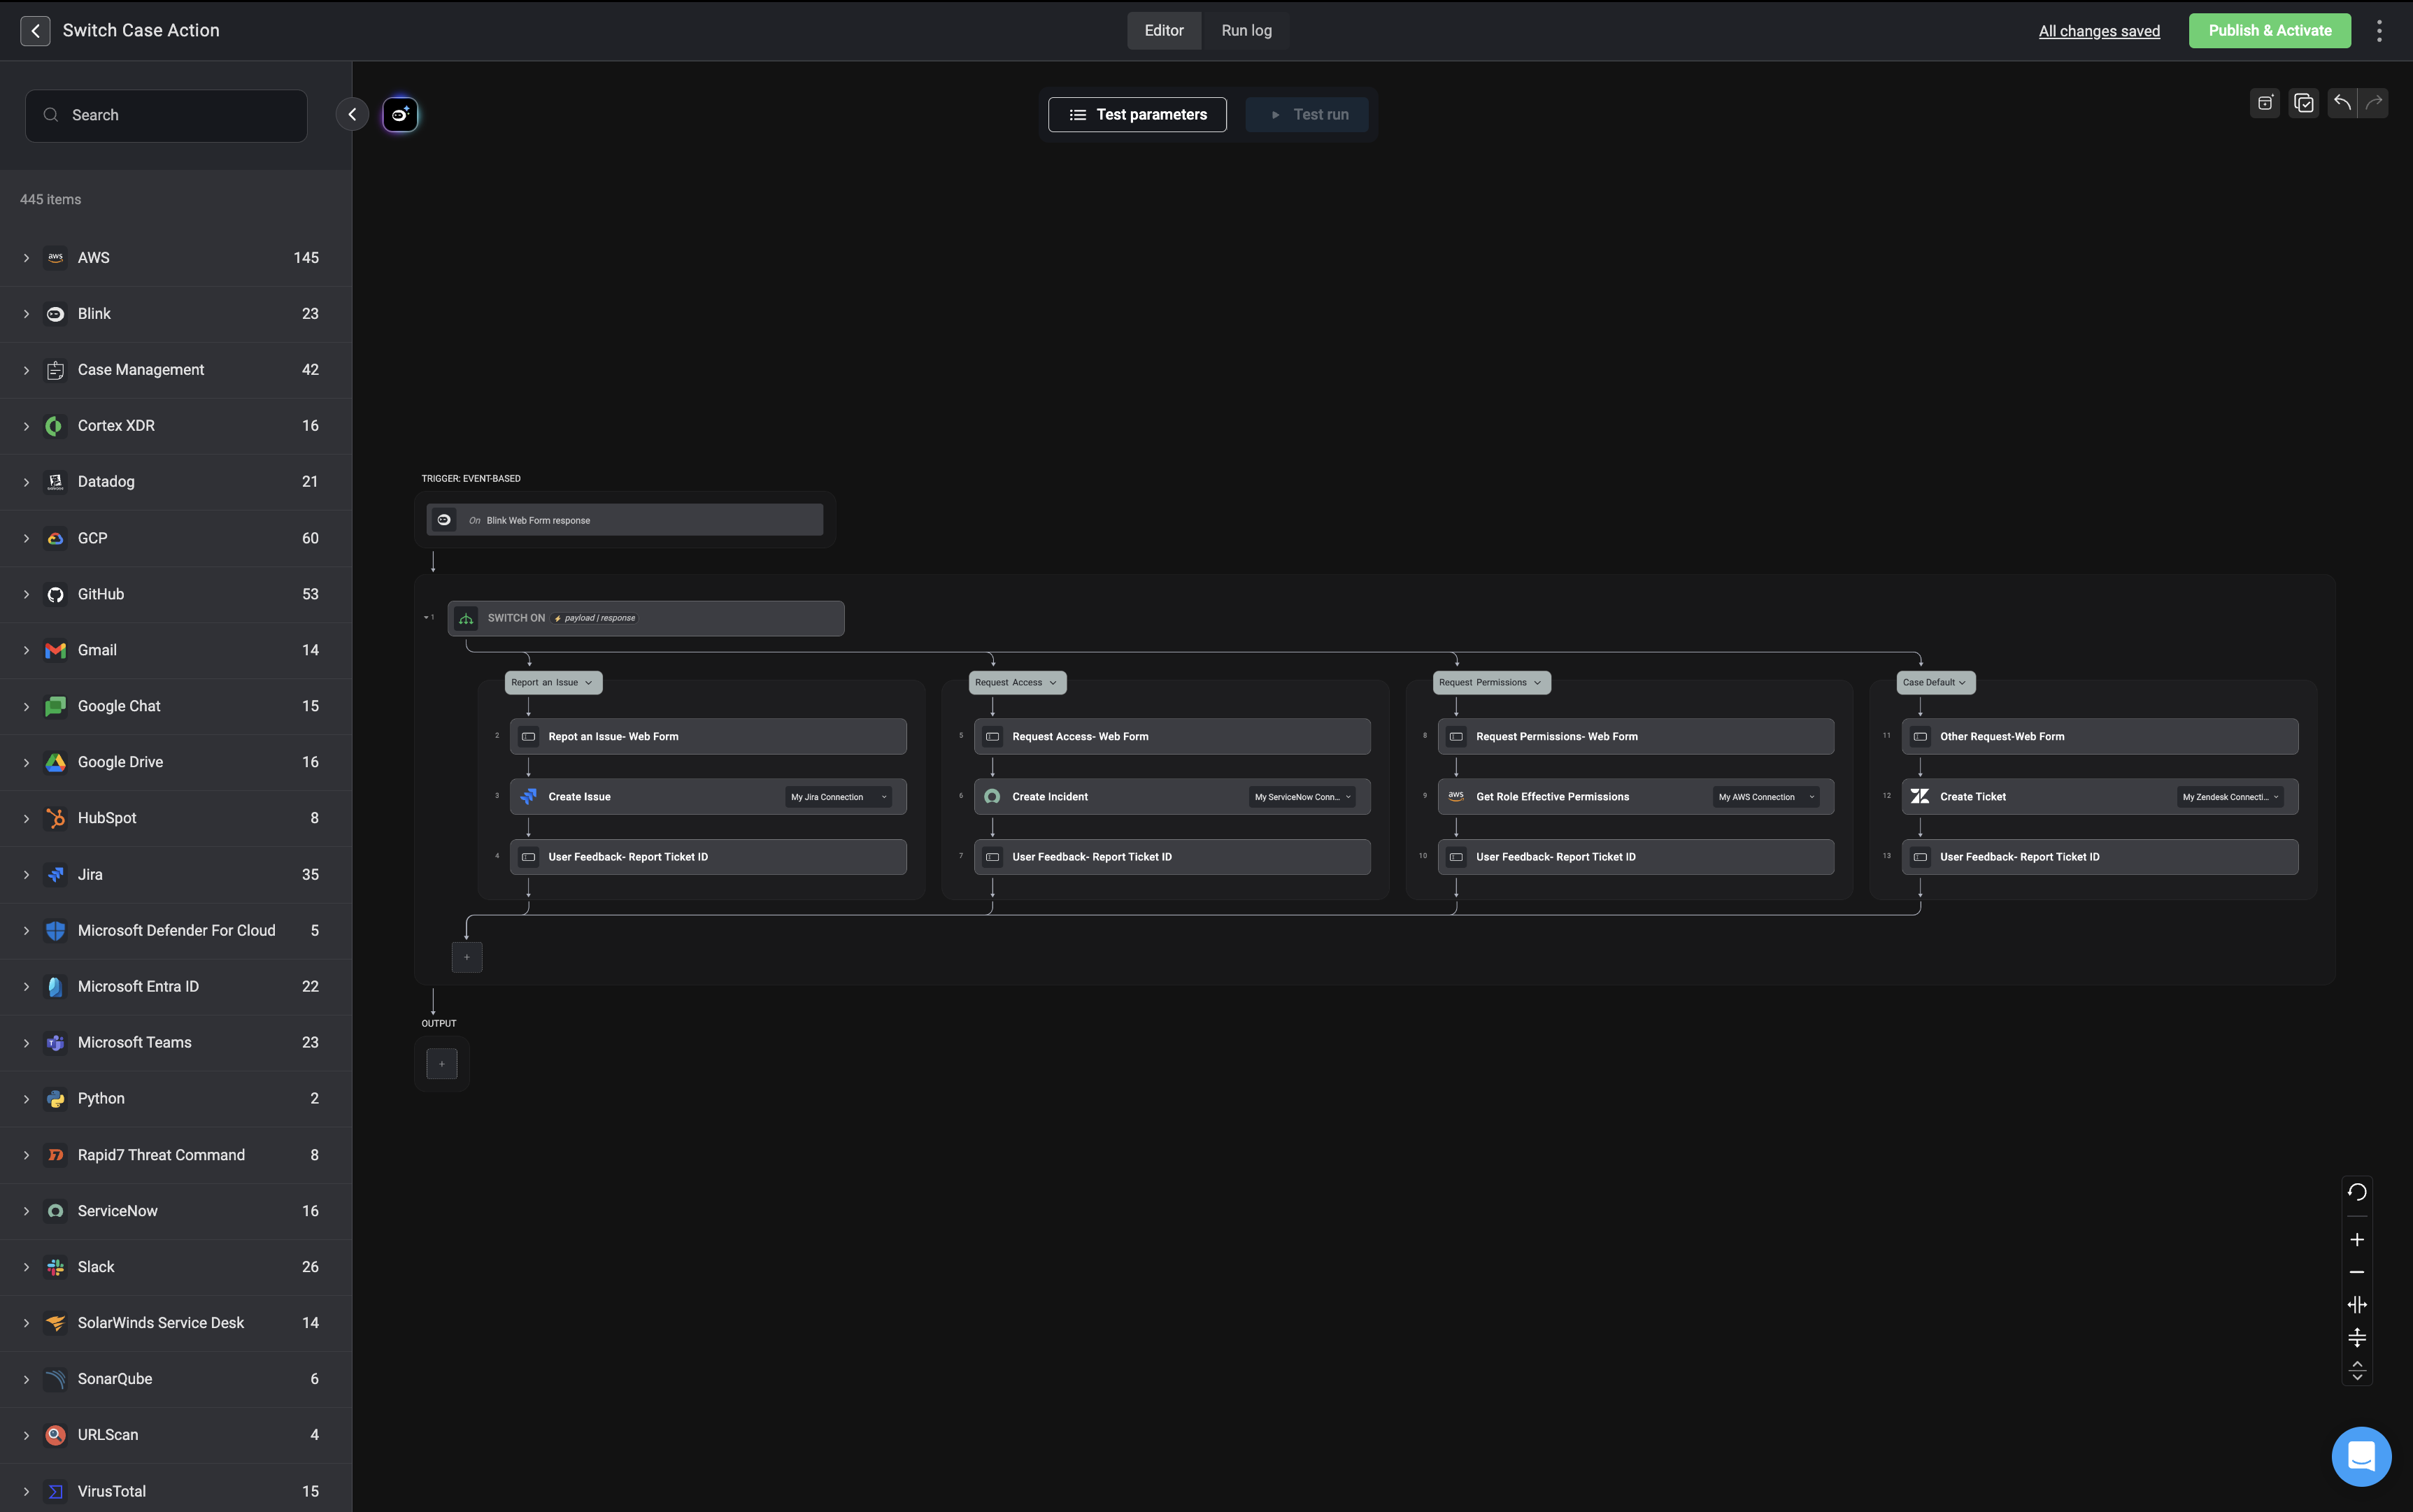
The Switch Case action allows you to compare a given value with a series of possible values and execute different blocks of actions based on the matching case value.
| Flow Control Action Name | description |
| ------------------------ | --------------------------------------------------------------------------------------------------------------------------------------------------------------------------------------------------------------------------------------------------- |
| Switch Variable | The Switch Case includes a Switch Variable which is compared to a list of case values. If any of these case values matches the Switch Variable, it prompts the execution of a particular block of actions associated with that matching case value. |
| Cases | Each Case is a value that is compared against the Switch Variable if the value of the Switch Variable matches a Case value, the corresponding block of actions associated with that will be executed |
| Actions | Within each case, you can choose any set of actions to be performed. |
| Case Default | The default case serves as a default output option and comes into play when the Switch Variable does not match any of the other Case values. |
Reorder cases by easily dragging & dropping to reorder. The system evaluates cases from top to bottom: the first matching condition runs, and if no condition matches, the default case is used.
1. Begin by setting the switch case variable. This is the variable whose value will be evaluated against each case condition. Only the case with a matching condition will run its associated actions.
 2. Click the "Add Case" button to create a new case branch.
 3. Provide a case name and set the case condition- this is the specific value that the switch case variable (created in `step 1`) will be compared against.
Case names update automatically based on their conditions.
3. Provide a case name and set the case condition- this is the specific value that the switch case variable (created in `step 1`) will be compared against.
Case names update automatically based on their conditions.
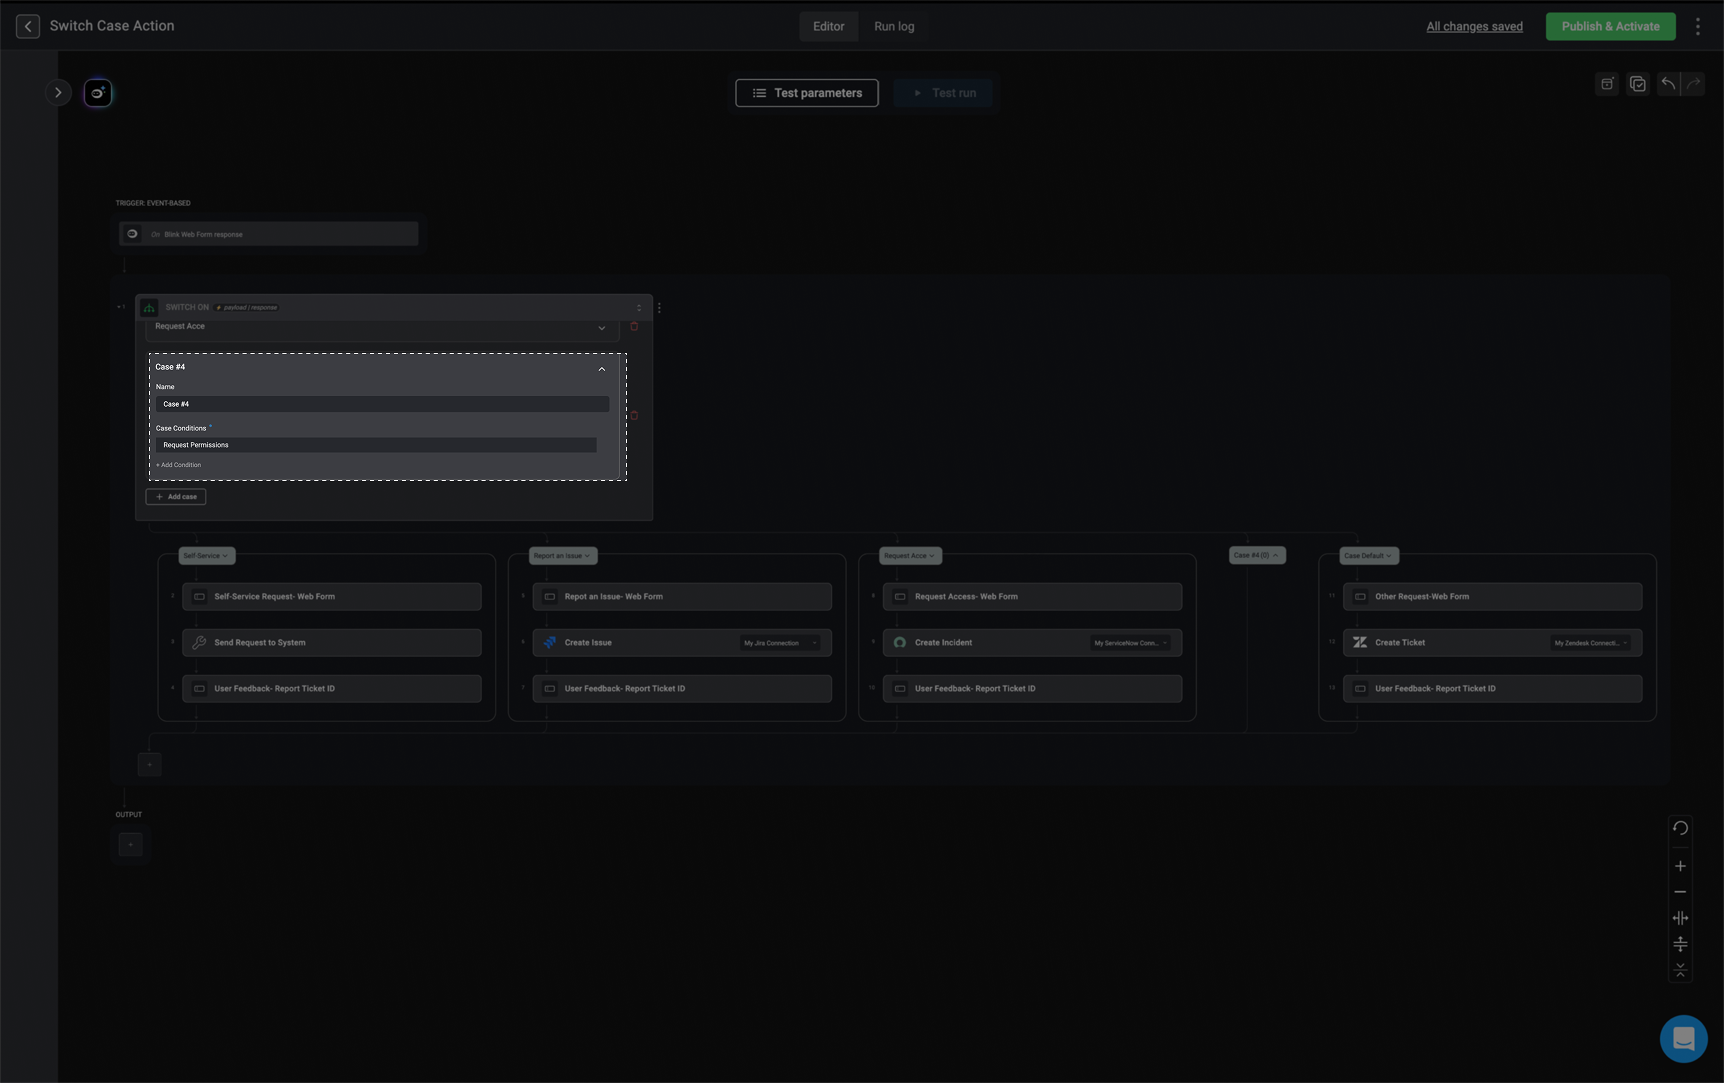 4. Inside each case, you can configure a unique set of actions that should run when that case is triggered.
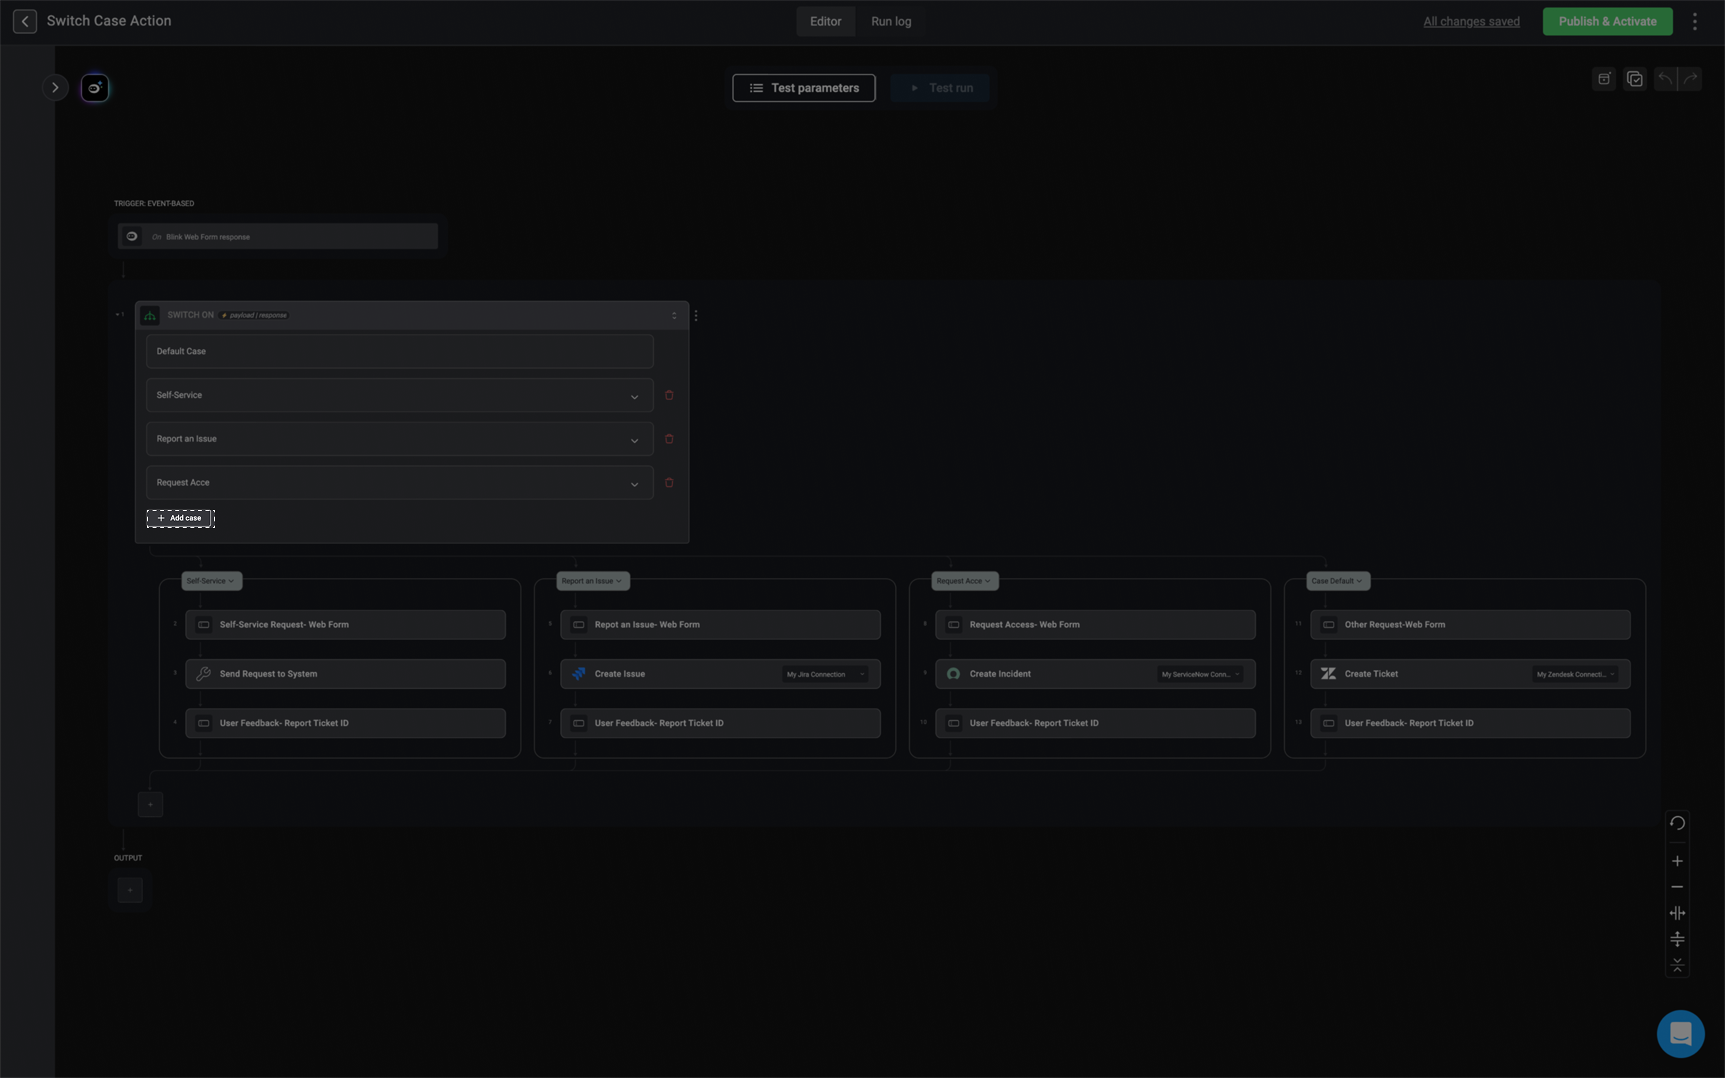
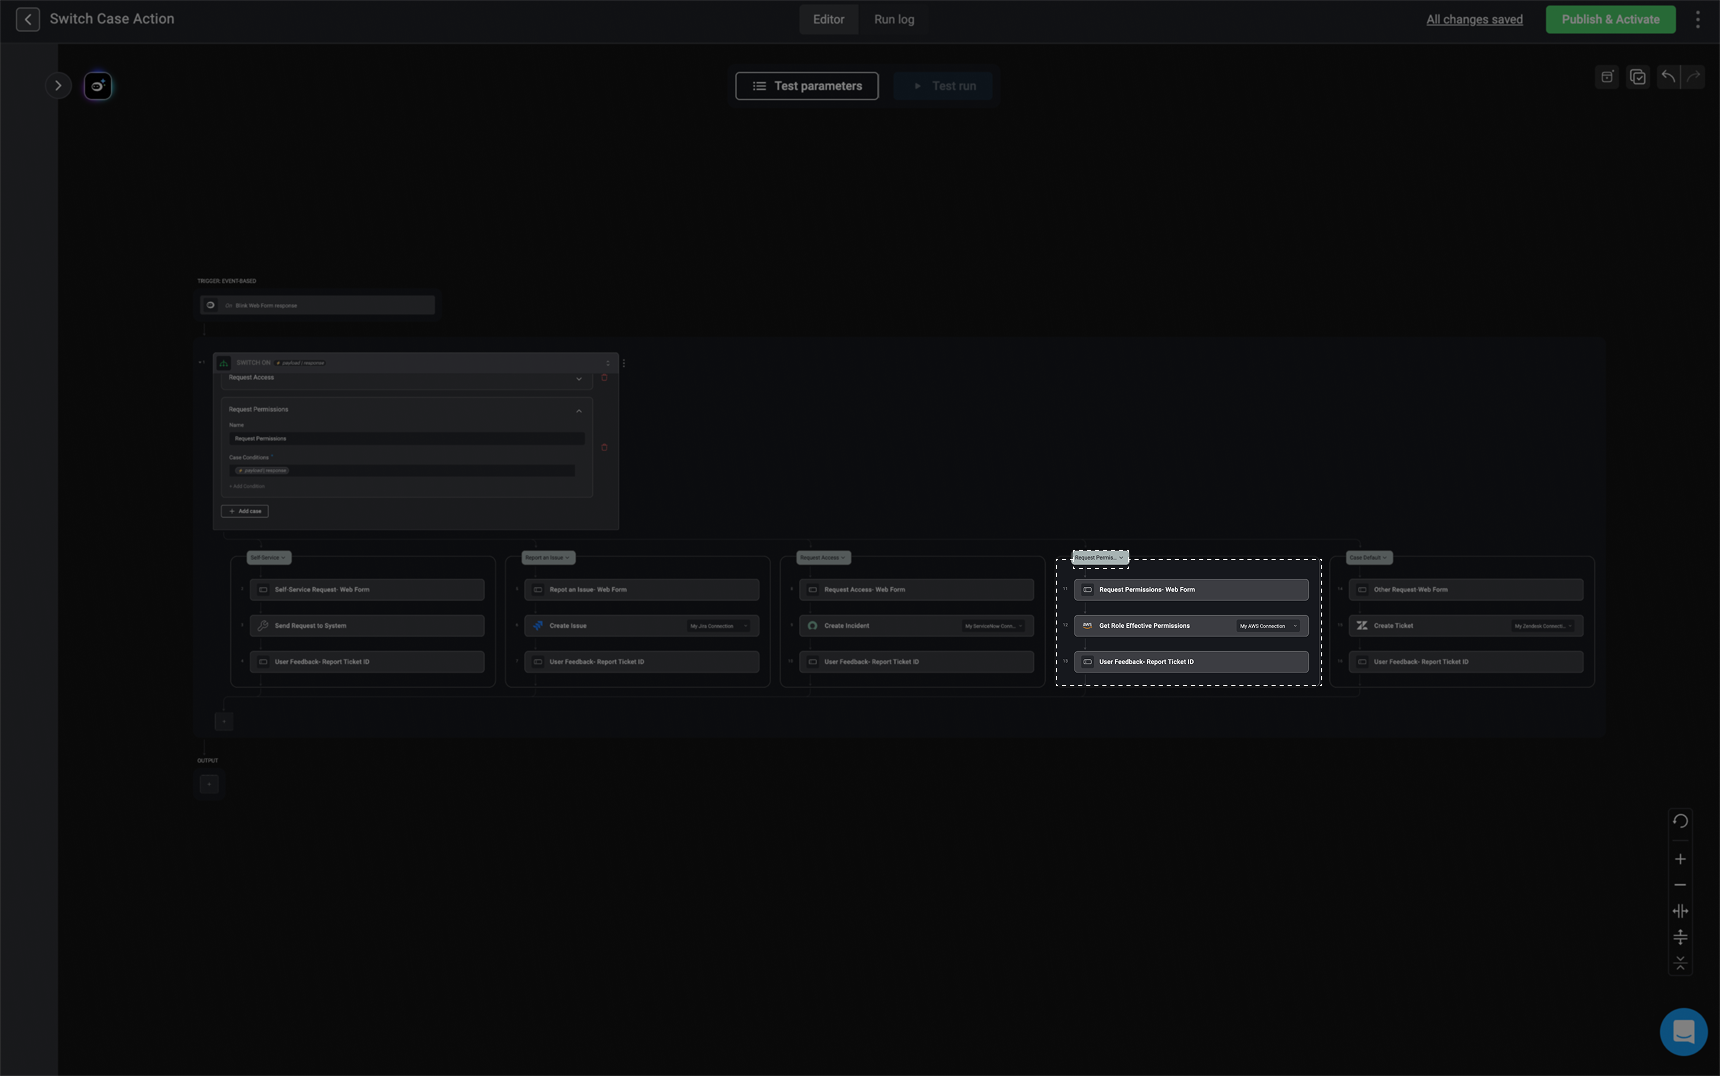 ### Overview
In the provided workflow example, the **Switch case** action is used to implement conditional branching based on the incoming data from the **Blink Web Form response** trigger. It allows the workflow to take different paths depending on the value of a specified variable or condition.
### Overview
In the provided workflow example, the **Switch case** action is used to implement conditional branching based on the incoming data from the **Blink Web Form response** trigger. It allows the workflow to take different paths depending on the value of a specified variable or condition.
 ### **Workflow Logic with `Switch Case` Action**
1. **Switch Case Action:**
* The workflow starts with a **Switch case** action that evaluates the user input from the [web form](/docs/blink-platform/web-form/web-form) response.
2. **Case 1: Self-Service Actions**
* If the web form submission indicates a self-service request, the workflow processes it by sending the request to the appropriate system and logging user feedback.
3. **Case 2: Report an Issue**
* If the submission is about reporting an issue, the workflow logs the report, creates an issue in Jira, and captures user feedback.
4. **Case 3: Request Access**
* If the submission is about requesting access, the workflow opens a ticket in ServiceNow with the request details, and captures user feedback.
5. **Default Case:**
* If the request does not match any specific case, the workflow treats it as a general request, creates a ticket in Zendesk, and logs user feedback.
***
## Loop Through
### **Workflow Logic with `Switch Case` Action**
1. **Switch Case Action:**
* The workflow starts with a **Switch case** action that evaluates the user input from the [web form](/docs/blink-platform/web-form/web-form) response.
2. **Case 1: Self-Service Actions**
* If the web form submission indicates a self-service request, the workflow processes it by sending the request to the appropriate system and logging user feedback.
3. **Case 2: Report an Issue**
* If the submission is about reporting an issue, the workflow logs the report, creates an issue in Jira, and captures user feedback.
4. **Case 3: Request Access**
* If the submission is about requesting access, the workflow opens a ticket in ServiceNow with the request details, and captures user feedback.
5. **Default Case:**
* If the request does not match any specific case, the workflow treats it as a general request, creates a ticket in Zendesk, and logs user feedback.
***
## Loop Through
The loop through action executes an action or multiple actions for each element in a list.
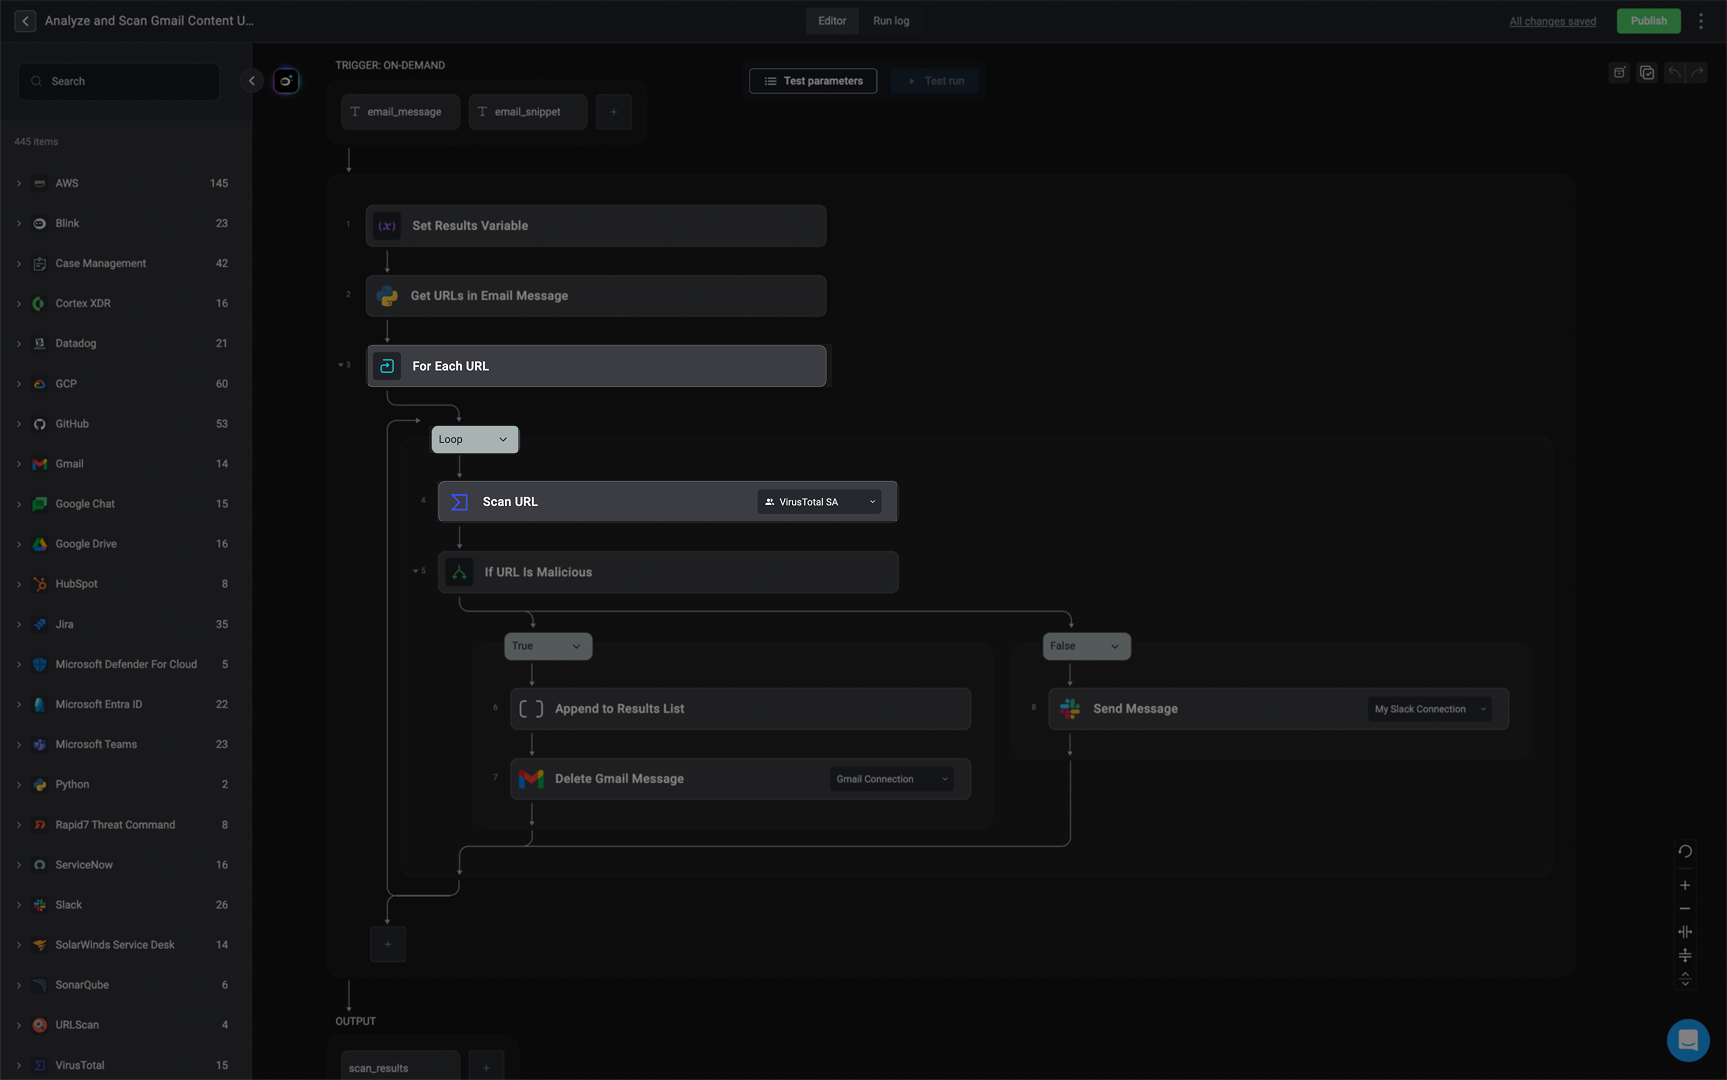 ### **Workflow Logic with Loop Action**
The loop action iterates over each URL extracted from the email. Here’s how it works:
1. **Extract URLs** – The workflow retrieves all URLs from the email.
2. **Loop on Each URL** – The loop action takes each URL one by one and processes it through the following steps:
* **Scan URL** – The URL is checked using a security service (e.g., VirusTotal).
* **If Malicious** – A condition checks if the scan result marks the URL as malicious.
* **Notify & Delete** – If malicious, the workflow notifies a designated channel (e.g., Slack) and deletes the email from Gmail.
## While Loop
### **Workflow Logic with Loop Action**
The loop action iterates over each URL extracted from the email. Here’s how it works:
1. **Extract URLs** – The workflow retrieves all URLs from the email.
2. **Loop on Each URL** – The loop action takes each URL one by one and processes it through the following steps:
* **Scan URL** – The URL is checked using a security service (e.g., VirusTotal).
* **If Malicious** – A condition checks if the scan result marks the URL as malicious.
* **Notify & Delete** – If malicious, the workflow notifies a designated channel (e.g., Slack) and deletes the email from Gmail.
## While Loop
The **'While'** action enables you to run an action or multiple actions for as long as specified conditions are met.
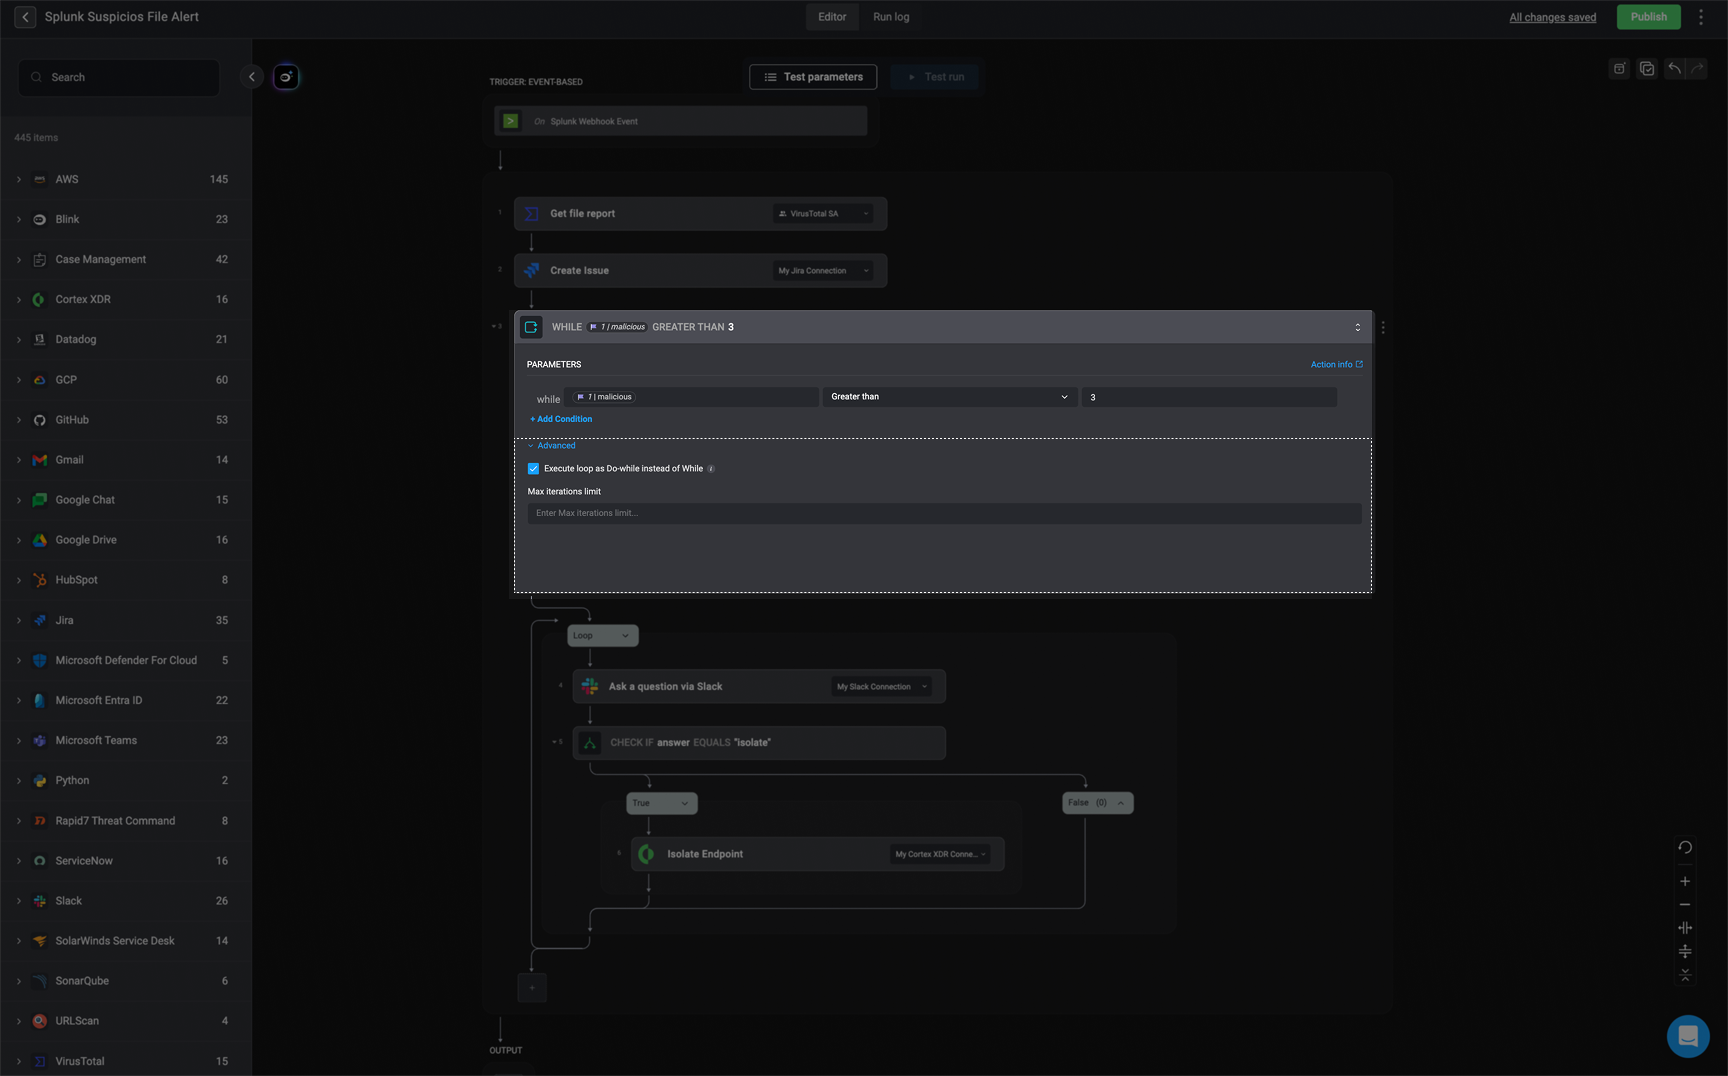 ### Overview
This **Splunk Suspicious File Alert** workflow automates threat response by analyzing potentially malicious files detected by Splunk, creating a Jira issue, and checking VirusTotal for threat intelligence. If a file has more than three malicious detections, it prompts a security analyst via Slack to decide whether to isolate the affected endpoint using Cortex XDR.
### Overview
This **Splunk Suspicious File Alert** workflow automates threat response by analyzing potentially malicious files detected by Splunk, creating a Jira issue, and checking VirusTotal for threat intelligence. If a file has more than three malicious detections, it prompts a security analyst via Slack to decide whether to isolate the affected endpoint using Cortex XDR.
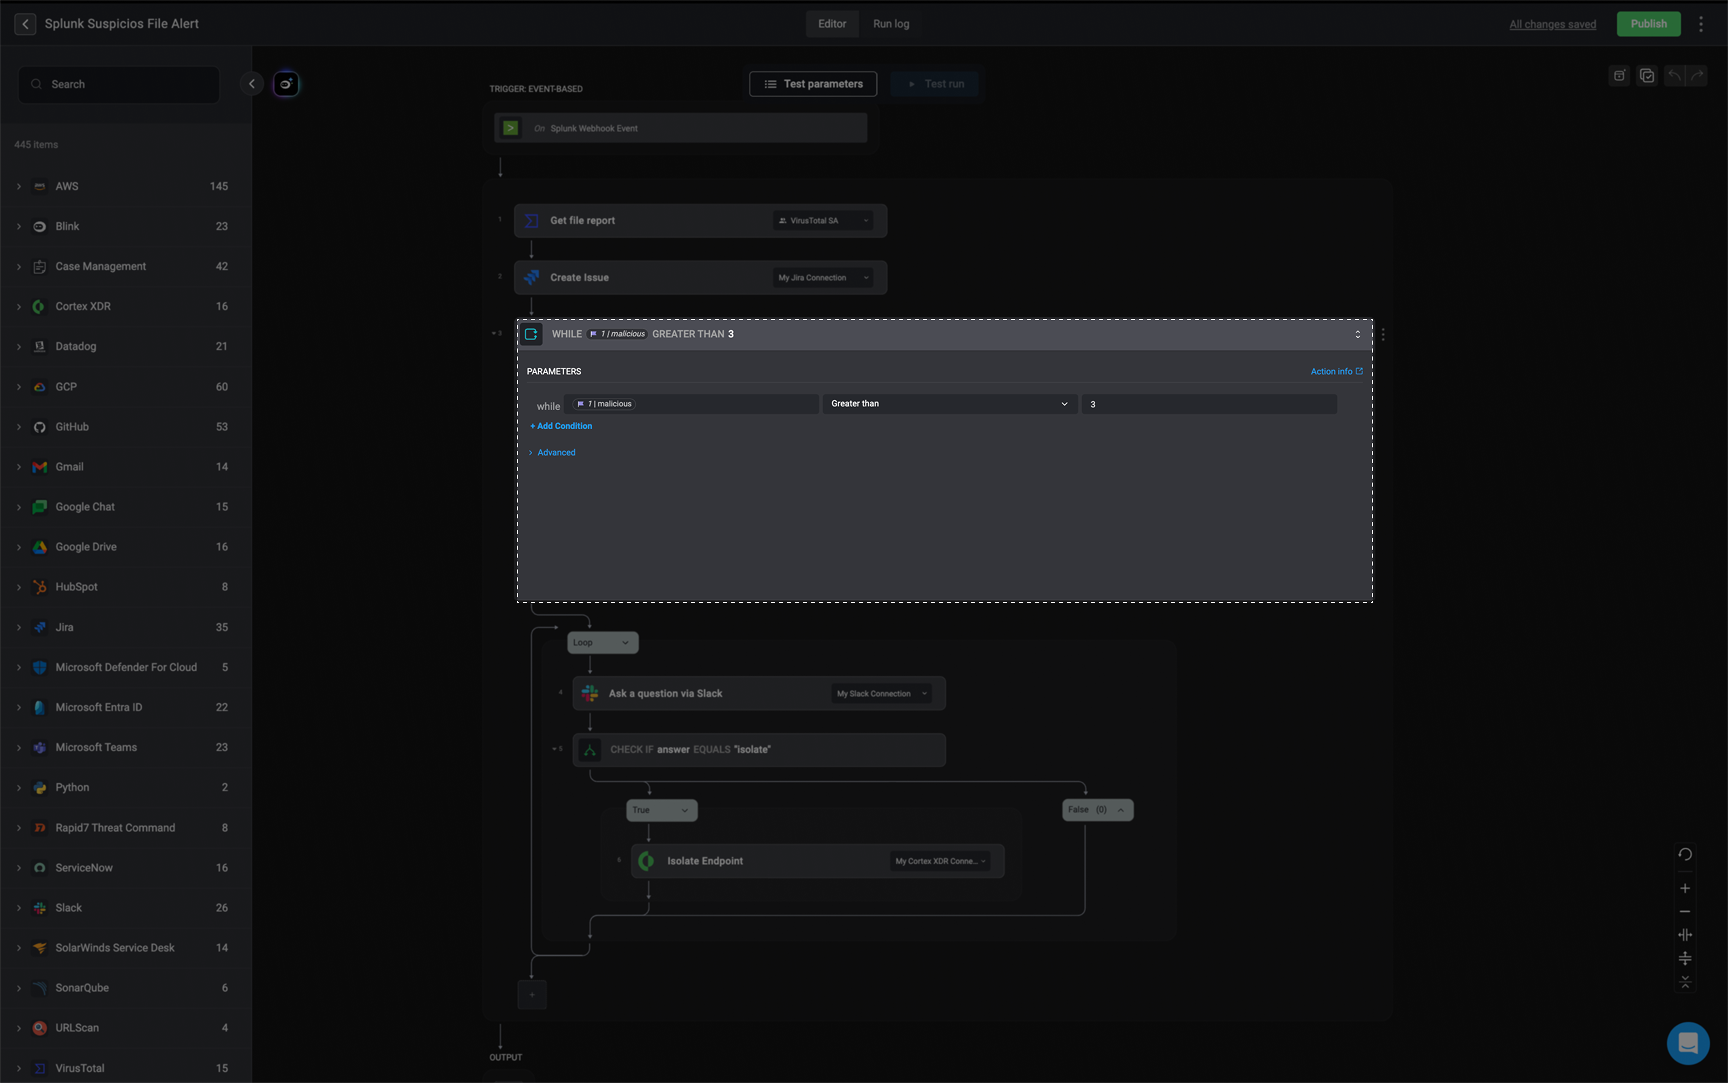 ### **Workflow Logic with `While` Action**
The while loop in the workflow is configured with the condition:
**If "malicious" is greater than 3, continue looping.**
* This means the workflow will repeatedly check if the number of malicious detections in the file report (from VirusTotal) exceeds 3. If this condition holds true, the loop will continue executing the steps inside it.
**Inside the loop:**
* A Slack message is sent to ask a question.
* If the answer equals "Isolate", the endpoint is isolated using Cortex XDR.
***
## Wait
### **Workflow Logic with `While` Action**
The while loop in the workflow is configured with the condition:
**If "malicious" is greater than 3, continue looping.**
* This means the workflow will repeatedly check if the number of malicious detections in the file report (from VirusTotal) exceeds 3. If this condition holds true, the loop will continue executing the steps inside it.
**Inside the loop:**
* A Slack message is sent to ask a question.
* If the answer equals "Isolate", the endpoint is isolated using Cortex XDR.
***
## Wait
The **'Wait'** Action pauses the workflow for a set time before continuing to run the rest of the workflow. You can specify the wait time in **seconds, minutes, or hours**.
| Variable type | Default value | |
| ------------- | -------------------------------------------------------------------------------------------------------------------------------------------------------------------------------------------------------------- | - |
| Wait For | 1. [Time Interval](#wait-for-time-interval), 2. [Workflow Execution](#wait-for-workflow-execution), 3. [Web Form Response](#wait-for-web-form-response) or 4. [Callback Response](#wait-for-callback-response) | |
| Timeout | The time value- when reached, the step is completed and the workflow will continue | |
| Time Unit | Seconds, Minutes, or Hours. | |
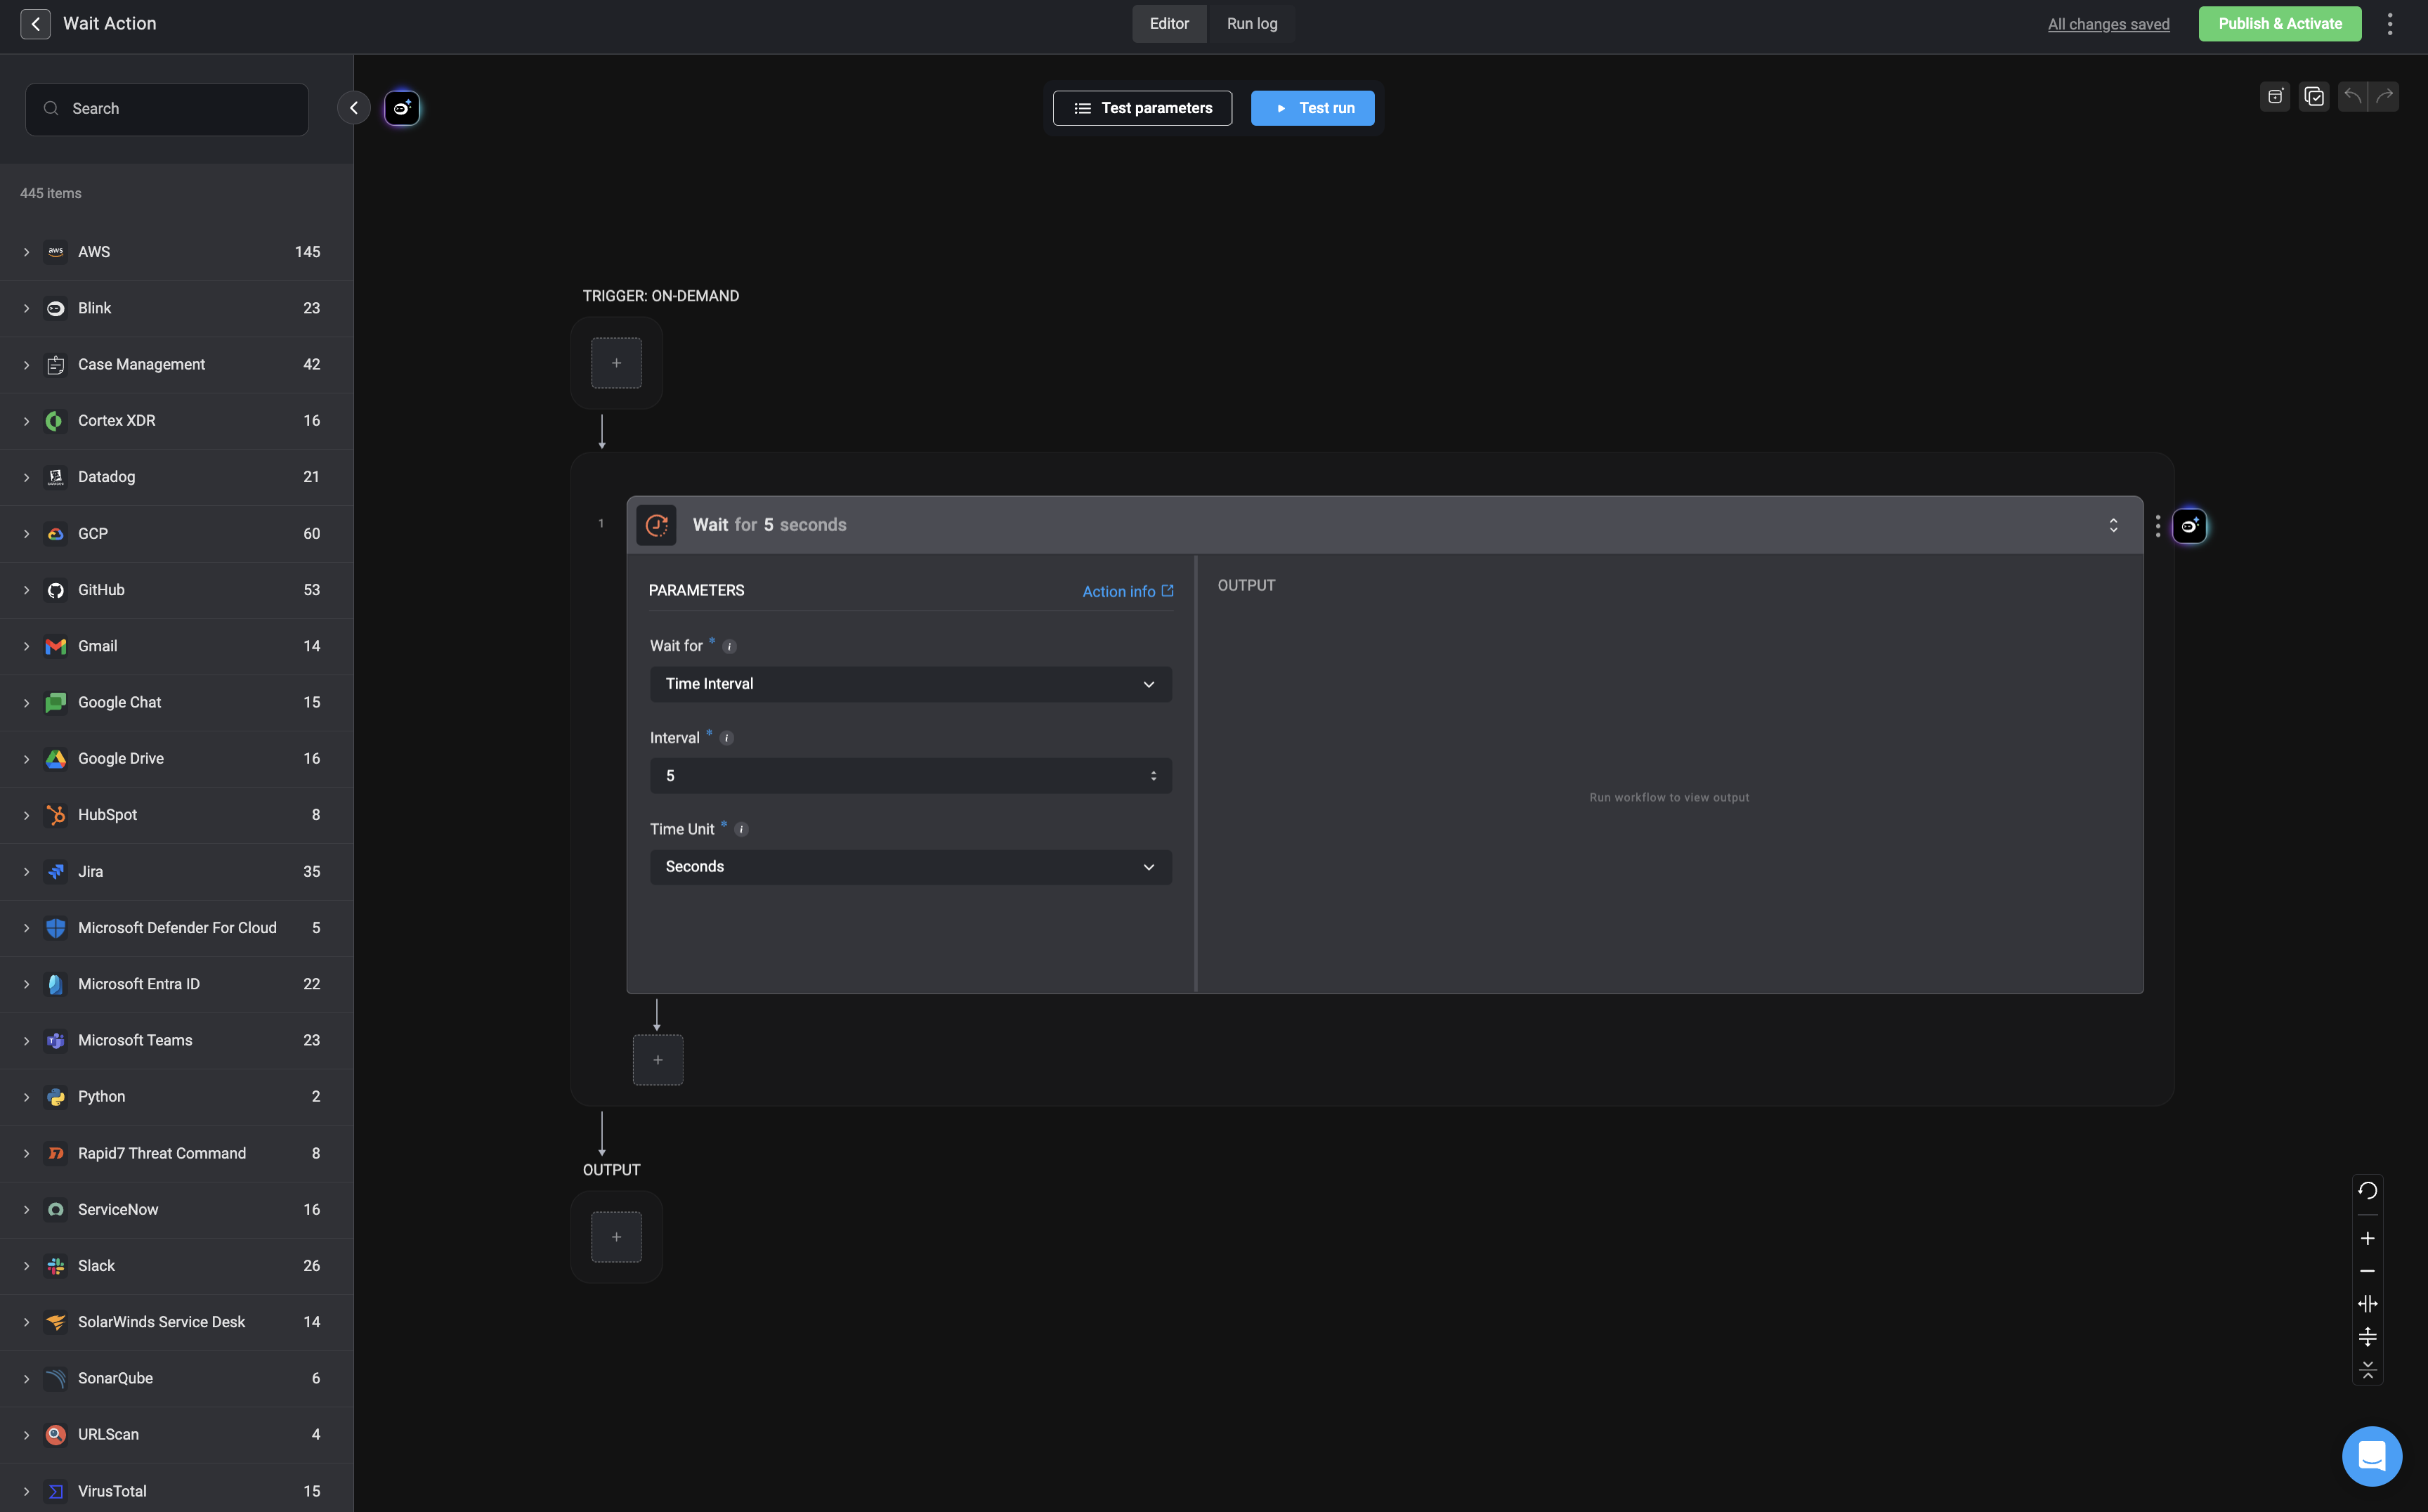 This is the default mode for the *Wait Action*. It directs the Workflow to wait a specified amount of time until it continues running. When configuring the step, specify the number of seconds, minutes or hours to wait.
This mode enables you to wait for steps in your Workflow that execute other workflows asynchronously. The step is paused until all the executions it is waiting for, have finished running. The output of the Wait Action will return details of the executions it is waiting for.
The mode is used with the [New Web Form Action](/docs/blink-platform/web-form) to pause the workflow until a response from a user is submitted through the web form. This ensures the workflow proceeds only after the necessary input is received.
This mode is used together with the [Generate Callback URL](/docs/workflows/building-workflows/actions/basic-actions/http-actions/generate-callback-url) action. It pauses the workflow until the external service completes its process and sends back the required data, allowing the workflow to resume once a response is received.
* In the **Wait** step, under the **Callback URL's** parameter, users should provide a single callback URL or a comma-separated list of URLs to wait for.
* The **Wait** action completes only after all specified callback URLs have responded.
***
## Set Variables
This is the default mode for the *Wait Action*. It directs the Workflow to wait a specified amount of time until it continues running. When configuring the step, specify the number of seconds, minutes or hours to wait.
This mode enables you to wait for steps in your Workflow that execute other workflows asynchronously. The step is paused until all the executions it is waiting for, have finished running. The output of the Wait Action will return details of the executions it is waiting for.
The mode is used with the [New Web Form Action](/docs/blink-platform/web-form) to pause the workflow until a response from a user is submitted through the web form. This ensures the workflow proceeds only after the necessary input is received.
This mode is used together with the [Generate Callback URL](/docs/workflows/building-workflows/actions/basic-actions/http-actions/generate-callback-url) action. It pauses the workflow until the external service completes its process and sends back the required data, allowing the workflow to resume once a response is received.
* In the **Wait** step, under the **Callback URL's** parameter, users should provide a single callback URL or a comma-separated list of URLs to wait for.
* The **Wait** action completes only after all specified callback URLs have responded.
***
## Set Variables
The set variables Action enables users to define variables and use them in the execution of the Workflow.
| Variable Type | Default value | Notes |
| ------------- | ------------- | ------------------------------------------------------------------------------------------------------------------------------------------------------------------------------------------------------------------------------------------------------------------------------------------------------------------------------------------------------------------------------------------------------------------------------------------------------------------------------------------------------------------------------------------------------------------------------------------------------ |
| Numeric | 0 | |
| String | "" | |
| List | \[] | Lists can be comma-separated or in `JSON` list format. |
| Boolean | false | When defining a Boolean-type variable, the Blink supports multiple input formats to represent `true` and `false`.
The following values are interpreted as **true**:
- `true`/`TRUE`/ `True`
- `1`
- `t` / `T`
The following values are interpreted as **false**:
- `false`/ `FALSE`/ `False`
- `0`
- `f` / `F`
- If no value is provided (i.e., the field is left blank), it is automatically interpreted as **false** by default. This normalization ensures consistent Boolean handling regardless of input format.
|
 The **'Set Variable'** action allows you to store and reuse values in different parts of your workflow, depending on how you configure it.
In the following workflow use case example, we assign a variable to store the name of a Slack channel (type: string). This variable is then referenced in two actions:
In the [Ask a Question Via Slack](/docs/workflows/building-workflows/actions/advanced-actions/interactive-actions/ask-a-question/ask-a-question-slack) action (Step 1), where it is used in the "To" parameter to specify the recipient channel.
In the [Send Slack Message](/docs/workflows/building-workflows/actions/advanced-actions/interactive-actions/slack-interactivity) action (step 9), where it is reused to send a message to the same channel.
***
## Note
The **'Set Variable'** action allows you to store and reuse values in different parts of your workflow, depending on how you configure it.
In the following workflow use case example, we assign a variable to store the name of a Slack channel (type: string). This variable is then referenced in two actions:
In the [Ask a Question Via Slack](/docs/workflows/building-workflows/actions/advanced-actions/interactive-actions/ask-a-question/ask-a-question-slack) action (Step 1), where it is used in the "To" parameter to specify the recipient channel.
In the [Send Slack Message](/docs/workflows/building-workflows/actions/advanced-actions/interactive-actions/slack-interactivity) action (step 9), where it is reused to send a message to the same channel.
***
## Note
The 'Note' action provides a [rich text editor](/docs/blink-platform/interface-components/rich-text-editor) that allows you to add helpful instructions, explanations, or contextual guidance for end-users within a Workflow. The text editor supports Markdown (`md`) syntax. This action is useful for adding clarity to complex workflows, ensuring users understand the next steps or any important details.
 ***
## Run - On Error
***
## Run - On Error
The **Run - On Error** action is used to handle errors that might occur during the execution of a workflow. It utilizes a dual-step structure, consisting of **Run** and **On Error**, designed to efficiently manage any errors that might arise while executing actions within the **Run** phase.
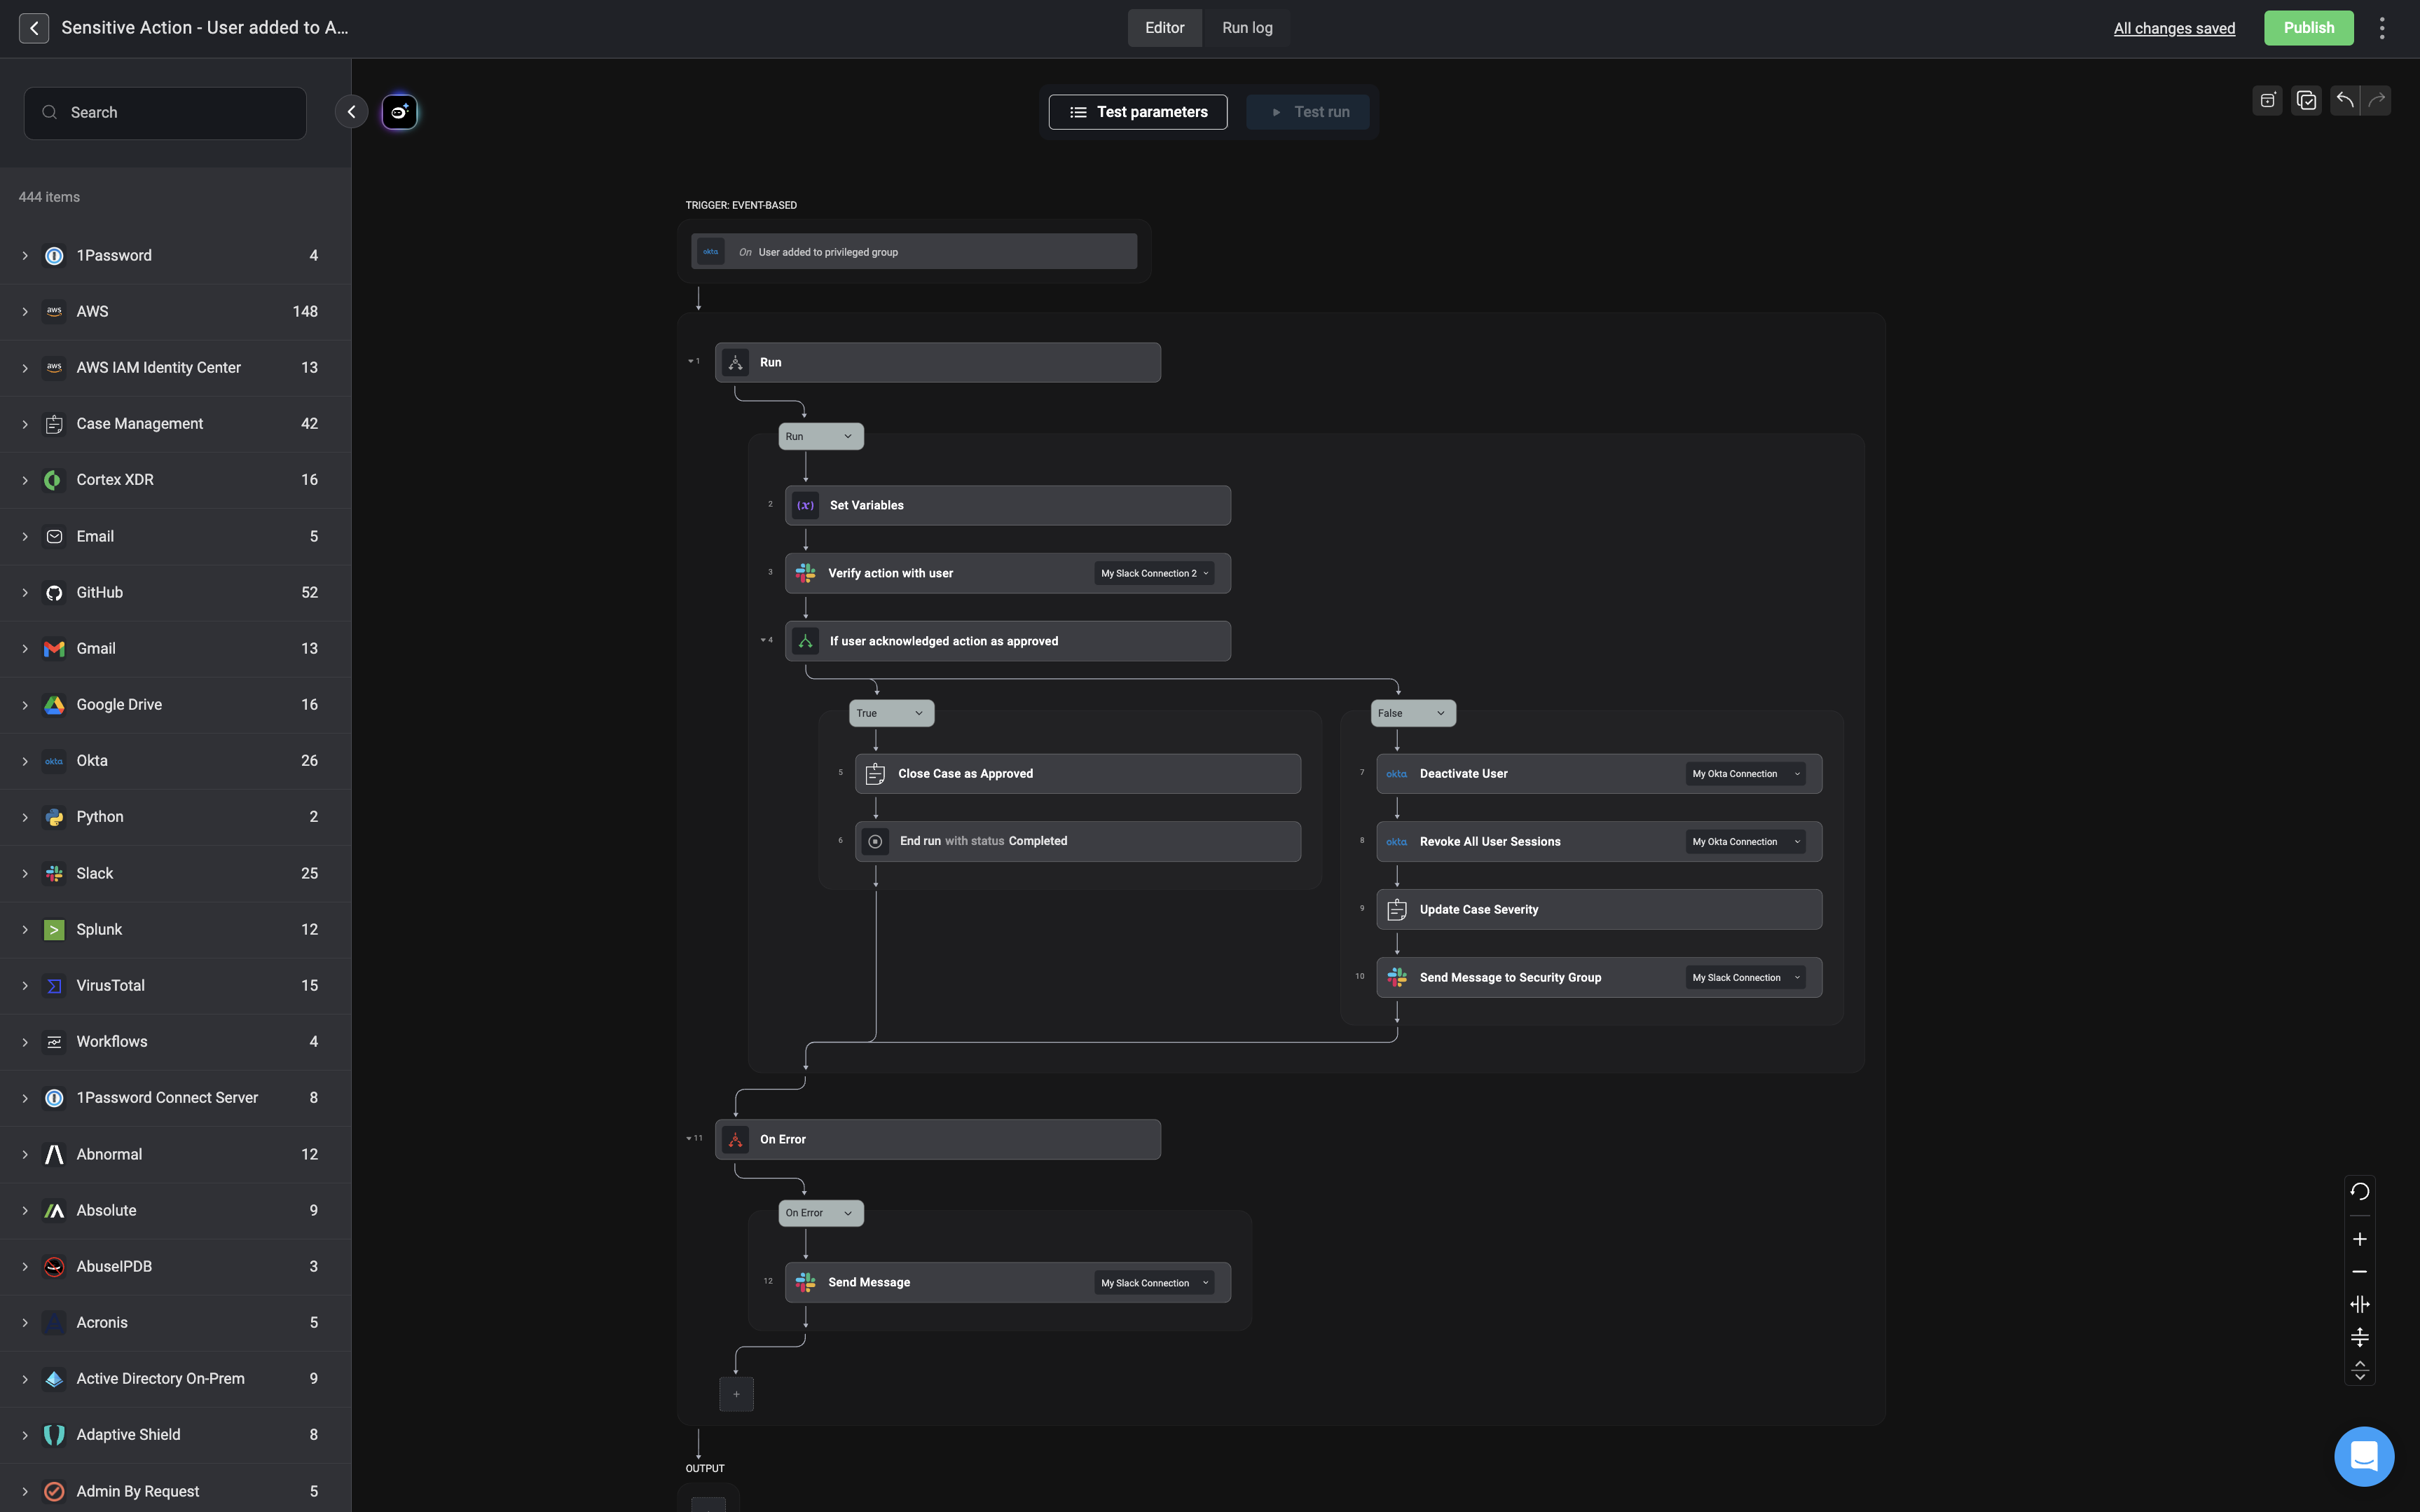 ### **Workflow Logic with `Run - On Error` Action**
1. The workflow is triggered when a new user is added to a group in Okta.
2. It retrieves the user's email and asks an administrator (via Slack) if they authorized the action.
3. If the admin denies responsibility, the workflow deactivates the user in Okta and notifies the security team.
4. The **On Error** statement is a fail-safe mechanism that catches any unexpected issues (e.g., API failures, Slack/Okta connection issues, or execution errors).
5. If an error occurs at any step, it sends a notification to the security group via Slack, alerting them to unusual activity.
***
## End Run
### **Workflow Logic with `Run - On Error` Action**
1. The workflow is triggered when a new user is added to a group in Okta.
2. It retrieves the user's email and asks an administrator (via Slack) if they authorized the action.
3. If the admin denies responsibility, the workflow deactivates the user in Okta and notifies the security team.
4. The **On Error** statement is a fail-safe mechanism that catches any unexpected issues (e.g., API failures, Slack/Okta connection issues, or execution errors).
5. If an error occurs at any step, it sends a notification to the security group via Slack, alerting them to unusual activity.
***
## End Run
The End Run Action enables you to select the final status of an execution, **Completed** or **Failed**.
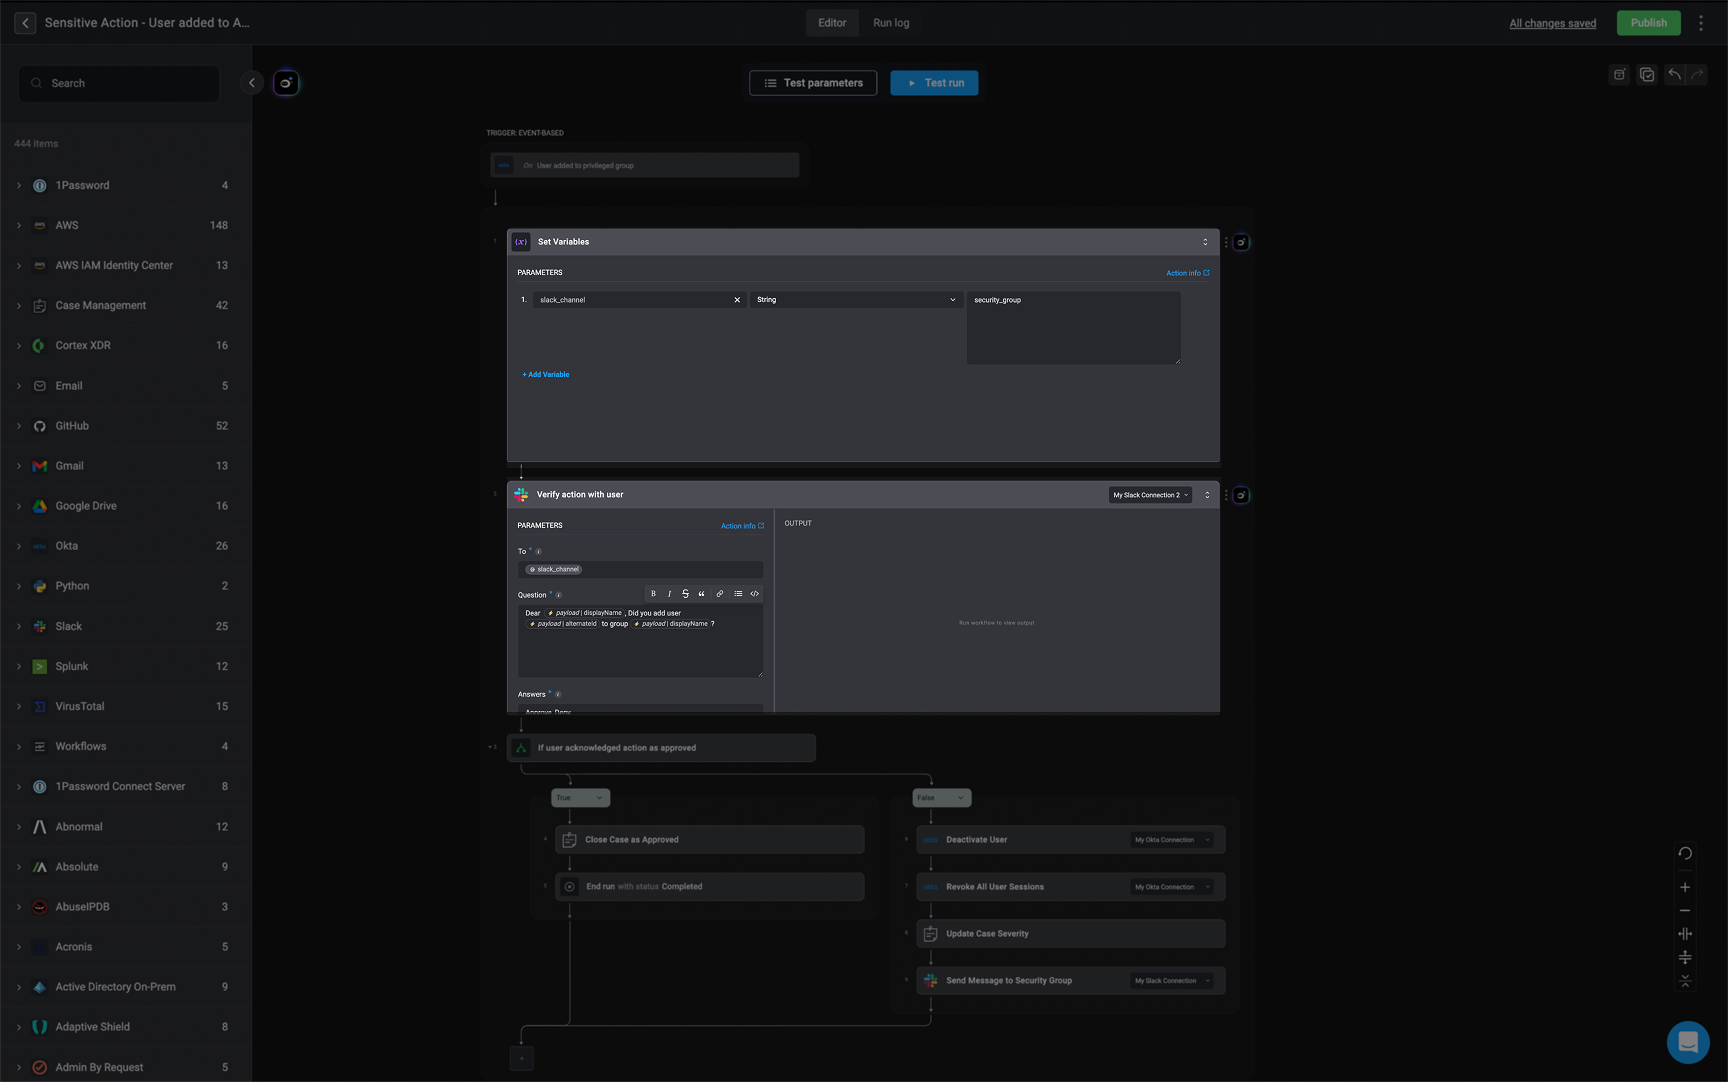
 ### **Workflow Logic with `End Run` Action**
1. **Set Variables**
Captures key information related to the event, such as the user details, group name, and timestamp.
2. **Verify Action with User**
Sends a Slack message to the affected user, prompting them to confirm whether the action was expected and authorized.
3. **Evaluate User Response**
A conditional check is used to determine if the user acknowledged the action as approved.
* **If the user approved the action:**
* **Close Case as Approved**
The incident is considered benign and marked as resolved.
* **End Run with Status: Completed**
Stops workflow execution and marks the run as successful.
* **If the user did not approve or did not respond:**
* **Deactivate User**
Disables the user's account in Okta.
* **Revoke All User Sessions**
Ends all active sessions for the user to prevent further access.
* **Update Case Severity**
Escalates the case severity level to reflect the potential risk.
* **Send Message to Security Group**
Notifies the security team via Slack about the unauthorized or unverified action.
***
### Purpose of the "End Run" Action
The **"End run with status Completed"** step ensures the workflow concludes cleanly when no further action is required. It provides a clear stopping point and records the successful resolution in logs and dashboards. This step is critical for reporting and distinguishes approved events from security incidents requiring follow-up.
### **Workflow Logic with `End Run` Action**
1. **Set Variables**
Captures key information related to the event, such as the user details, group name, and timestamp.
2. **Verify Action with User**
Sends a Slack message to the affected user, prompting them to confirm whether the action was expected and authorized.
3. **Evaluate User Response**
A conditional check is used to determine if the user acknowledged the action as approved.
* **If the user approved the action:**
* **Close Case as Approved**
The incident is considered benign and marked as resolved.
* **End Run with Status: Completed**
Stops workflow execution and marks the run as successful.
* **If the user did not approve or did not respond:**
* **Deactivate User**
Disables the user's account in Okta.
* **Revoke All User Sessions**
Ends all active sessions for the user to prevent further access.
* **Update Case Severity**
Escalates the case severity level to reflect the potential risk.
* **Send Message to Security Group**
Notifies the security team via Slack about the unauthorized or unverified action.
***
### Purpose of the "End Run" Action
The **"End run with status Completed"** step ensures the workflow concludes cleanly when no further action is required. It provides a clear stopping point and records the successful resolution in logs and dashboards. This step is critical for reporting and distinguishes approved events from security incidents requiring follow-up.