Adding a Custom HTML Widget
1
Open the Widget Menu
In the Edit Mode tab of the Dashboards Building Interface, click the “add a widget” button.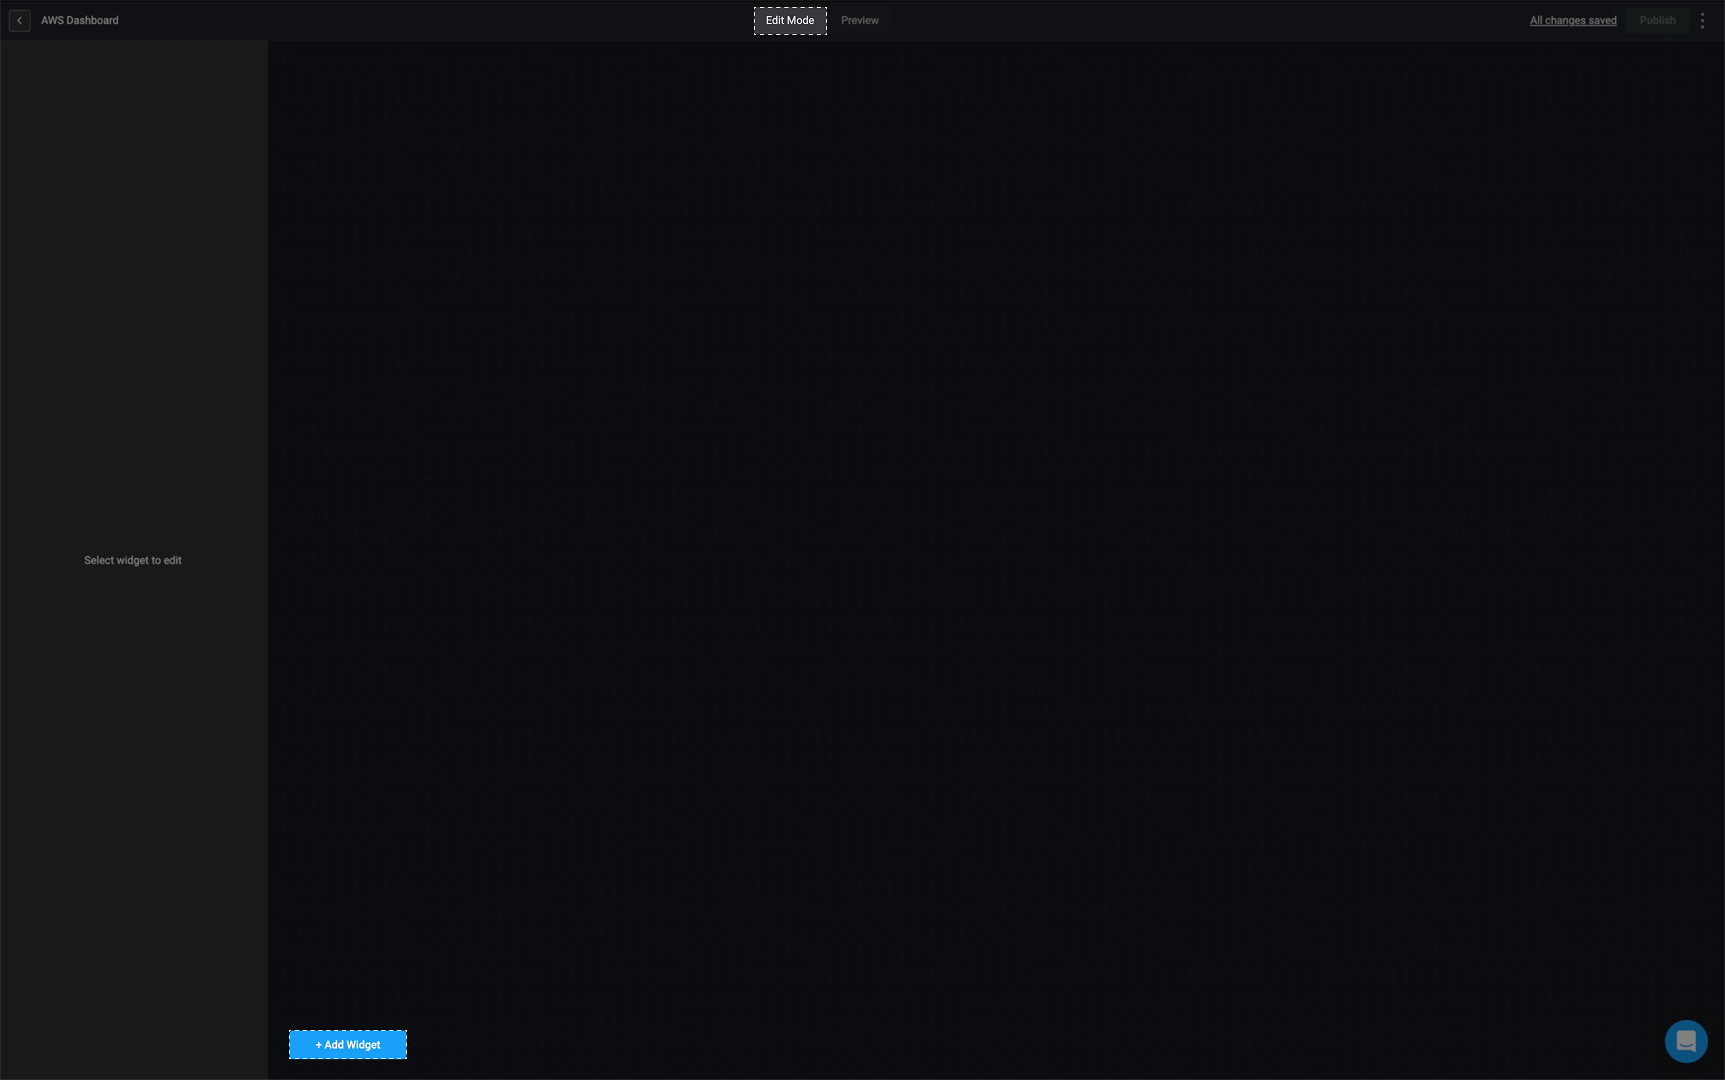
2
Select the Custom HTML Widget
Choose the Custom HTML option from the widget list.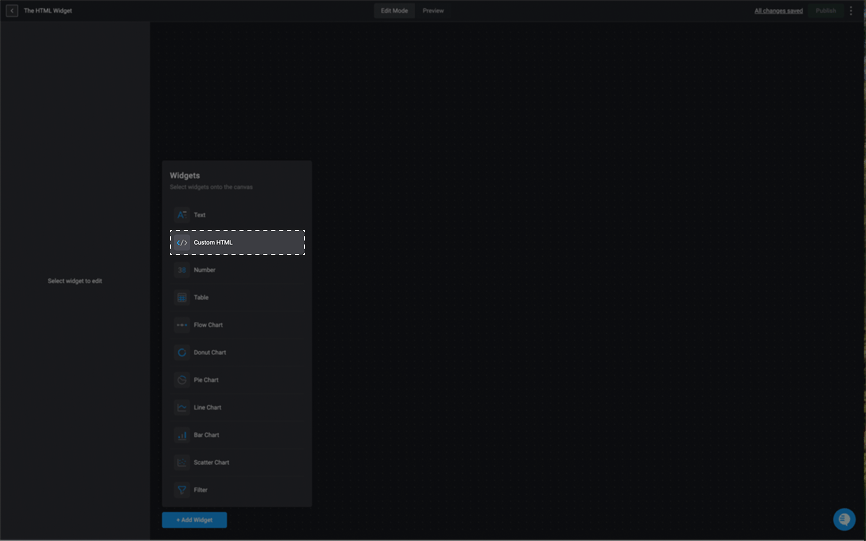
3
Rename the Widget
In the sidebar in the top left corner, double-click on Untitled widget and provide a name for the selected widget.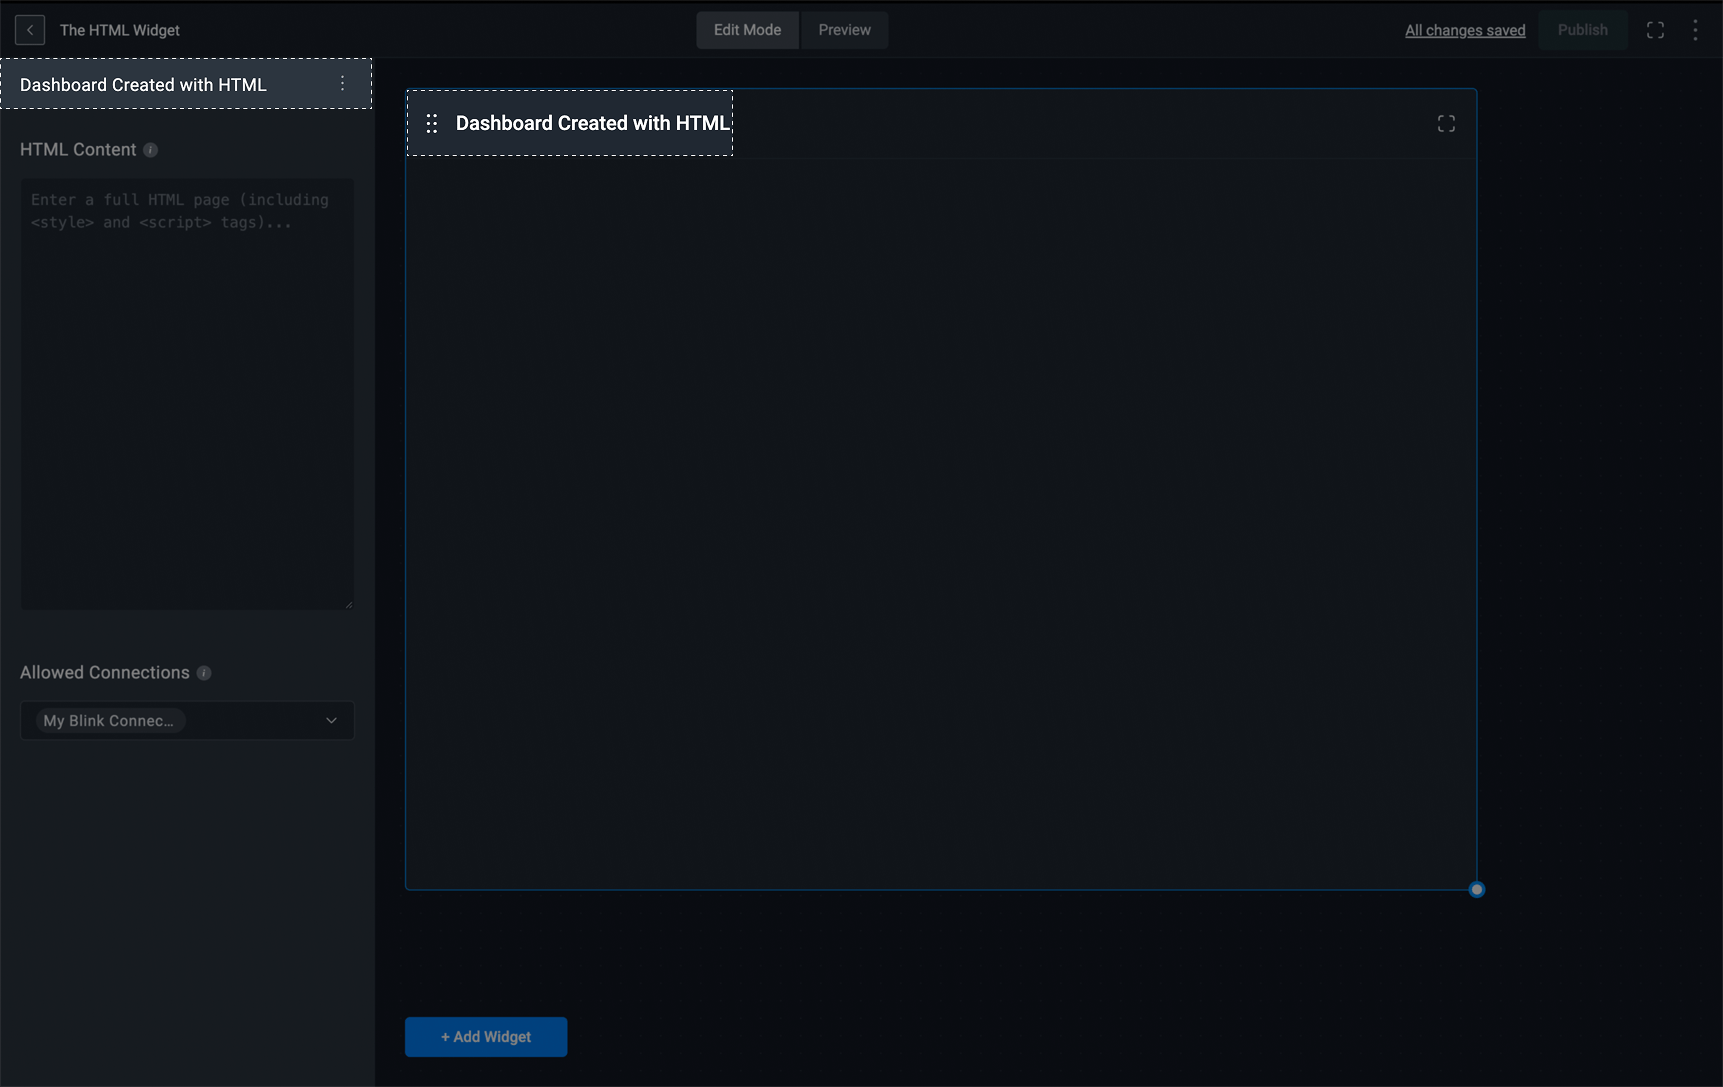
4
Add HTML Content
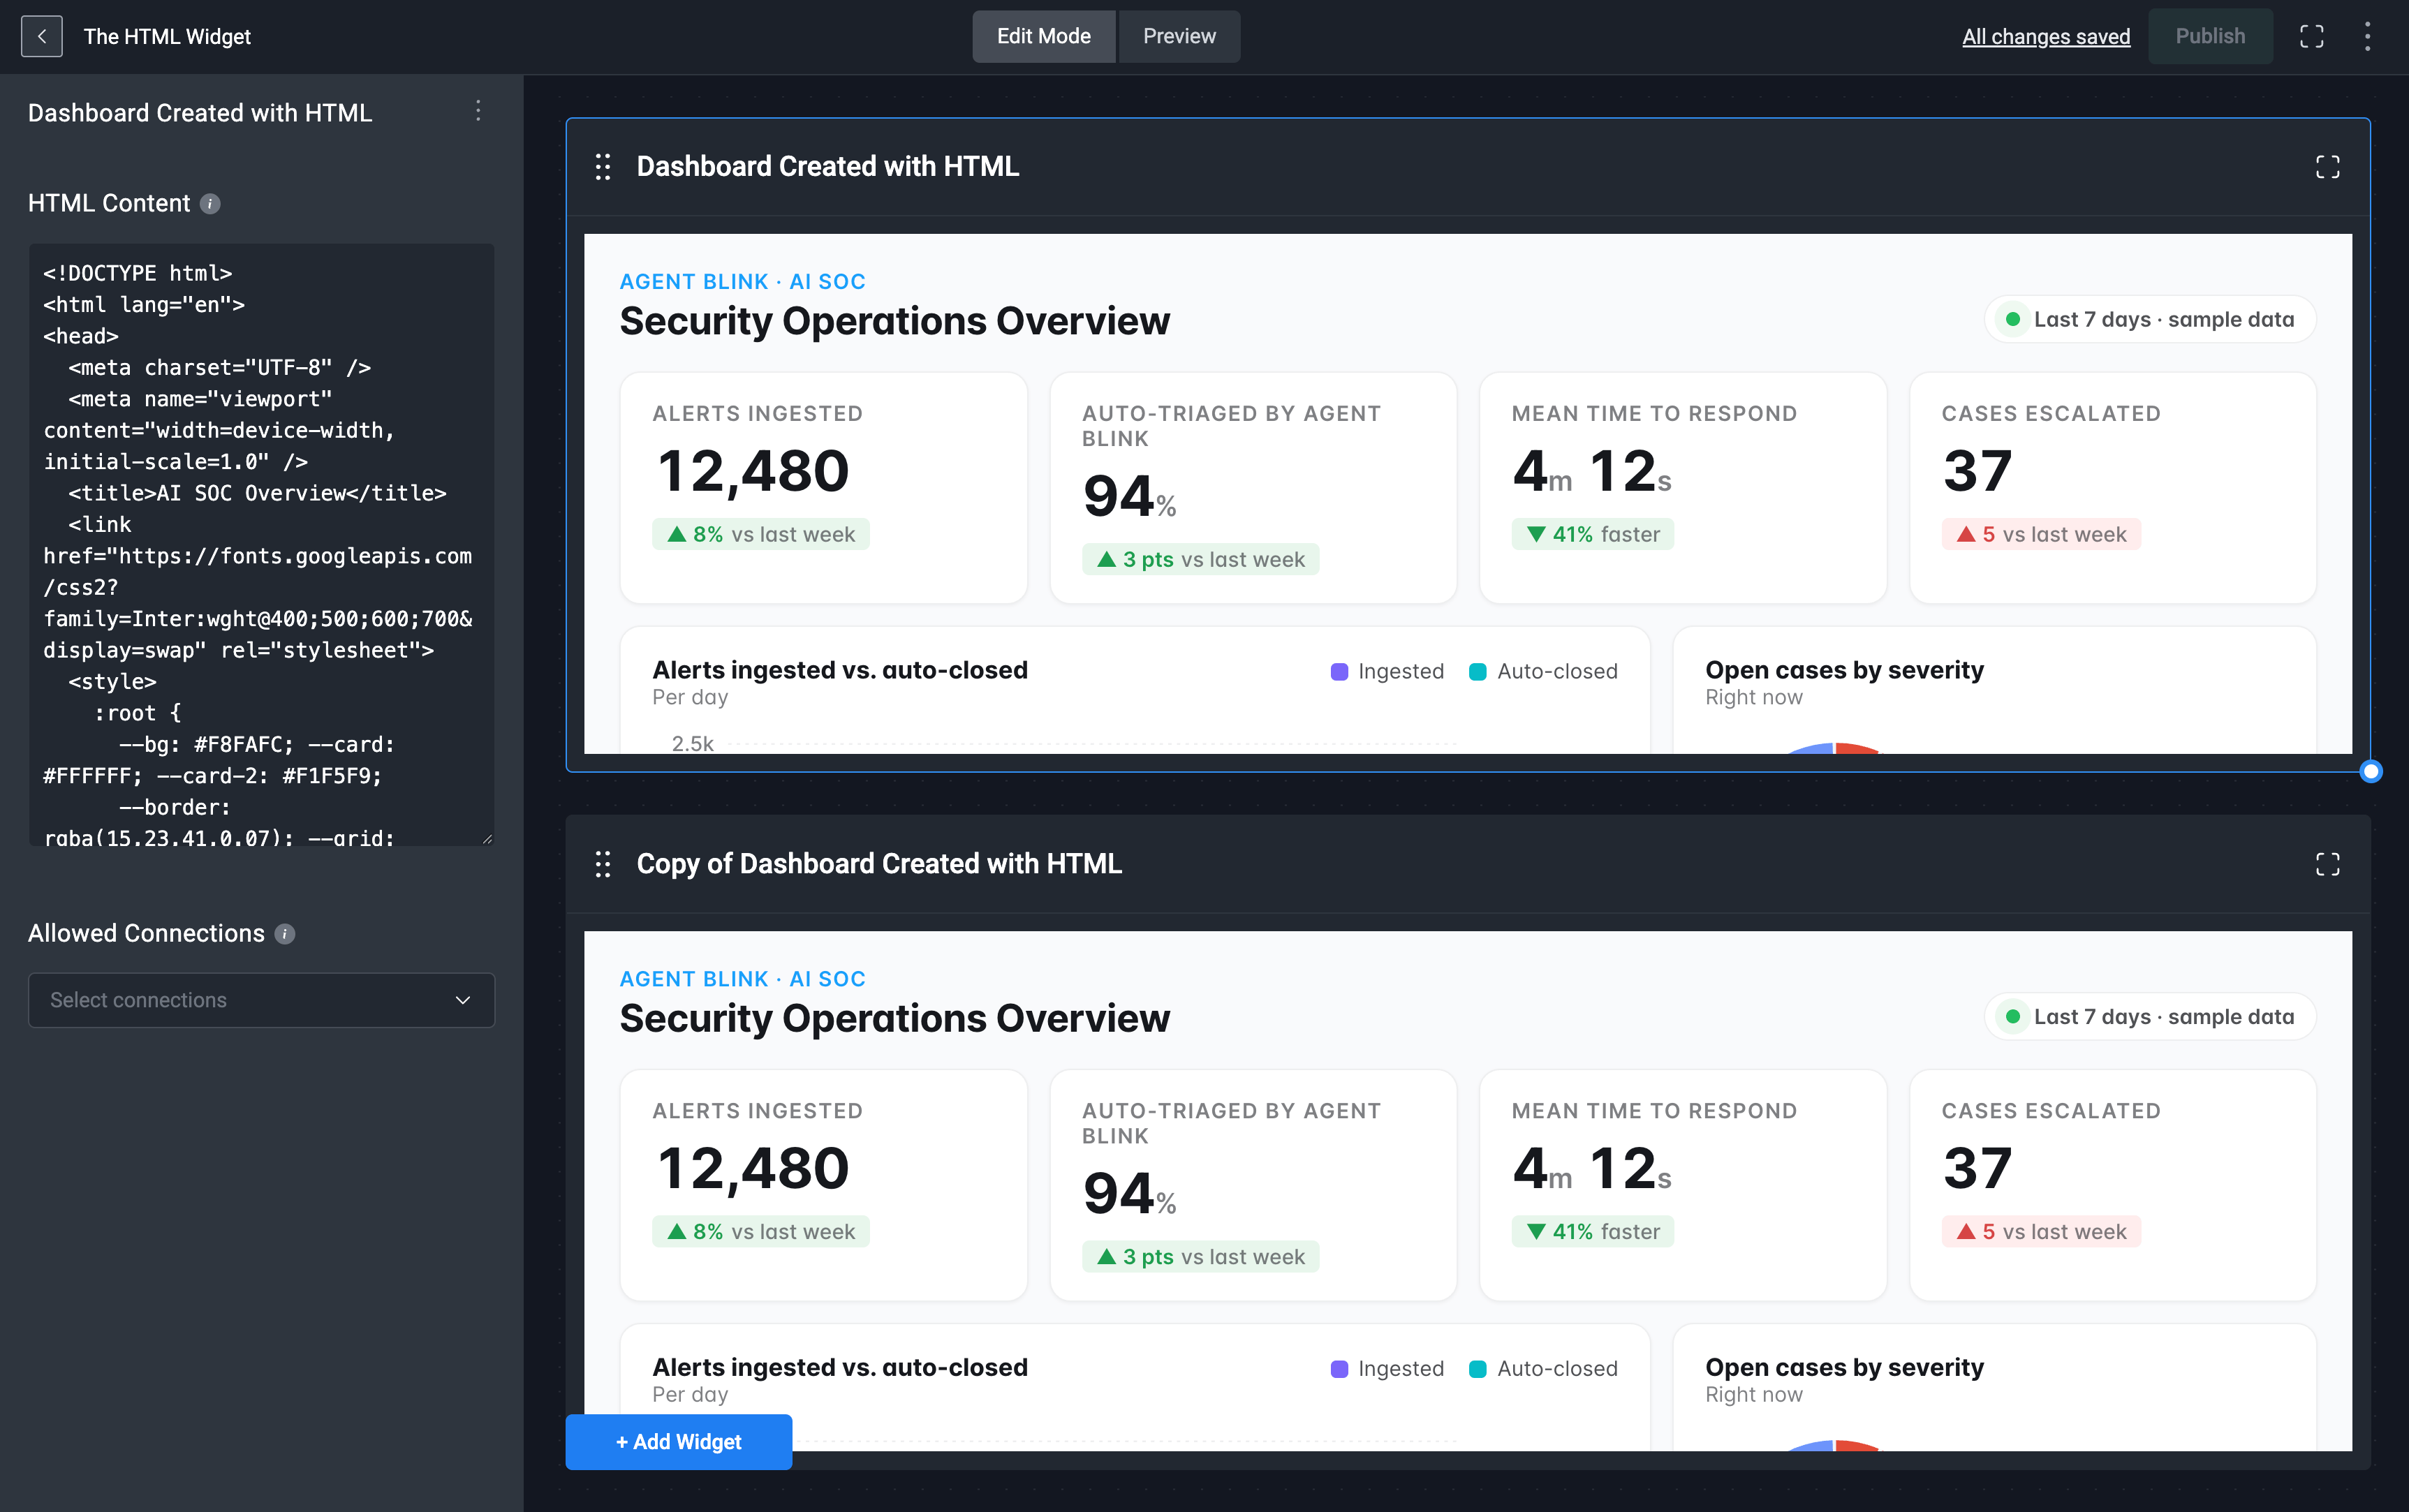
Enter your HTML content (including 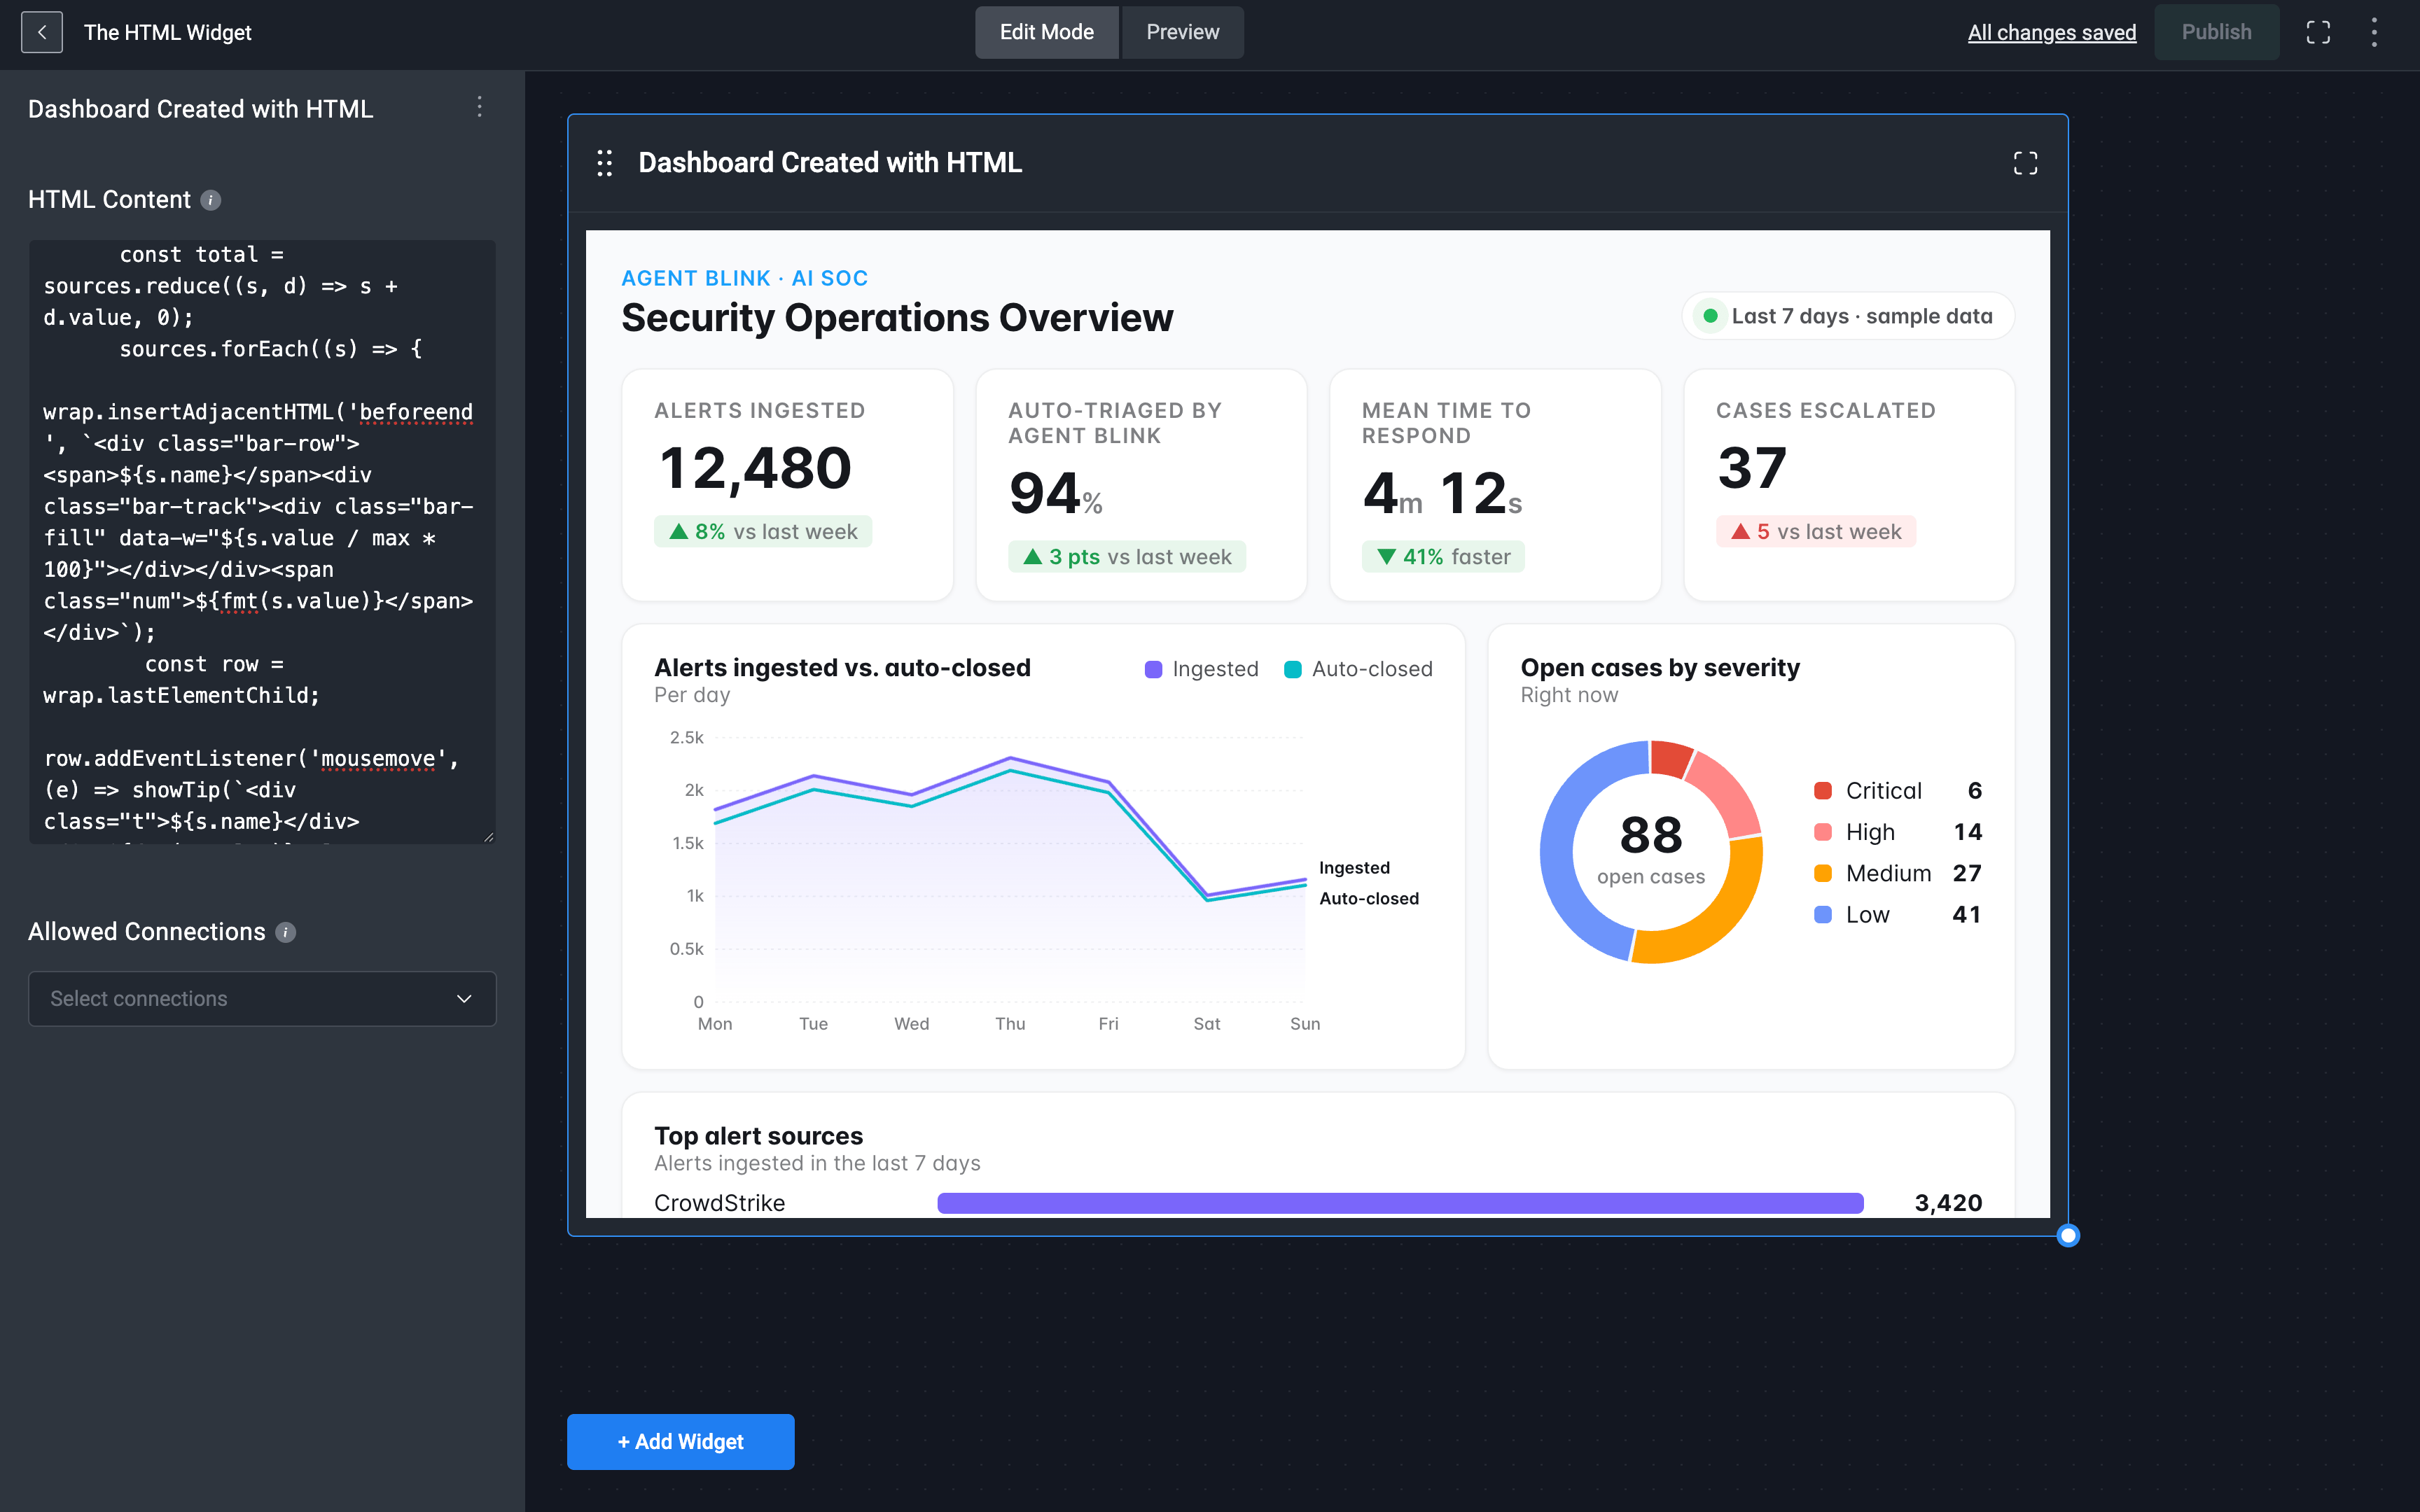
<script> and <styles> tag). The HTML you add will automatically appear in the HTML widget.
Select the icon in the top-right corner of the custom HTML widget to view it in full screen.Note:The HTML widget supports both static and dynamic HTML
If your HTML widget makes HTTP requests, see the next section, Making HTTP Requests in the Custom HTML Widget, to learn how it works.
Making HTTP Requests in the Custom HTML Widget
The Custom HTML Widget lets you make HTTP requests directly from your dashboard, either to Blink’s APIs or to third-party vendor APIs. For example, you can add a button that fetches data from a vendor and displays the response inside the widget.Note: To make HTTP requests, you must follow the configuration and syntax rules described below. Requests that don’t follow this exact format are ignored.
- Preview mode: requests only run when the dashboard is in Preview mode.
- A request message sent with
window.parent.postMessage(), with:type: 'html-widget:execute'- a unique
requestId - a
payloadcontainingurlandmethod
- A
messagelistener that checks fortype: 'html-widget:execute-result'and the matchingrequestId, and handles bothsuccessand failure.
connection: when the request needs to authenticate through one of your workspace connections, for example, to call a vendor’s API or Blink’s API. The connection must also be selected in the widget’s ‘Allowed Connections’ field. Requests to APIs that don’t need authentication can leave it out.Query parameters: when the endpoint accepts query parameters, such as filters, sorting, or paging, add them to the end of theurl, for example?sort=updated&per_page=10. There’s no separate field for query parameters.headers: when the endpoint expects extra headers, such as a specificAcceptorContent-Typevalue.body: when the method sends data, typicallyPOST,PUT, orPATCH. Always pass it as a JSON string.
- Your widget sends a request message to Blink using
window.parent.postMessage(), with the typehtml-widget:execute. - Blink executes the HTTP request. If the request includes a connection, Blink uses that connection to authenticate.
- Blink sends the result back to your widget as a message with the type
html-widget:execute-result. - Your widget listens for that message, matches it to the original request using the
requestId, and displays the result.
Configuration and Syntax Rules
Configuration and Syntax Rules
If your request uses a connection, complete the following steps. Requests that don’t use a connection, such as calls to public APIs that don’t require authentication, can skip these steps and leave 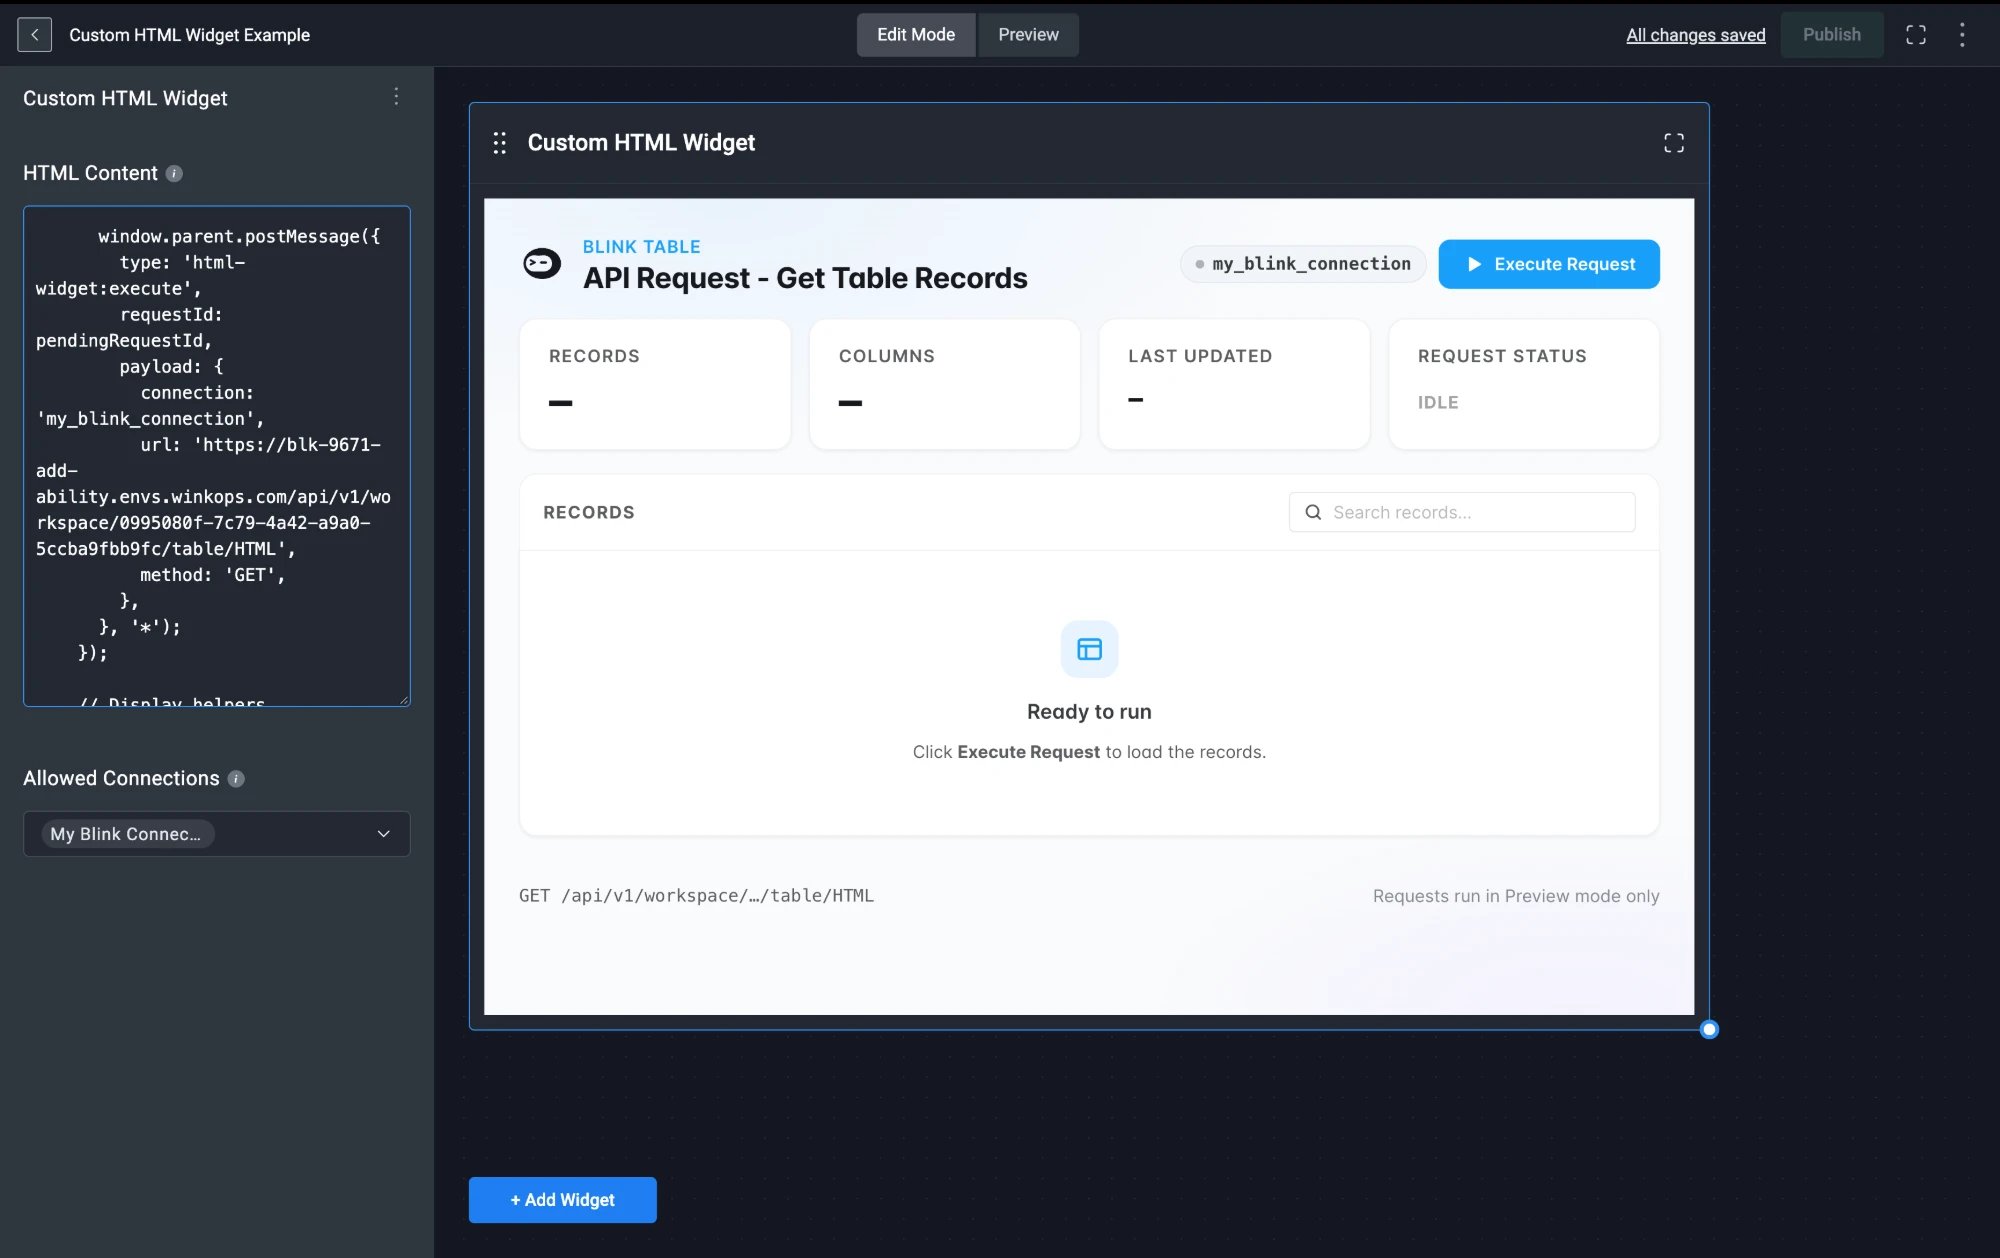
connection out of the payload.1
Create a Connection
Create a connection for the vendor you want to call (for example, GitHub) in your workspace. The connection provides the authentication for every request made through it.
2
Select the Connection in the Widget
In the widget’s sidebar, below HTML Content, open the Allowed Connections dropdown and select the connection you want the widget to use. You can search for a connection, and select more than one if your widget calls several vendors.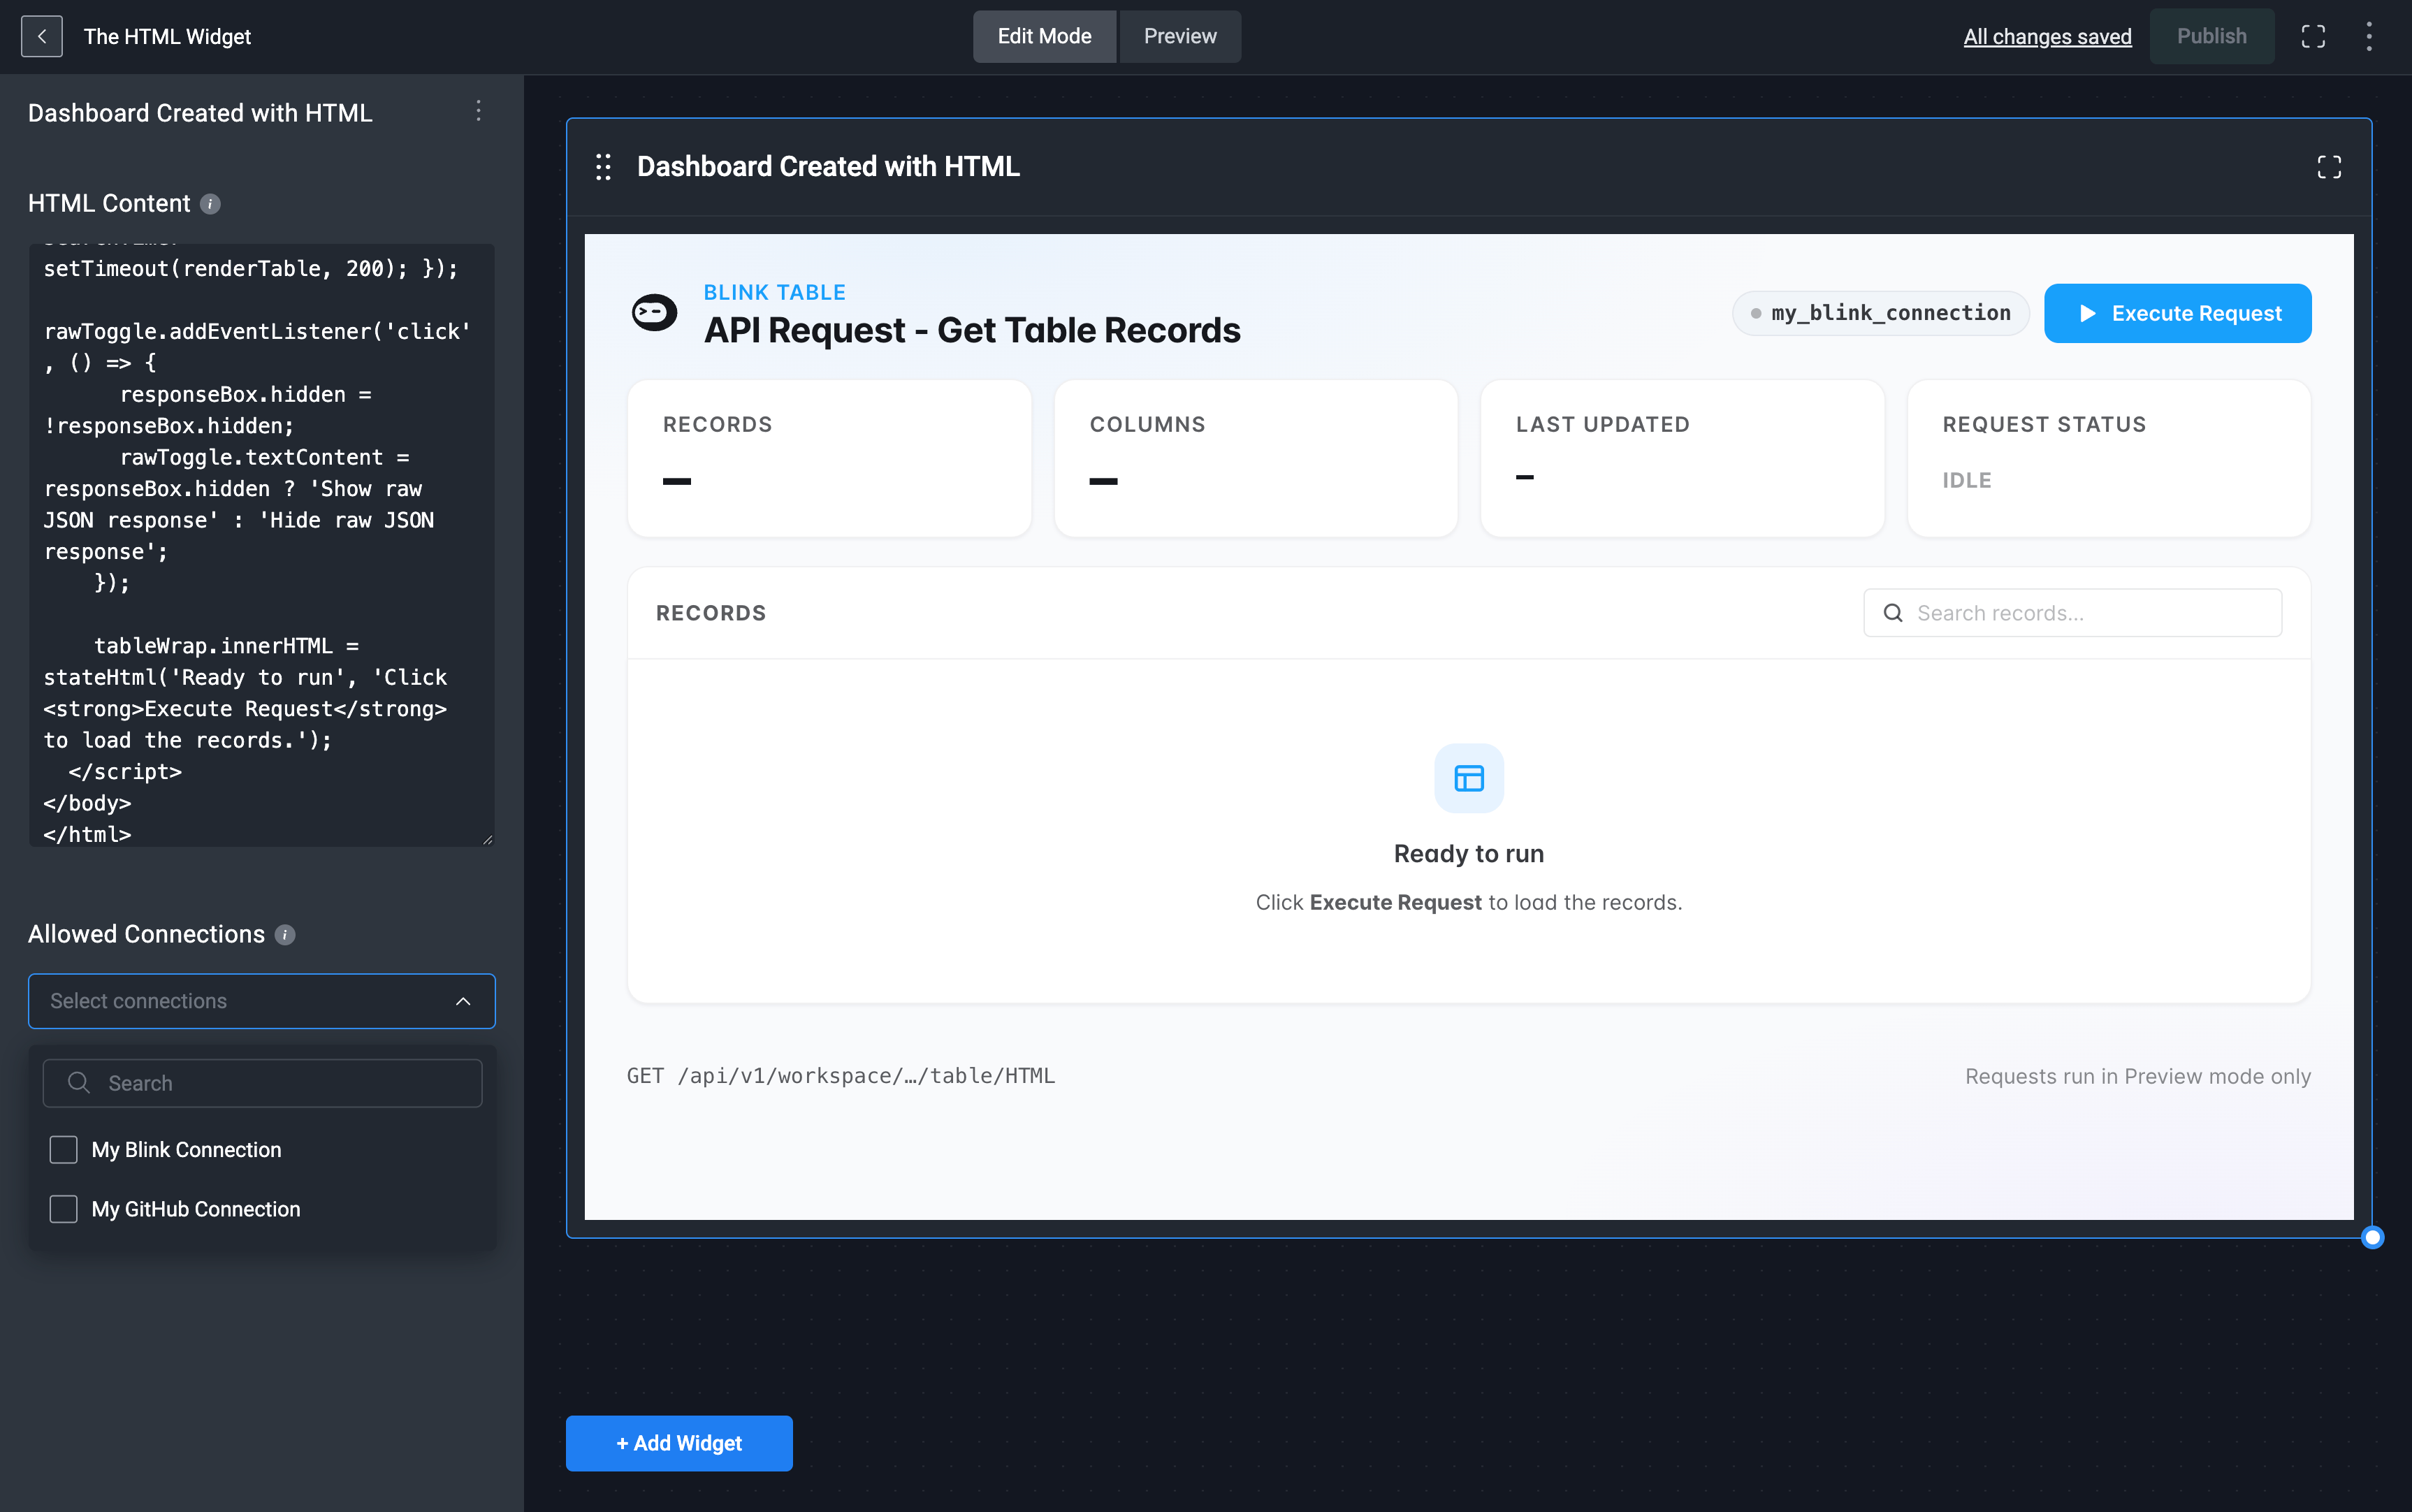
3
Reference the Connection in Your HTML
In your script, set the 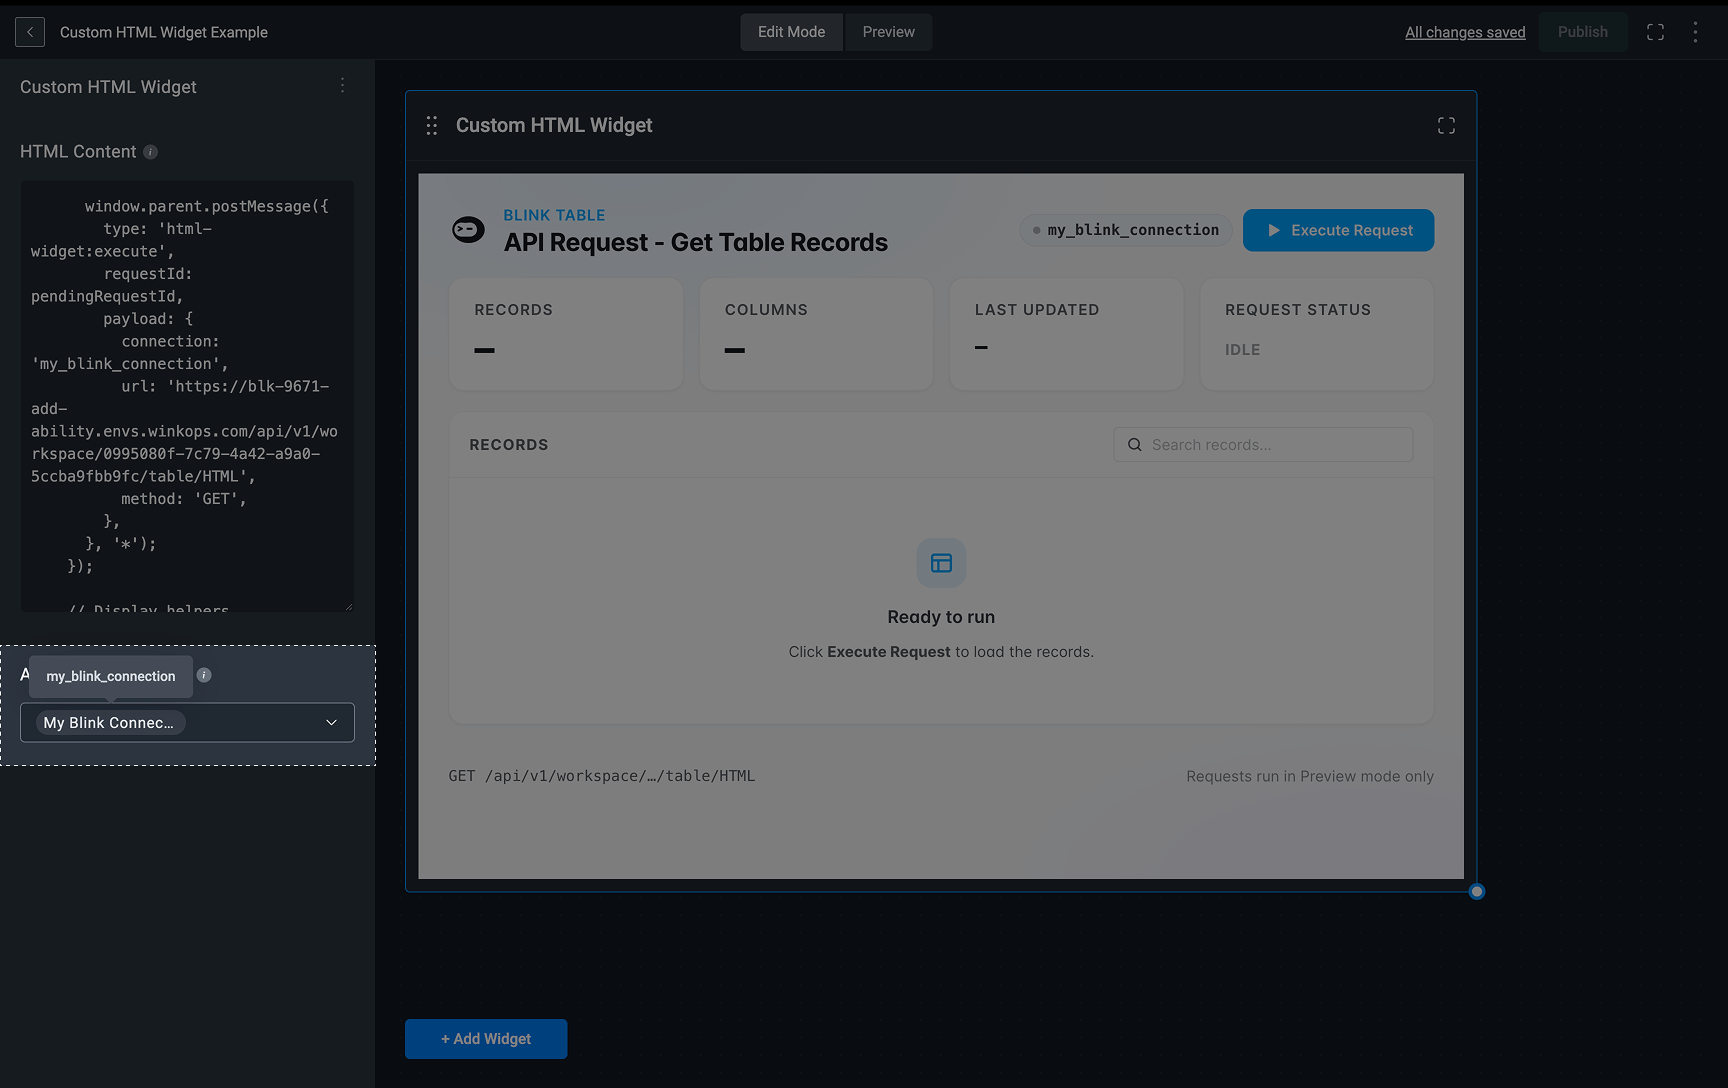
connection key value of the request payload to the connection’s name, for example, connection: 'my_blink_connection'.To find the name to use, hover over the connection in the Allowed Connections field. The tooltip shows the connection name. Always use the name from the tooltip, not the display name shown in the dropdown. For example, My Blink Connection is referenced as my_blink_connection. Copy it exactly as it appears in the tooltip.Note: Selecting a connection in the Allowed Connections field authorizes the widget to use it. Only selected connections can be used in your HTML, so if a connection isn’t selected, any request that references its name fails.
Sending a Request
To send a request, callwindow.parent.postMessage() with a request message:Request Message Fields
The second argument of
postMessage(), the target origin, must be '*'.Payload Fields
Note: Query parameters are passed in the
url, not as a separate payload field. If a value contains spaces or special characters, encode it with encodeURIComponent(), for example '?q=' + encodeURIComponent('status = "open"').Examples by Request Type
The required fields are the same in every request. What changes is the method and the optional fields the endpoint needs.- GET
- GET with query parameters
- POST with headers and body
A
GET request with only the required fields:Note: In your widget, store the
requestId in a variable before sending the request (as in the full example), so your listener can match the result to it.Making Requests to Blink’s APIs
You can also use the widget to call Blink’s REST API, for example, to read records from a table or to run a workflow. Requests to Blink’s APIs follow the same rules as any other request, with these specifics:- Connection: you need a Blink connection, selected in the widget’s Allowed Connections field. As with any connection, reference it by the name in its tooltip. For example, My Blink Connection is referenced as
my_blink_connection. - URL: use your Blink environment’s API address followed by the endpoint path, in the format
https://<your-blink-domain>/api/v1/<endpoint-path>. The default domain isapp.blinkops.com. It must match the API address configured in your Blink connection. - IDs: endpoints usually include IDs, such as your workspace ID, a table name, or a workflow ID. See the API reference for each endpoint’s path, parameters, and body.
my_blink_connection:- List table records (GET)
- Run a workflow (POST)
Lists records from a table, using the
q query parameter in the URL to filter them with RQL. The RQL query is encoded with encodeURIComponent() because it can contain spaces and special characters. See List Records from Table.Receiving the Response
To receive the result, add amessage event listener to the window:type isn’t 'html-widget:execute-result', or whose requestId doesn’t match the request you’re waiting for.Result Message Fields
Syntax Rules
Follow these rules in every widget that makesHTTP requests:- Send requests with
window.parent.postMessage(). This is how the widget passes the request to Blink to run, through your connection if the request includes one. - Use the exact message types. Send requests with
type: 'html-widget:execute'and listen fortype: 'html-widget:execute-result'. - Generate a new
requestIdfor every request. Reusing an ID makes it impossible to tell which result belongs to which request. - Register the
messagelistener before sending a request, so the widget is ready when the result arrives. - Always check both
typeandrequestIdat the start of your listener, and ignore any message that doesn’t match. - Handle both outcomes. Check
msg.success, and displaymsg.dataon success ormsg.erroron failure. - Pass
bodyas a JSON string. Wrap it in single quotes, with double quotes inside, for example'{"key": "value"}'. - Never put credentials in your HTML. If the API requires authentication, use a connection instead.
Full Example
The following widget displays an Execute Request button. When clicked, it calls the GitHub API through themy_github_connection connection, shows the request status, and displays the response or error.Editing a HTML Widget
Any changes made to the HTML, will be automatically applied to the HTML widget in real time.Deleting a HTML Widget
1
Select the HTML Widget
In the left-hand sidebar, click the icon in the top-right corner and then select the delete button.
2
Delete the HTML Widget
The HTML widget will be removed from your Dashboard Building Interface.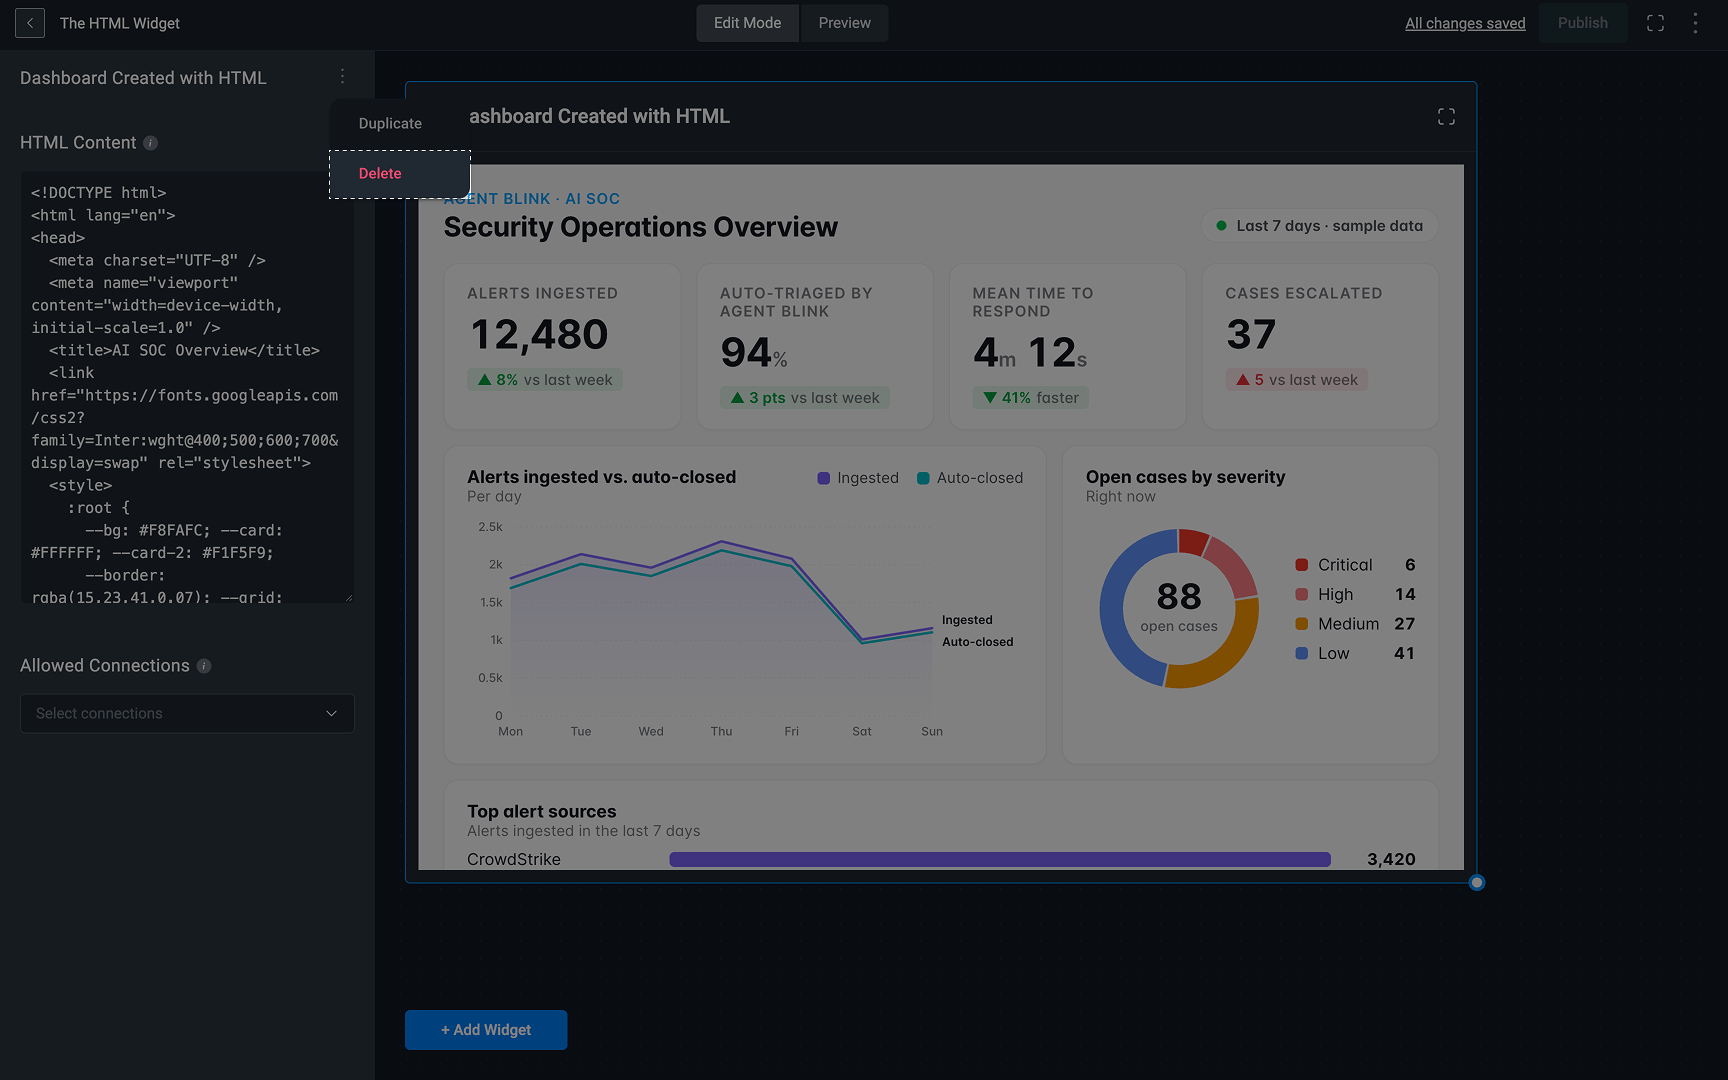
Duplicate Widget
1
Select the HTML Widget
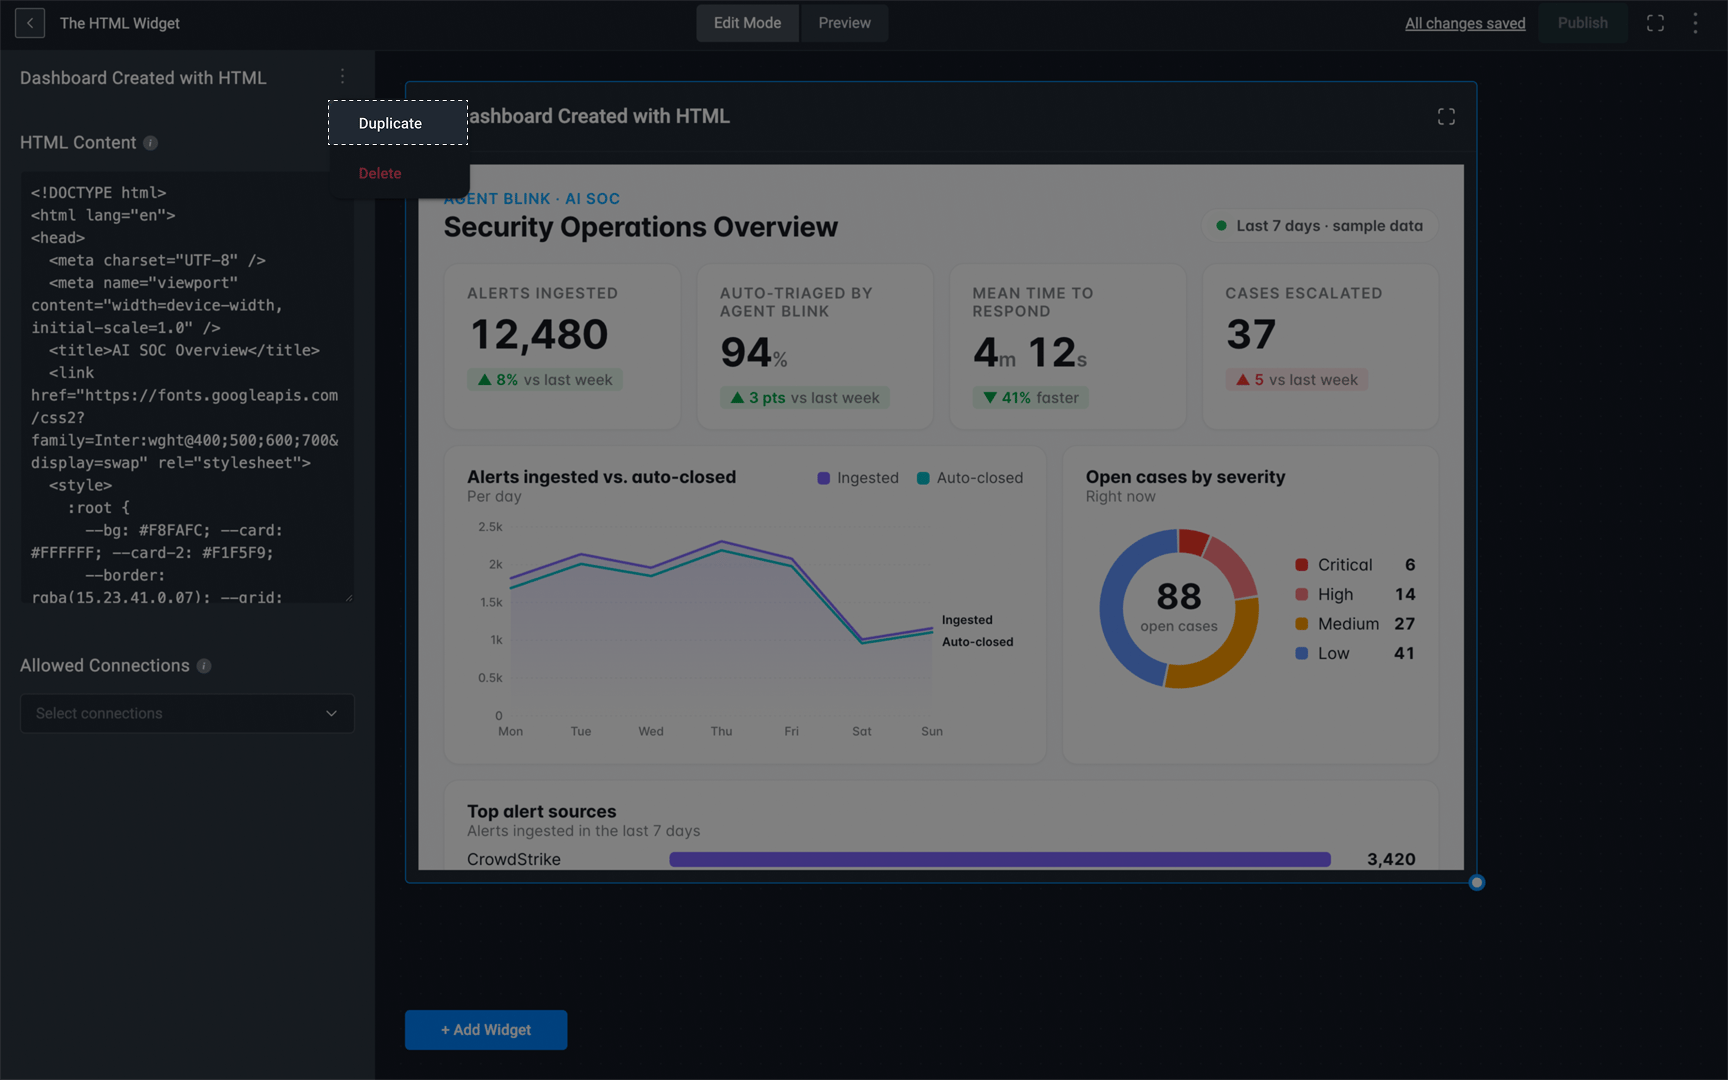
In the left-hand sidebar, click the icon in the top-right corner and then select the duplicate button.
2
Duplicate the HTML Widget
The HTML widget will be duplicated